
这是 Arduino IDE 安装与使用笔记的卡片盒笔记集合。每张卡片独立成篇,卡片之间通过
#锚点互联。 遵循卢曼卡片盒笔记法:一张卡片 = 一个想法,用你自己的话写,像教别人一样。
学习大纲:从"下载软件"到"点亮第一颗灯"
一句话:本笔记按一条主线循序渐进——装好工具 → 认识界面 → 建好项目 → 理解程序结构 → 跑通第一个程序。
逻辑链条总览
① 下载 Arduino IDE
   │  装好工具才有得玩
   ▼
② 认识 IDE 界面
   │  工具栏 / 编辑区 / 状态栏各是啥
   ▼
③ 新建 sketch + 选开发板
   │  第一步创建项目并指定板子
   ▼
④ C 语言 → Arduino 代码转换
   │  main() 拆成 setup() + loop()
   ▼
⑤ 跑第一个程序:LED 闪烁
   │  编译 ✅ → 上传
   ├────────────────────────────┐
   ▼                            ▼
 上传报错①:端口找不到        上传报错②:速率过高崩溃
   │  Could not open port       │  chip stopped responding
   │  重新选端口                 │  921600 → 115200
   └──────────────┬─────────────┘
                  ▼
           🎉 板上 LED 亮起来
每一站:抛出的问题 → 你要掌握的答案
| 站 | 你要问自己的问题 | 答案在哪张卡片 |
|---|---|---|
| ① 怎么开始? | 从哪下载?选哪个版本? | 下载 Arduino IDE |
| ② 装完怎么用? | 界面哪块是工具栏?代码写在哪? | 认识 IDE 界面 |
| ③ 第一个项目? | 怎么新建 sketch?怎么选 ESP32-S3? | 新建 sketch 与选开发板 |
| ④ 代码怎么写? | C 和 Arduino 的入口函数差在哪? | C 语言 → Arduino 代码转换 |
| ⑤ 怎么验证环境通? | 第一个程序怎么编译、上传? | ESP32-S3 第一个程序 |
| ⑥ 上传报错怎么办? | Could not open port 是什么?怎么解决? | 端口找不到/被占用 |
| ⑦ 端口对了还报错? | chip stopped responding 是什么? | 上传速率过高崩溃 |
怎么用这个大纲
- 自学:先看大纲掌握全貌 → 再逐张卡片深入 → 学完回到大纲确认"每条链我都懂了"
- 讲给别人:照着流程讲——每站先抛出问题,再展开卡片里的答案;遇到上传报错正好是现成的故障案例
卡片索引
| 卡片 | 类型 | 说明 |
|---|---|---|
| 下载 Arduino IDE | 操作卡 | 官网下载与版本选择 |
| 认识 IDE 界面 | 概念卡 | 默认打开界面长什么样 |
| 新建 sketch 与选开发板 | 操作卡 | 第一步创建项目并指定板子 |
| C 语言 → Arduino 代码转换 | 概念卡 | 从 main() 到 setup()/loop() |
| ESP32-S3 第一个程序 | 操作卡 | LED 闪烁:验证编译 + 上传 |
| 端口找不到/被占用 | 故障卡 | Could not open port 排查 |
| 上传速率过高崩溃 | 故障卡 | chip stopped responding 排查 |
操作卡:下载 Arduino IDE
一句话:去官网下载最新版,装完就能写代码。
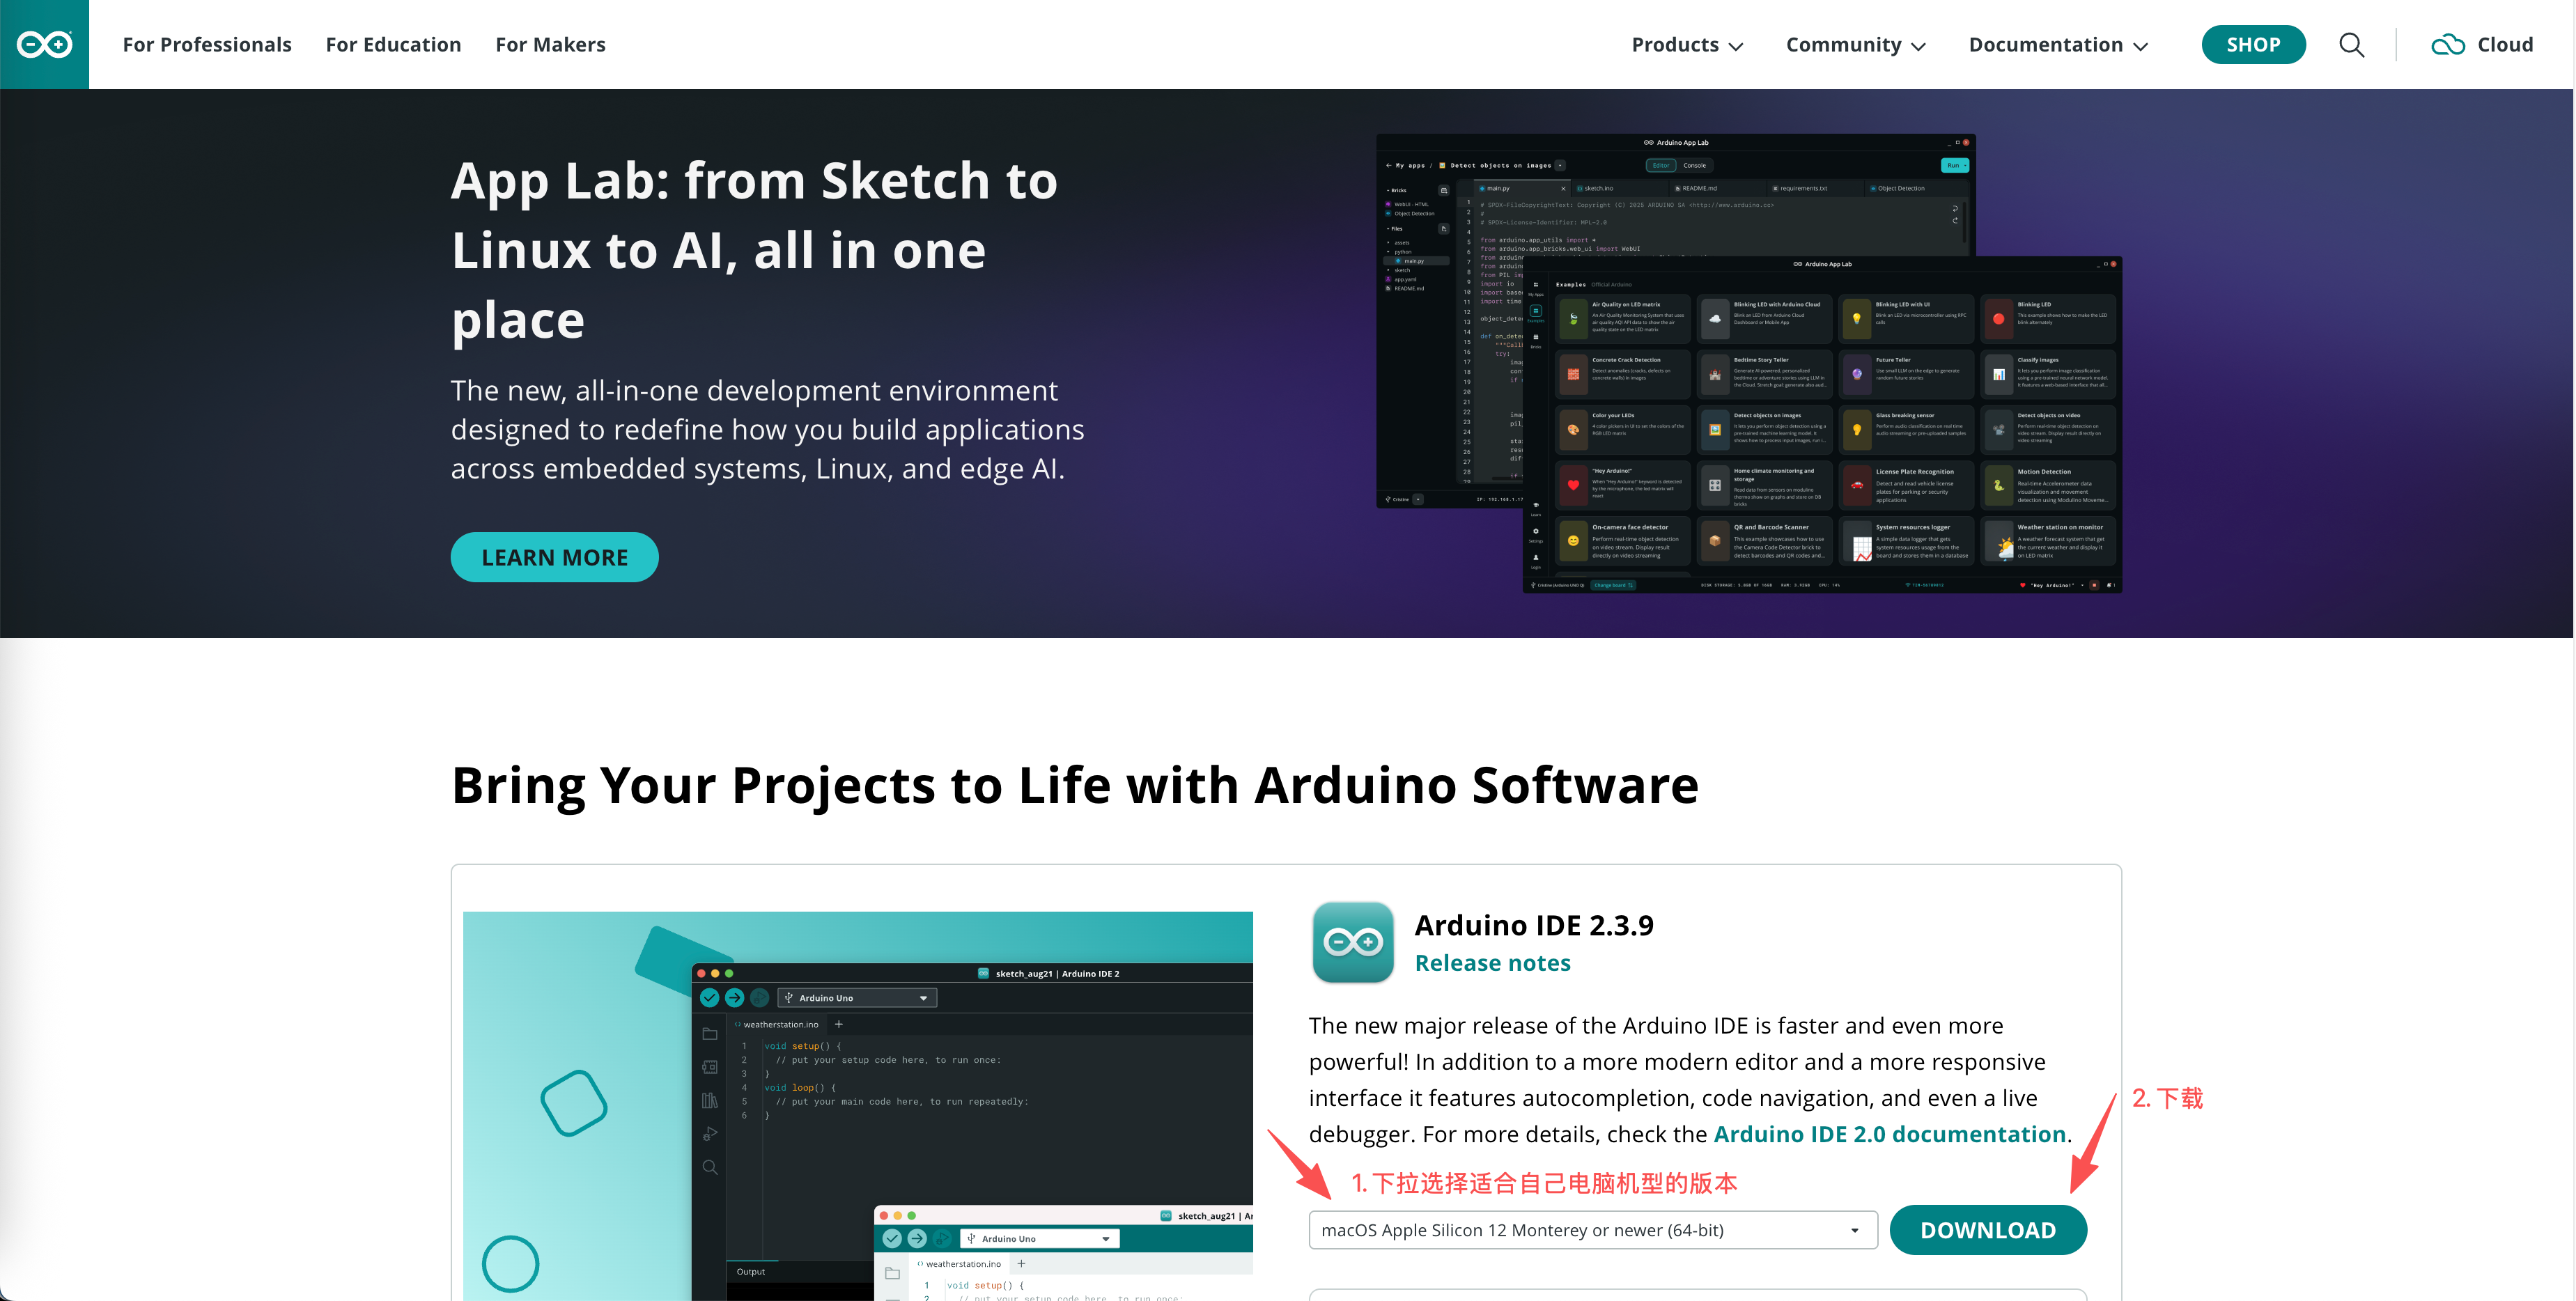
下载地址
本文使用版本:Arduino IDE 2.3.9。
👉关联卡
- → #认识 IDE 界面 装好后怎么用
概念卡:认识 IDE 界面
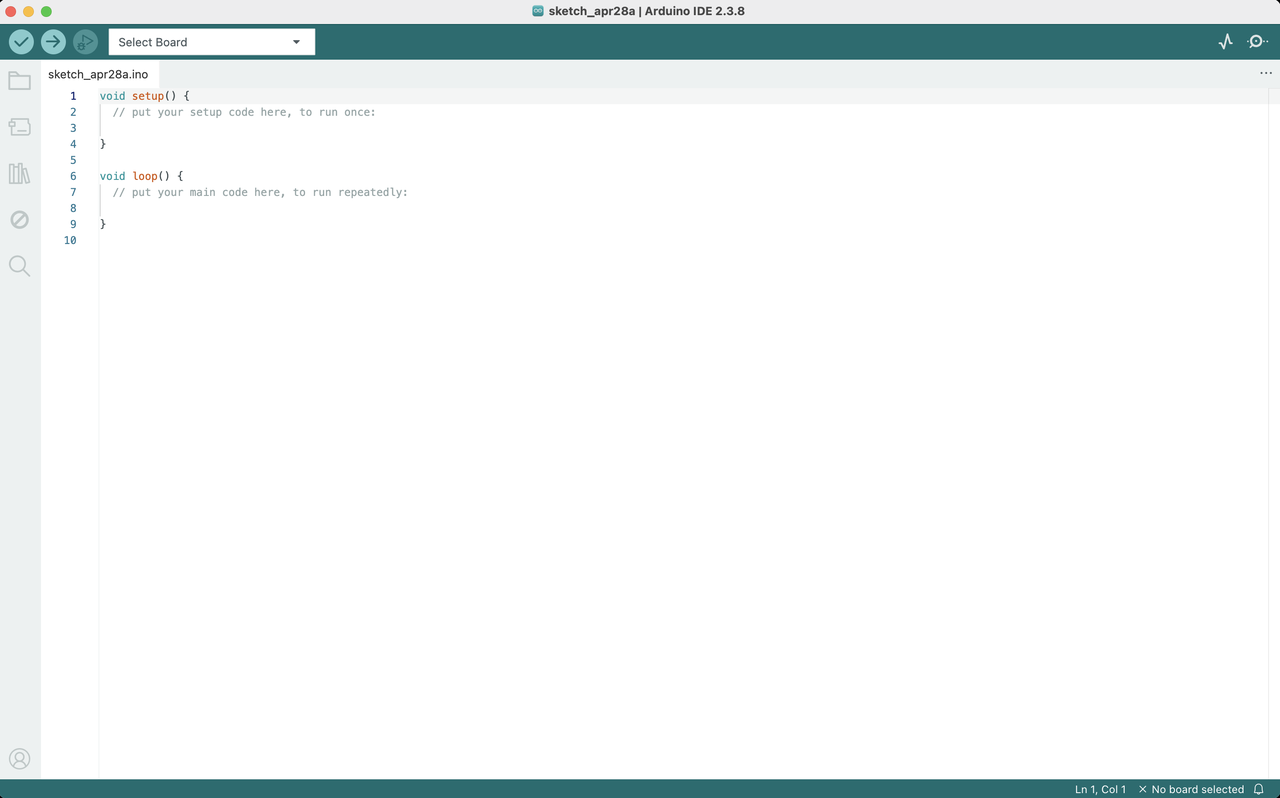
一句话:Arduino IDE 2.x 的默认界面就是一个「编辑器 + 状态栏」,左上角是操作按钮。
默认打开界面
界面核心区域
| 区域 | 作用 |
|---|---|
| 左侧边栏 | 库管理器、开发板管理器等 |
| 顶部工具栏 | 验证 ✓、上传 →、选择开发板 |
| 编辑区 | 写代码的地方 |
| 底部状态栏 | 编译/上传进度、错误信息 |
👉关联卡
- ← #下载 Arduino IDE 安装前
- → #新建 sketch 与选开发板 开始写第一行代码
操作卡:新建 sketch 与选开发板
一句话:File -> New Sketch 新建项目,再从开发板管理器选对板子,不然编译会报错。
Step 1:新建 sketch
- 菜单栏:File → New Sketch
Step 2:选择开发板
- 点击顶部工具栏的选择开发板下拉框
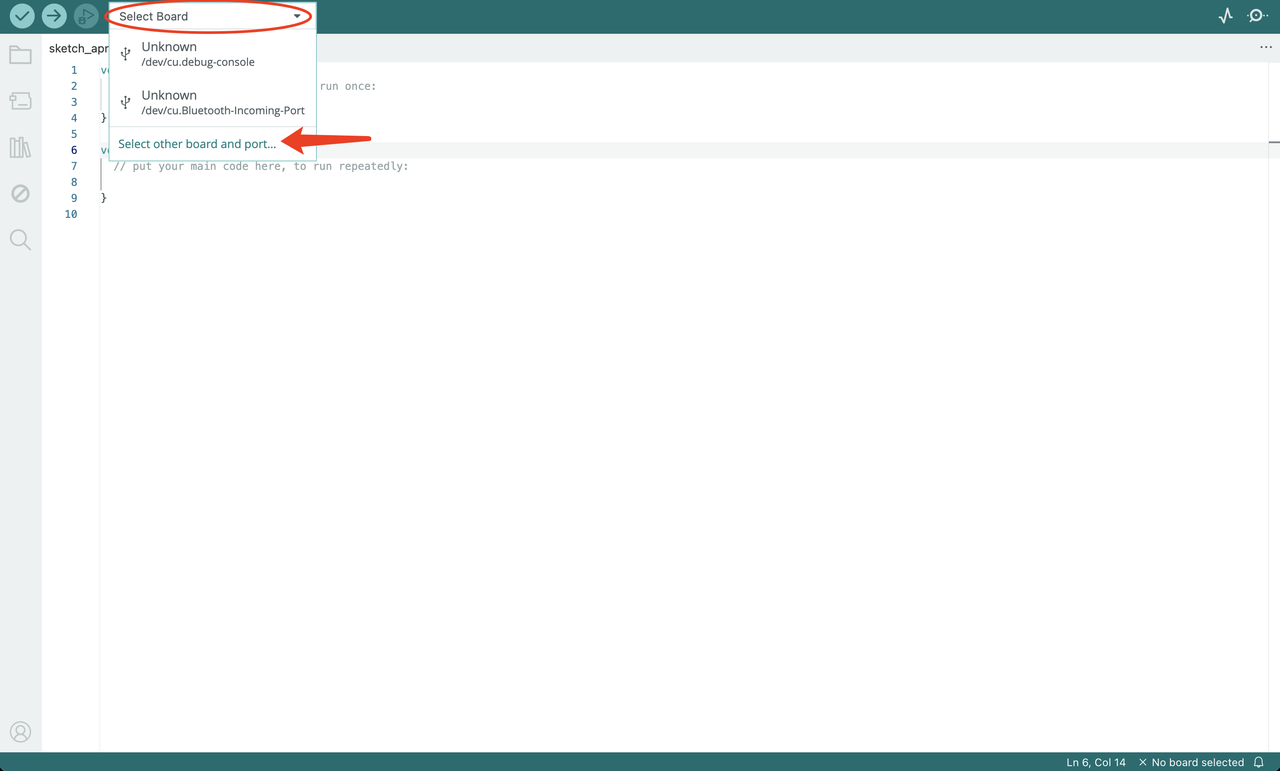
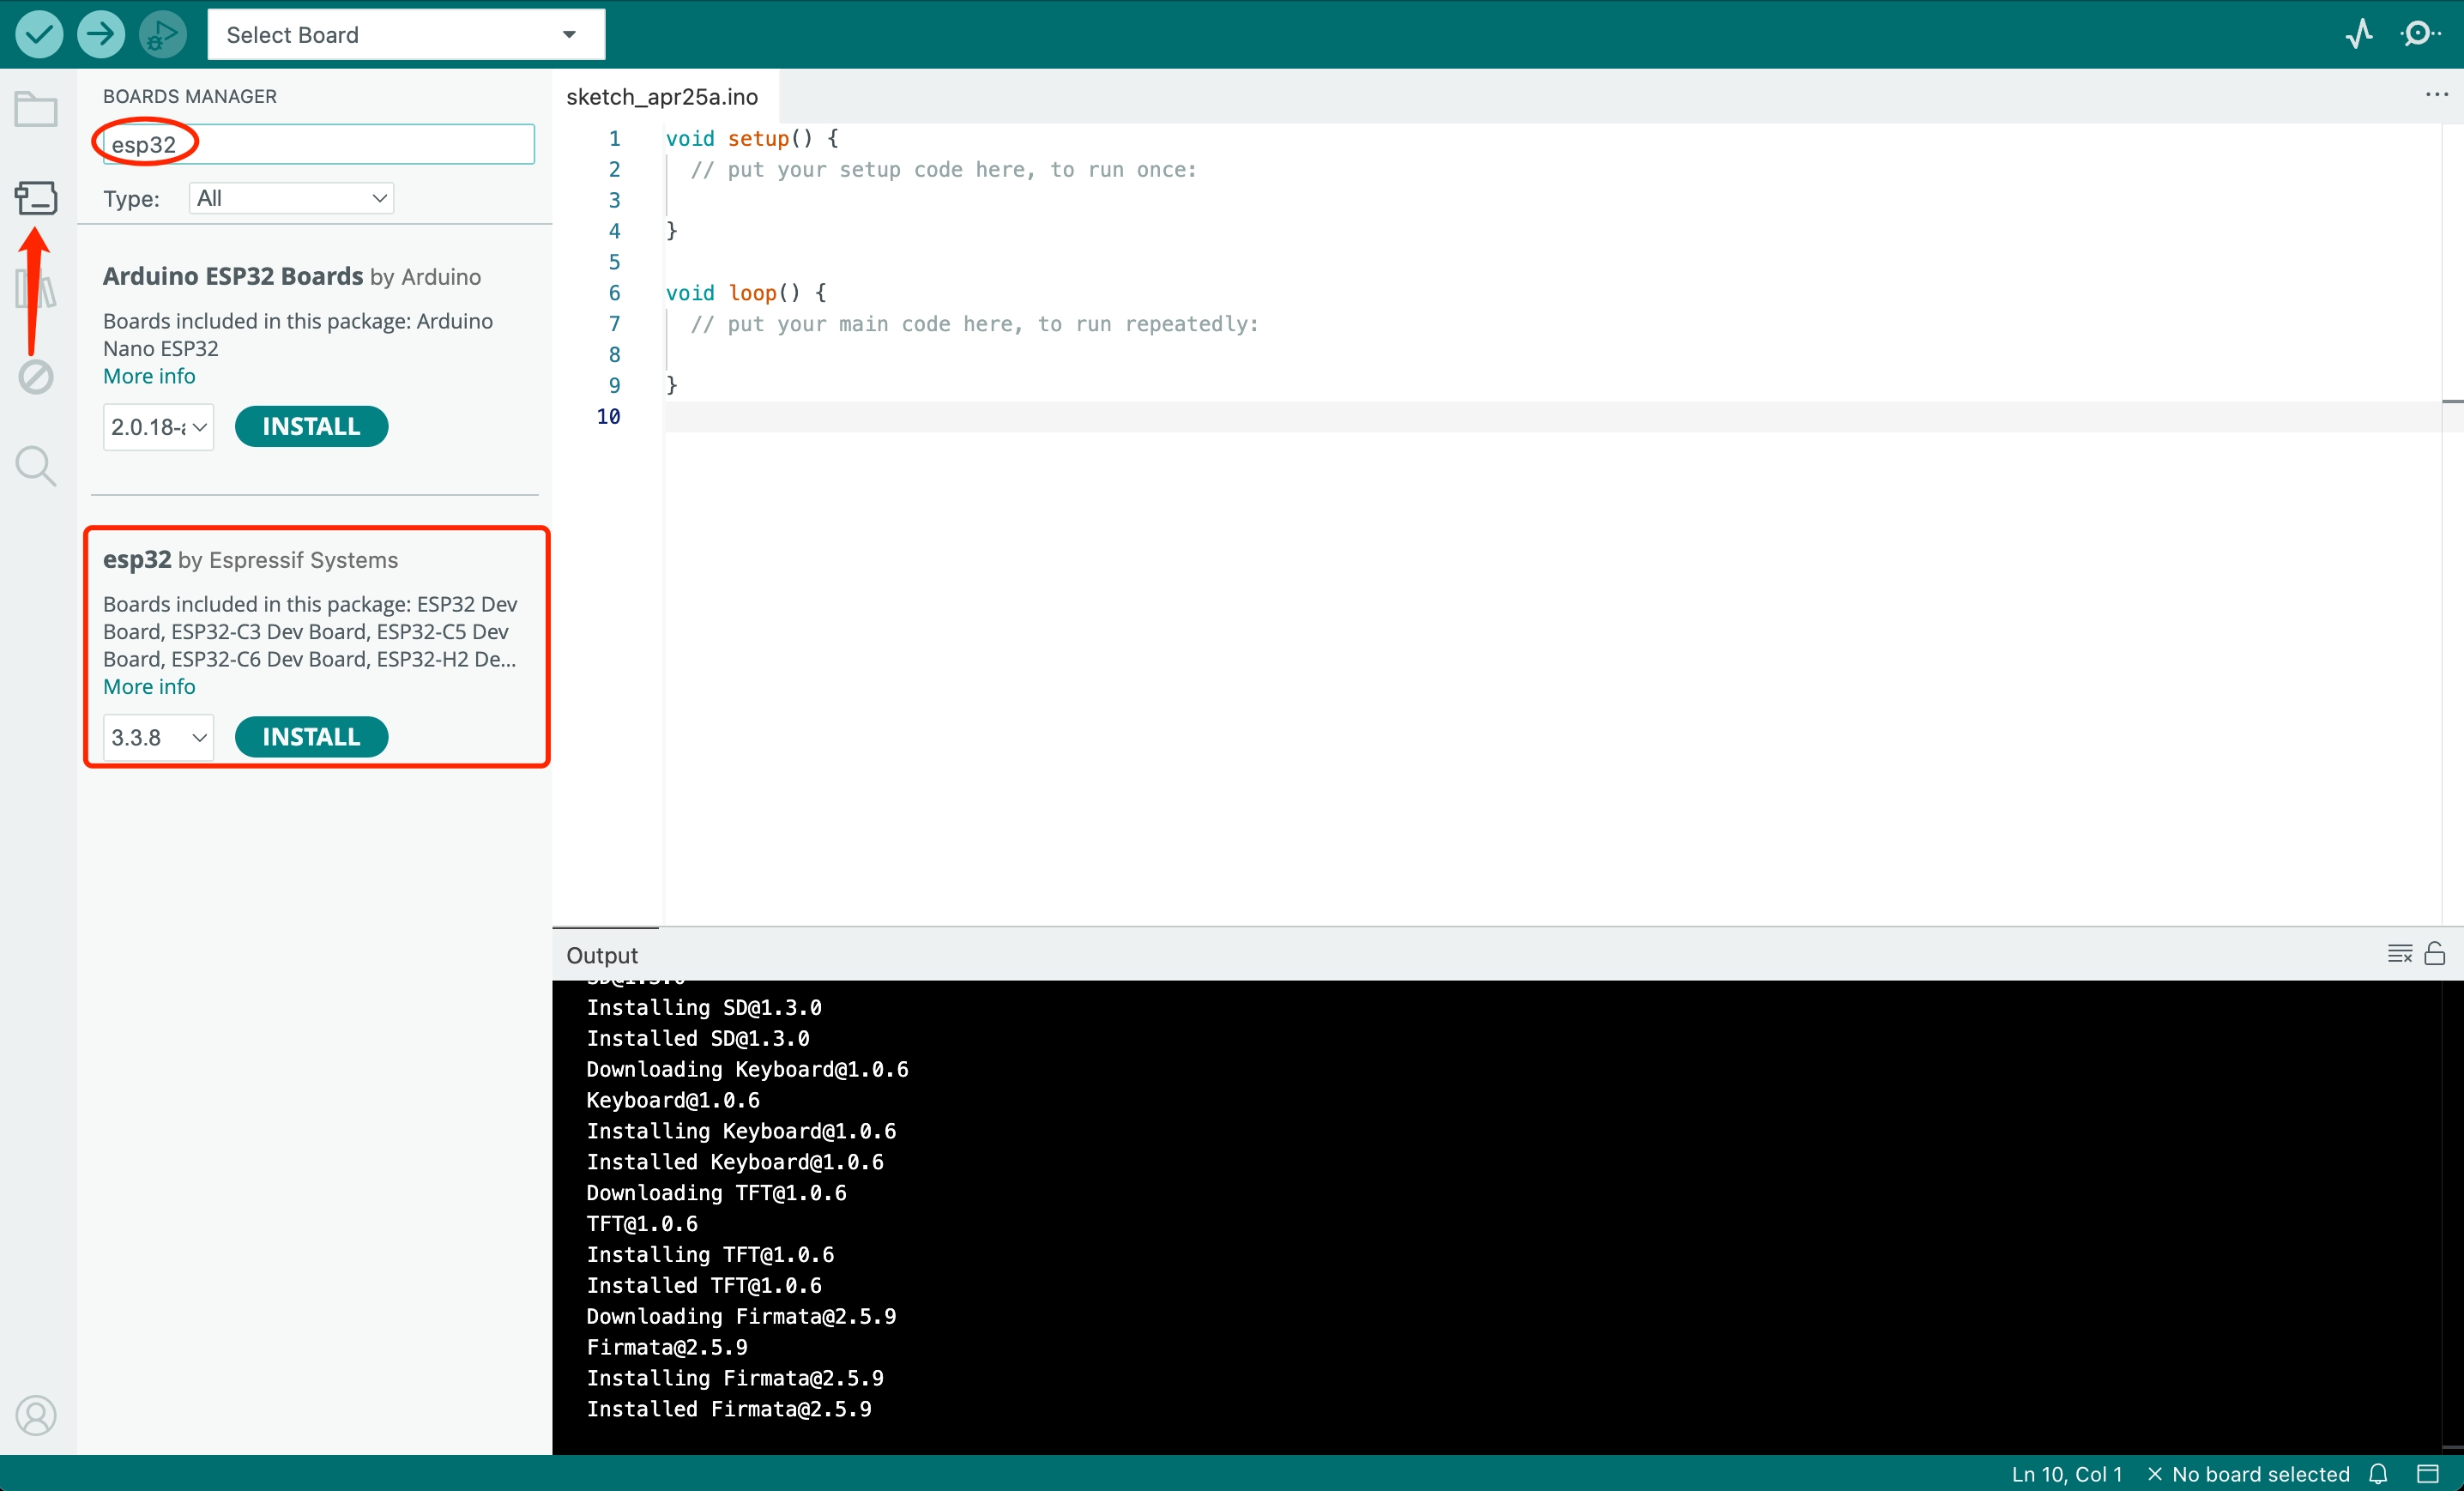
- 搜索你的板子型号(本文用 ESP32-S3),如搜索
esp32s3 dev,选择第一个即可
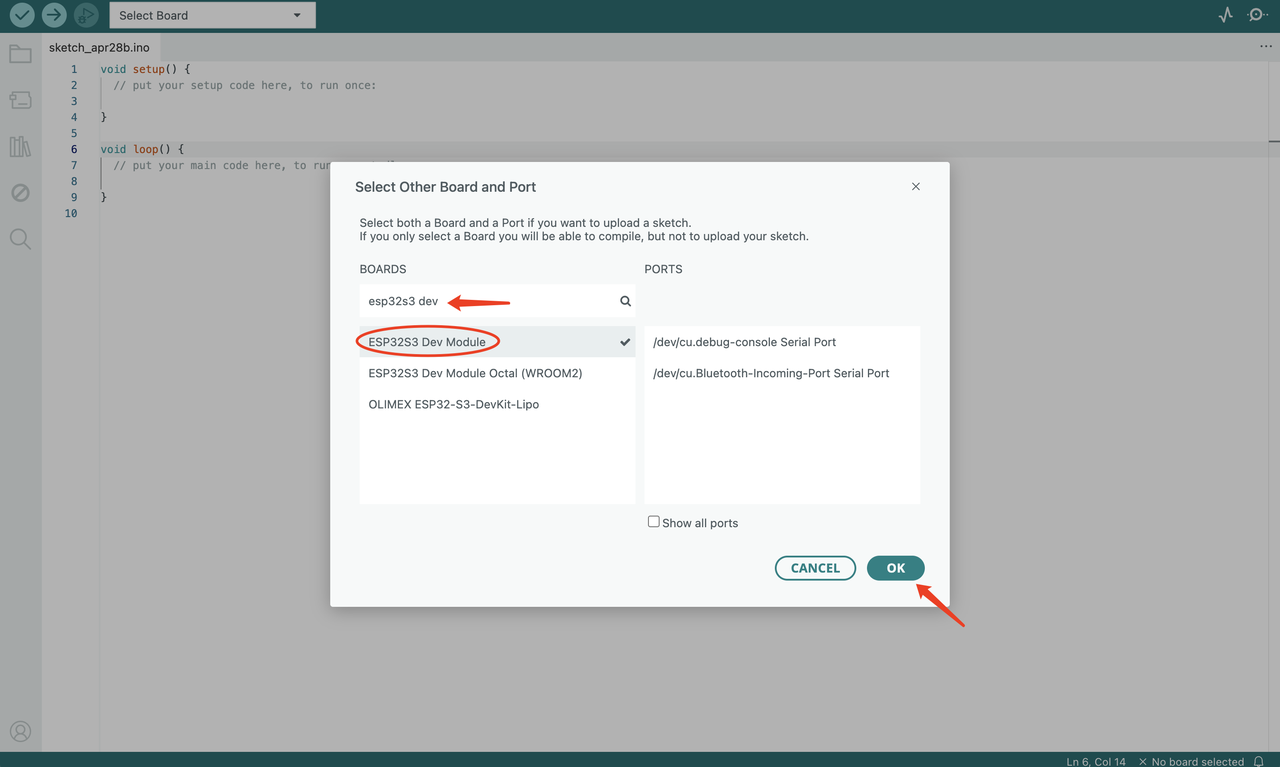
⚠️ 第一次选 ESP32 板子时,可能需要先在「开发板管理器」里安装 ESP32 支持包,否则搜不到。
👉关联卡
- ← #认识 IDE 界面 界面操作
- → #C 语言 → Arduino 代码转换 写完代码怎么验证
概念卡:C 语言 → Arduino 代码转换
一句话:C 语言从 main() 开始,Arduino 把入口拆成 setup()(跑一次)和 loop()(反复跑)。
两种程序结构对比
C 语言版(PC 上跑):
#include <stdio.h>

// 程序入口函数(所有C语言程序都从main()函数开始执行)
int main() {
   // 格式化输出函数,向控制台打印指定内容,\n表示换行符
   printf("Hello World!\n");
   printf("欢迎开始学习C语言!\n");

   // main函数返回0,表示程序正常结束
   return 0;
}
Arduino 版(板子上跑):
// Arduino程序不需要独立的main函数
// setup()函数在板子启动时执行一次
void setup() {
   // 初始化串口通信,设置波特率为9600
   Serial.begin(9600);

   // 打印信息到串口监视器
   Serial.println("Hello World!");
   Serial.println("欢迎开始学习 Arduino 语言!");
}

// loop()函数在setup()执行完后会不断循环执行
void loop() {
   // 这里什么都不做,因为只需要输出一次信息
   // 如果希望重复输出,可以在这里添加代码
}
核心差异
| 对比项 | C 语言 | Arduino |
|---|---|---|
| 入口函数 | main() | 隐式入口 |
| 初始化一次 | main 开头写 | setup() |
| 反复执行 | 需要手动循环 | loop() 自动循环 |
| 输出方式 | printf() | Serial.println() |
| 运行环境 | PC 控制台 | 嵌入式板子 |
验证编译
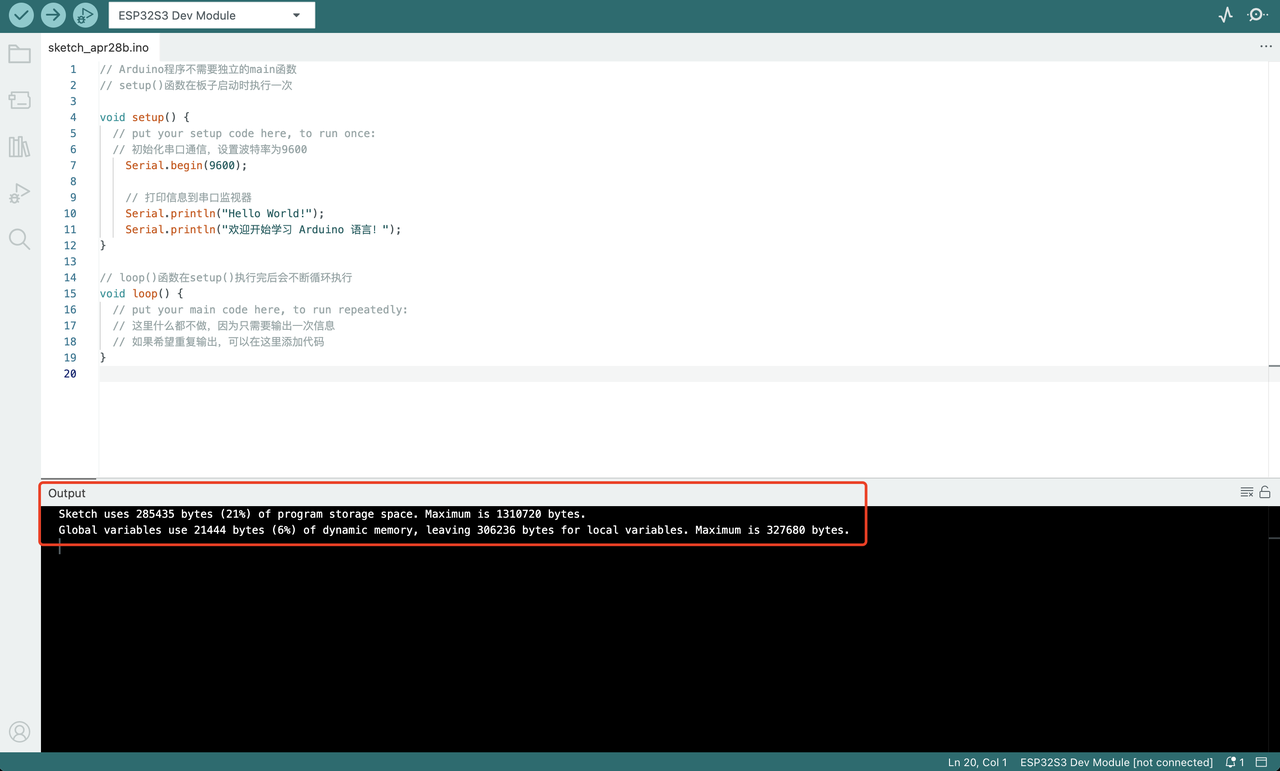
写完后点击 验证 ✓(Verify) 按钮,通过后会显示编译成功。
👉关联卡
- ← #新建 sketch 与选开发板 第一步
- → 舵机程序解读 实际项目的完整代码
操作卡:ESP32-S3 第一个程序
一句话:把官方示例(LED 闪烁)烧进板子,第一次成功点亮板载 LED = 环境通了。
示例代码(官方自带)
打开 Arduino IDE 自带的实例:File → Examples → 01.Basics → Blink,或直接新建 sketch 粘贴下面代码:
// the setup function runs once when you press reset or power the board
void setup() {
  // initialize digital pin LED_BUILTIN as an output.
  pinMode(LED_BUILTIN, OUTPUT);
}

// the loop function runs over and over again forever
void loop() {
  digitalWrite(LED_BUILTIN, HIGH);  // change state of the LED by setting the pin to the HIGH voltage level
  delay(1000);                      // wait for a second
  digitalWrite(LED_BUILTIN, LOW);   // change state of the LED by setting the pin to the LOW voltage level
  delay(1000);                      // wait for a second
}
代码拆解
| 代码 | 作用 |
|---|---|
pinMode(LED_BUILTIN, OUTPUT) | 把板载 LED 引脚设为输出模式 |
digitalWrite(LED_BUILTIN, HIGH) | 点亮 LED(HIGH = 高电平) |
delay(1000) | 停 1 秒 |
digitalWrite(LED_BUILTIN, LOW) | 熄灭 LED(LOW = 低电平) |
| 循环执行 | 亮 1 秒 → 灭 1 秒 → 循环 |
验证编译
写完后点击**验证 ✓(Verify)**按钮,通过后会显示编译成功。
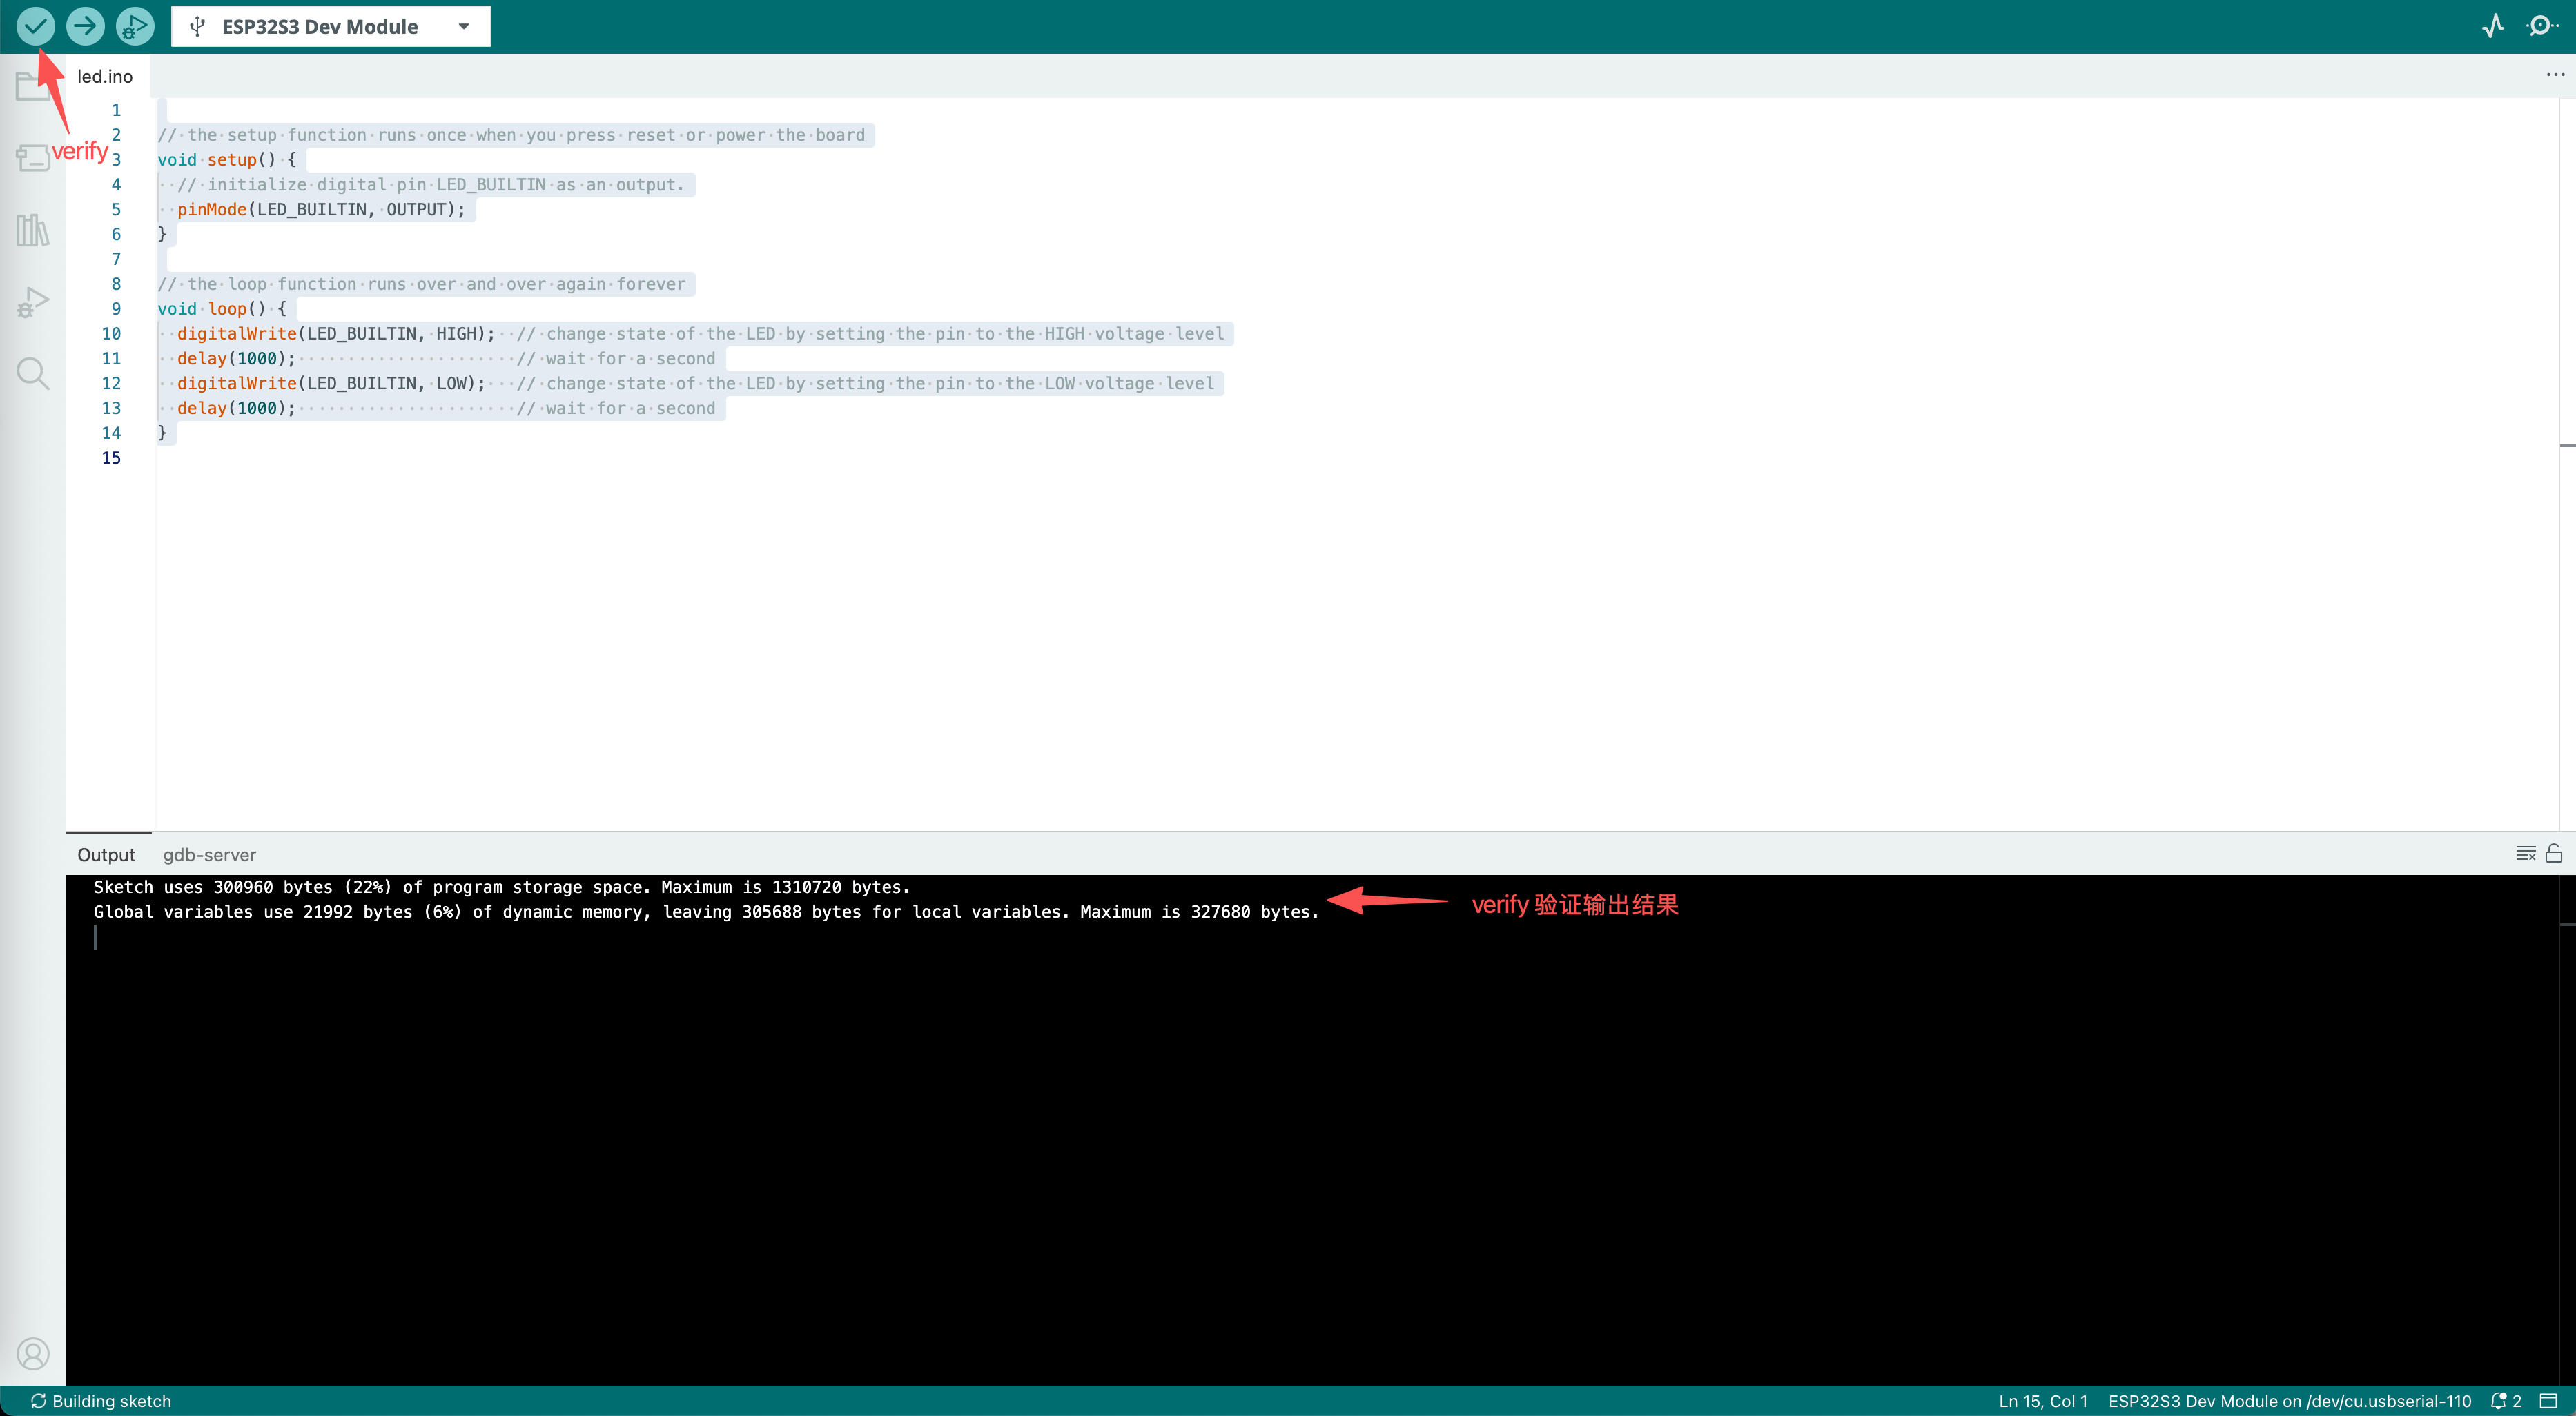
编译通过后,点击**上传 →(Upload)**按钮,把程序烧到板子上。
如果上传时报错,见下面的两张故障卡:#端口找不到/被占用、#上传速率过高崩溃。
👉关联卡
- ← #C 语言 → Arduino 代码转换 setup/loop 结构基础
- → #端口找不到/被占用 上传报错怎么排查
故障卡:端口找不到/被占用
一句话:Could not open port = Arduino 没找到你的板子,多半是端口选错了,重新选一下就好。
报错现象
点上传后,看到这样的输出:
Sketch uses 300960 bytes (22%) of program storage space. Maximum is 1310720 bytes.
Global variables use 21992 bytes (6%) of dynamic memory, leaving 305688 bytes for local variables. Maximum is 327680 bytes.
esptool v5.3.0
Serial port /dev/cu.usbmodem1101:

A fatal error occurred: Could not open /dev/cu.usbmodem1101, the port is busy or doesn't exist.
([Errno 2] could not open port /dev/cu.usbmodem1101: [Errno 2] No such file or directory: '/dev/cu.usbmodem1101')

Hint: Check if the port is correct and ESP connected

Failed uploading: uploading error: exit status 2
错误含义
关键信息在这一行:
A fatal error occurred: Could not open /dev/cu.usbmodem1101, the port is busy or doesn't exist.
Serial port /dev/cu.usbmodem1101:— Arduino 当前选中的端口Could not open ... doesn't exist— 这个端口根本打不开/不存在
最常见原因:端口号变了
ESP32-S3 每次重新插拔后,Mac 分配的端口号可能会变(比如从 usbmodem1101 变成了 usbmodem1201)。
你上次选的端口号是 usbmodem1101,但这次板子插上后变成了另一个端口,Arduino 还指着旧端口,自然打不开。
解决步骤
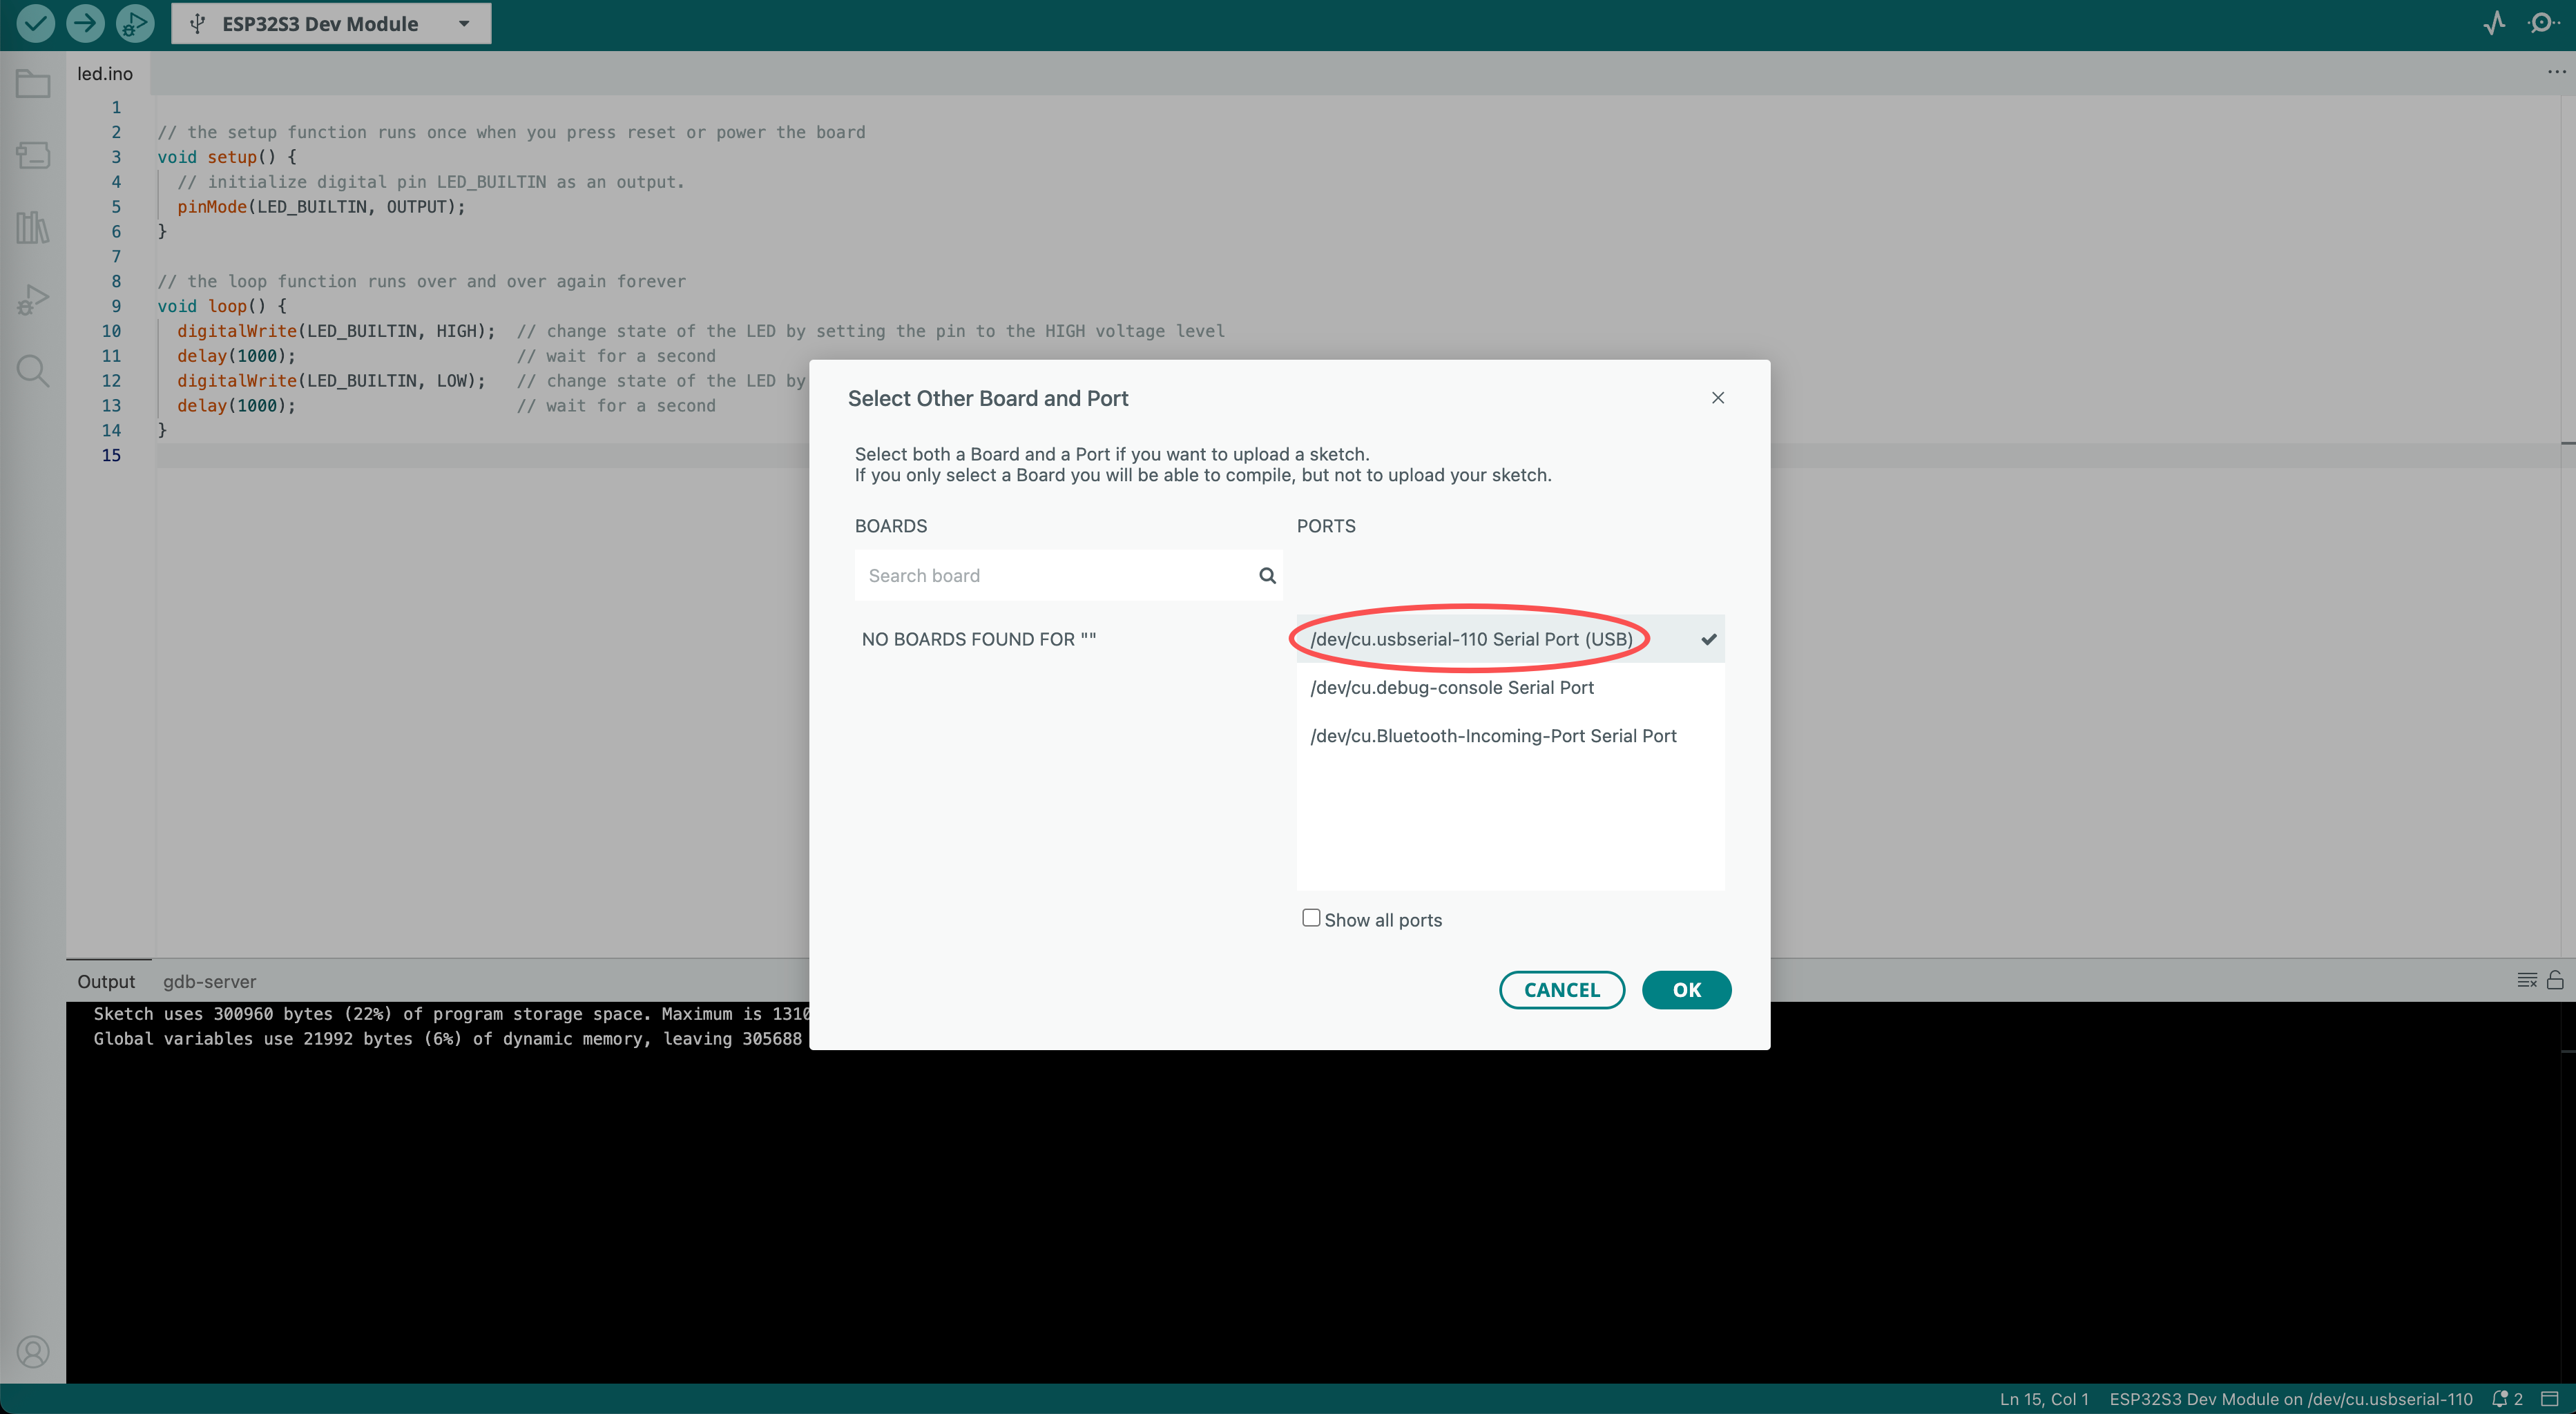
- 去 Arduino IDE 顶部菜单栏点击 Tools(工具)→ Port(端口)
- 看看有没有新的
/dev/cu.usbmodemXXXX - 重新选中它,然后再上传
👉关联卡
- ← #ESP32-S3 第一个程序 上传报错时来这里
- → #上传速率过高崩溃 端口对了还报错?
故障卡:上传速率过高崩溃
一句话:The chip stopped responding = 烧录时芯片被"噎住"了,把上传速率从 921600 降到 115200 就好。
报错现象
端口选对后,上传还是失败,输出一串 Traceback:
Sketch uses 300960 bytes (22%) of program storage space. Maximum is 1310720 bytes.
Global variables use 21992 bytes (6%) of dynamic memory, leaving 305688 bytes for local variables. Maximum is 327680 bytes.
esptool v5.3.0
Serial port /dev/cu.usbserial-110:
Connecting.....
Connected to ESP32-S3 on /dev/cu.usbserial-110:
Chip type:          ESP32-S3 (QFN56) (revision v0.2)
Features:           Wi-Fi, BT 5 (LE), Dual Core + LP Core, 240MHz, Embedded PSRAM 8MB (AP_3v3)
Crystal frequency:  40MHz
MAC:                28:84:85:4b:4d:d0

Uploading stub flasher...
Running stub flasher...
Traceback (most recent call last):
  File "esptool/__init__.py", line 1362, in _main
  File "esptool/__init__.py", line 1256, in main
  File "esptool/cli_util.py", line 346, in __call__
  File "rich_click/rich_command.py", line 402, in __call__
  File "click/core.py", line 1524, in __call__
  File "rich_click/rich_command.py", line 216, in main
  File "click/core.py", line 1912, in invoke
  File "click/core.py", line 1308, in invoke
  File "click/core.py", line 877, in invoke
  File "click/decorators.py", line 34, in new_func
  File "esptool/__init__.py", line 822, in write_flash_cli
  File "esptool/cmds.py", line 1776, in attach_flash
  File "esptool/cmds.py", line 1637, in _verify_flash_connection
  File "esptool/loader.py", line 1964, in read_spiflash_sfdp
  File "esptool/loader.py", line 1917, in run_spiflash_command
  File "esptool/loader.py", line 977, in read_reg
  File "esptool/loader.py", line 637, in check_command
  File "esptool/loader.py", line 567, in command
  File "esptool/loader.py", line 503, in read
StopIteration

A fatal error occurred: The chip stopped responding.
Stub flasher running.
Changing baud rate to 921600...
Changed.


Hard resetting via RTS pin...
Failed uploading: uploading error: exit status 2
错误含义
看最后两行关键信息:
A fatal error occurred: The chip stopped responding.
- 板子其实已经连上了(
Connected to ESP32-S3) - 但在烧录过程中芯片不再响应(
The chip stopped responding) - 日志里
Changing baud rate to 921600...暴露了问题:波特率太高
这种情况在 ESP32-S3 上很常见,通常是因为通信速率过高或主板参数设置错误导致的。
为什么速率太高会失败
默认的 921600 波特率对某些开发板上的 USB 串口芯片(如 CH340)或者稍微劣质的数据线来说太快了,导致数据丢包、芯片死机。
解决步骤(按顺序尝试)
1. 降低上传速率(最常见解法)
- 在 Arduino IDE 顶部菜单栏点击 Tools(工具)
- 找到 Upload Speed(上传速率)
- 将它从默认的
921600降低到115200 - 再次尝试上传
2. 换一根数据线 / 换一个 USB 口
劣质数据线或前置 USB 口供电不稳,都可能丢包。
降速后成功:完整日志对比
把速率降到 115200 后,上传一路绿灯:
Sketch uses 300960 bytes (22%) of program storage space. Maximum is 1310720 bytes.
Global variables use 21992 bytes (6%) of dynamic memory, leaving 305688 bytes for local variables. Maximum is 327680 bytes.
esptool v5.3.0
Serial port /dev/cu.usbserial-110:
Connecting.....
Connected to ESP32-S3 on /dev/cu.usbserial-110:
Chip type:          ESP32-S3 (QFN56) (revision v0.2)
Features:           Wi-Fi, BT 5 (LE), Dual Core + LP Core, 240MHz, Embedded PSRAM 8MB (AP_3v3)
Crystal frequency:  40MHz
MAC:                28:84:85:4b:4d:d0

Uploading stub flasher...
Running stub flasher...
Stub flasher running.

Configuring flash size...

Writing '/Users/finnley/Library/Caches/arduino/sketches/ABCC6EC8669EE1E66CF526C95804CB3F/led.ino.bootloader.bin' at 0x00000000...
Flash will be erased from 0x00000000 to 0x00004fff...
Compressed 19984 bytes to 13014...

Writing at 0x00000000 [                              ]   0.0% 0/13014 bytes...

Writing at 0x00004e10 [==============================] 100.0% 13014/13014 bytes...
Wrote 19984 bytes (13014 compressed) at 0x00000000 in 1.4 seconds (112.8 kbit/s).
Verifying written data...
Hash of data verified.

Writing '/Users/finnley/Library/Caches/arduino/sketches/ABCC6EC8669EE1E66CF526C95804CB3F/led.ino.partitions.bin' at 0x00008000...
Flash will be erased from 0x00008000 to 0x00008fff...
Compressed 3072 bytes to 146...

Writing at 0x00008000 [                              ]   0.0% 0/146 bytes...

Writing at 0x00008c00 [==============================] 100.0% 146/146 bytes...
Wrote 3072 bytes (146 compressed) at 0x00008000 in 0.0 seconds (798.6 kbit/s).
Verifying written data...
Hash of data verified.

Writing '/Users/finnley/Library/Arduino15/packages/esp32/hardware/esp32/3.3.10/tools/partitions/boot_app0.bin' at 0x0000e000...
Flash will be erased from 0x0000e000 to 0x0000ffff...
Compressed 8192 bytes to 47...

Writing at 0x0000e000 [                              ]   0.0% 0/47 bytes...

Writing at 0x00010000 [==============================] 100.0% 47/47 bytes...
Wrote 8192 bytes (47 compressed) at 0x0000e000 in 0.0 seconds (2024.2 kbit/s).
Verifying written data...
Hash of data verified.

Writing '/Users/finnley/Library/Caches/arduino/sketches/ABCC6EC8669EE1E66CF526C95804CB3F/led.ino.bin' at 0x00010000...
Flash will be erased from 0x00010000 to 0x00059fff...
Compressed 301104 bytes to 164145...

Writing at 0x00010000 [                              ]   0.0% 0/164145 bytes...

Writing at 0x0001bd3a [=>                            ]  10.0% 16384/164145 bytes...

Writing at 0x00028957 [====>                         ]  20.0% 32768/164145 bytes...

Writing at 0x0002e237 [=======>                      ]  29.9% 49152/164145 bytes...

Writing at 0x00033f9d [==========>                   ]  39.9% 65536/164145 bytes...

Writing at 0x000397c3 [=============>                ]  49.9% 81920/164145 bytes...

Writing at 0x0003f1a6 [================>             ]  59.9% 98304/164145 bytes...

Writing at 0x00044a59 [===================>          ]  69.9% 114688/164145 bytes...

Writing at 0x0004d642 [======================>       ]  79.9% 131072/164145 bytes...

Writing at 0x000534c1 [=========================>    ]  89.8% 147456/164145 bytes...

Writing at 0x00059687 [============================> ]  99.8% 163840/164145 bytes...

Writing at 0x00059830 [==============================] 100.0% 164145/164145 bytes...
Wrote 301104 bytes (164145 compressed) at 0x00010000 in 16.2 seconds (148.7 kbit/s).
Verifying written data...
Hash of data verified.

Hard resetting via RTS pin...
看到 Writing ... 100.0%、Wrote ... bytes、Hash of data verified.、Hard resetting via RTS pin... 全部完成,说明程序成功烧入。
这段日志非常完美,没有任何报错。你可以看到进度条一路走到了 100.0%,并且每写完一部分都会提示
Hash of data verified(数据校验通过),最后一句Hard resetting via RTS pin...说明电脑已经给板子发了重启指令,你的程序(led.ino)现在已经在板子上跑起来了。如果你上传的是一个控制 LED 闪烁的程序,现在可以观察板子上的灯是否在闪烁。
效果演示:板载 LED 闪烁
对比:失败 vs 成功
| 阶段 | 失败(921600) | 成功(115200) |
|---|---|---|
| 连接芯片 | ✅ Connected | ✅ Connected |
| 上传 stub | ✅ 成功 | ✅ 成功 |
| 开始写 Flash | ❌ StopIteration 崩溃 | ✅ 逐段写入 |
| 进度条 | 卡住不动 | 0% → 100% |
| 校验 | — | ✅ Hash verified |
学习要点:
Stub flasher running.之后立刻StopIteration,说明是传输中途断掉(速率过高丢包);而Writing at ...进度条能走起来、走到 100%,就说明链路是通的。
👉关联卡
- ← #端口找不到/被占用 端口对了还报错?
- ← #ESP32-S3 第一个程序 回到第一个程序