1Bundle 方式安装
1.1下载
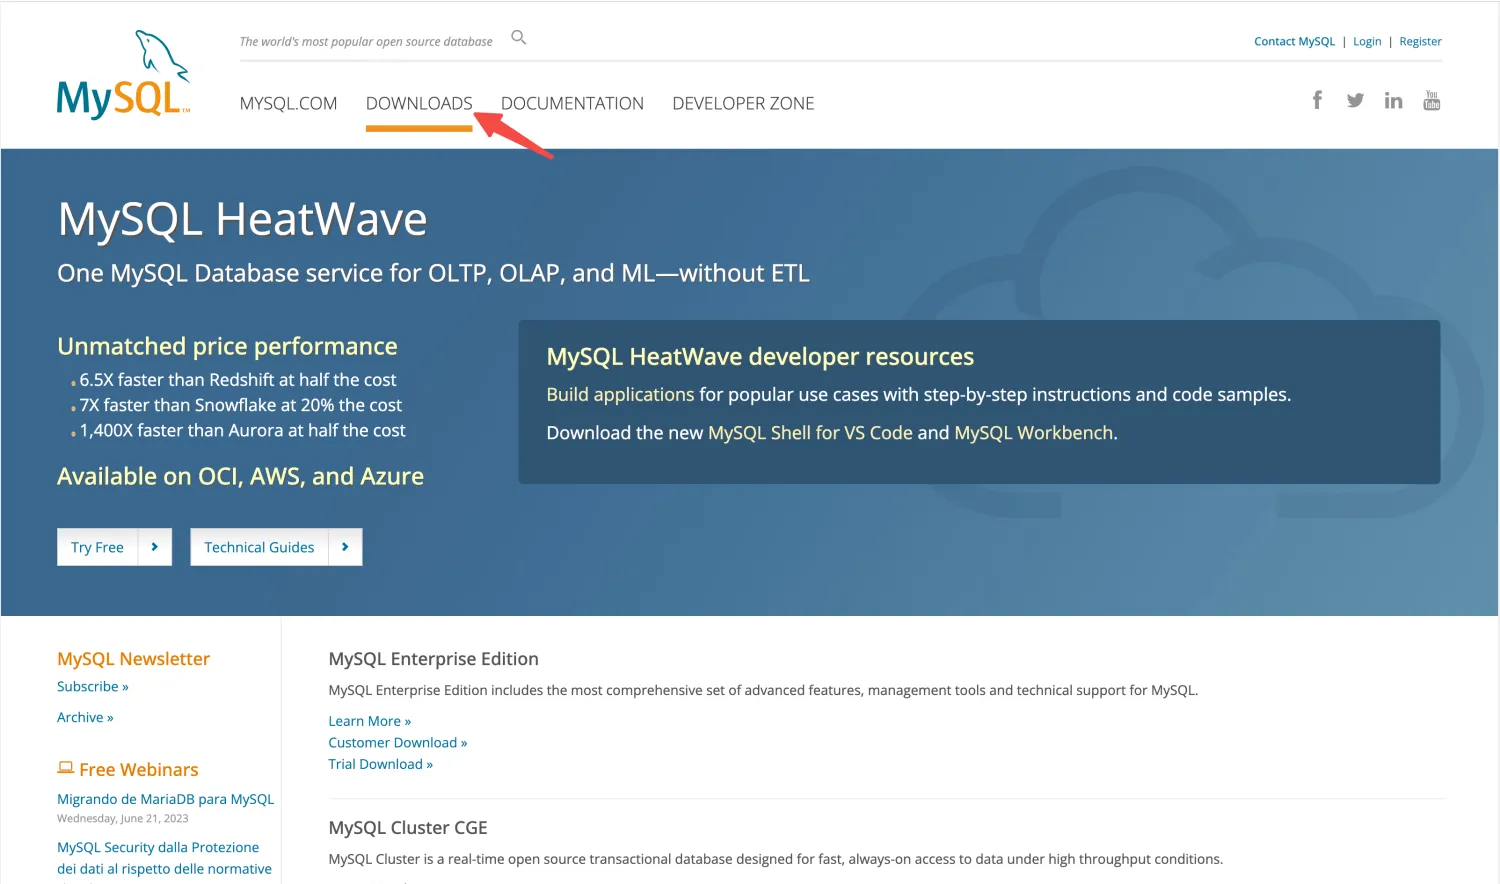
1、下载。
进入 MySQL 官网,选择 Downloads。
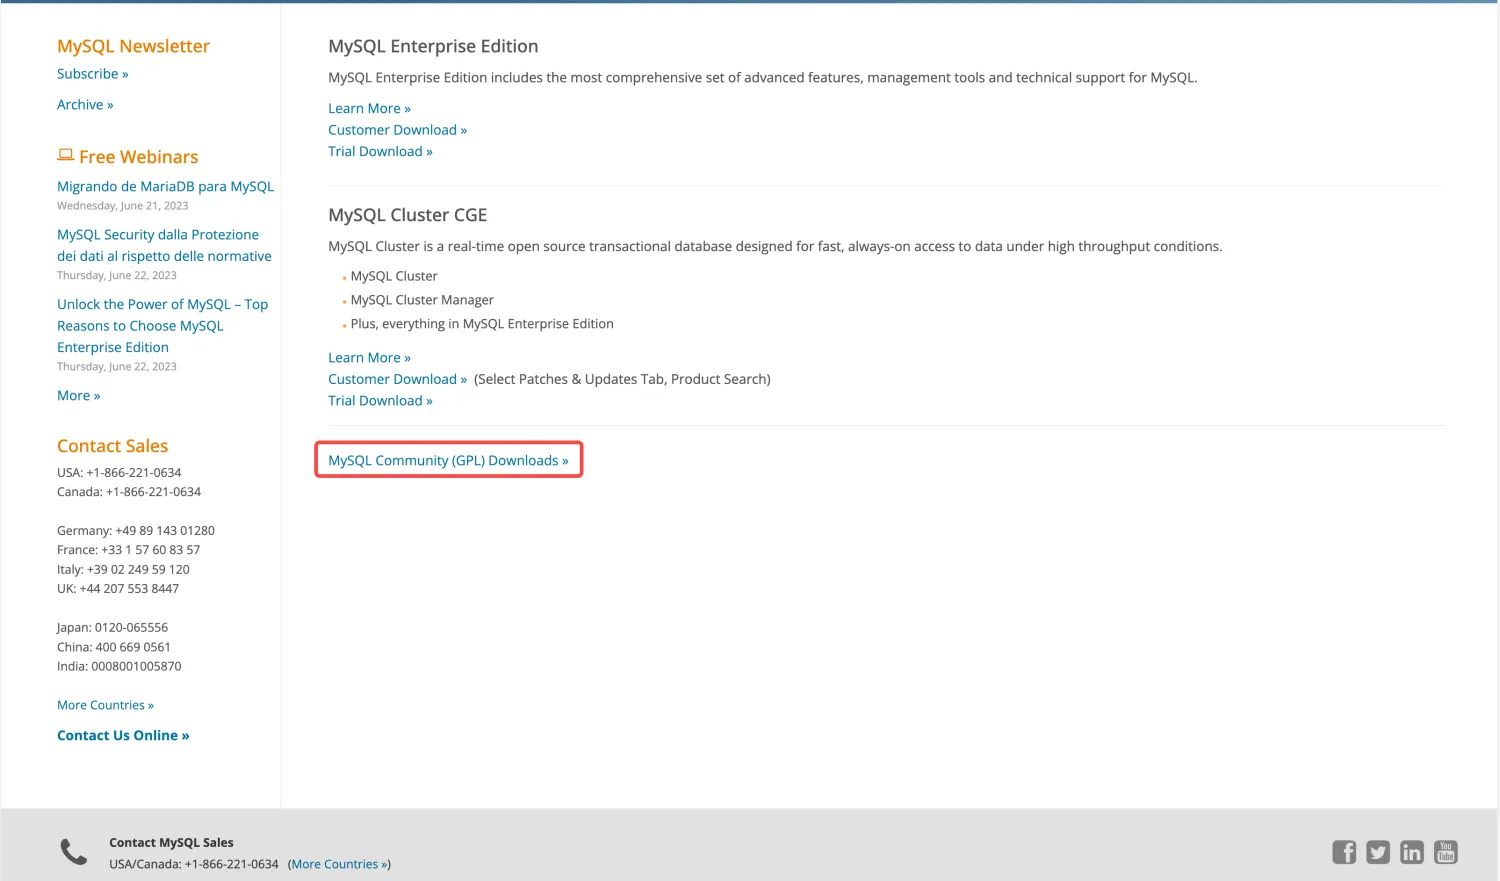
2、点击 MySQL Community (GPL) Downloads 下载社区版。
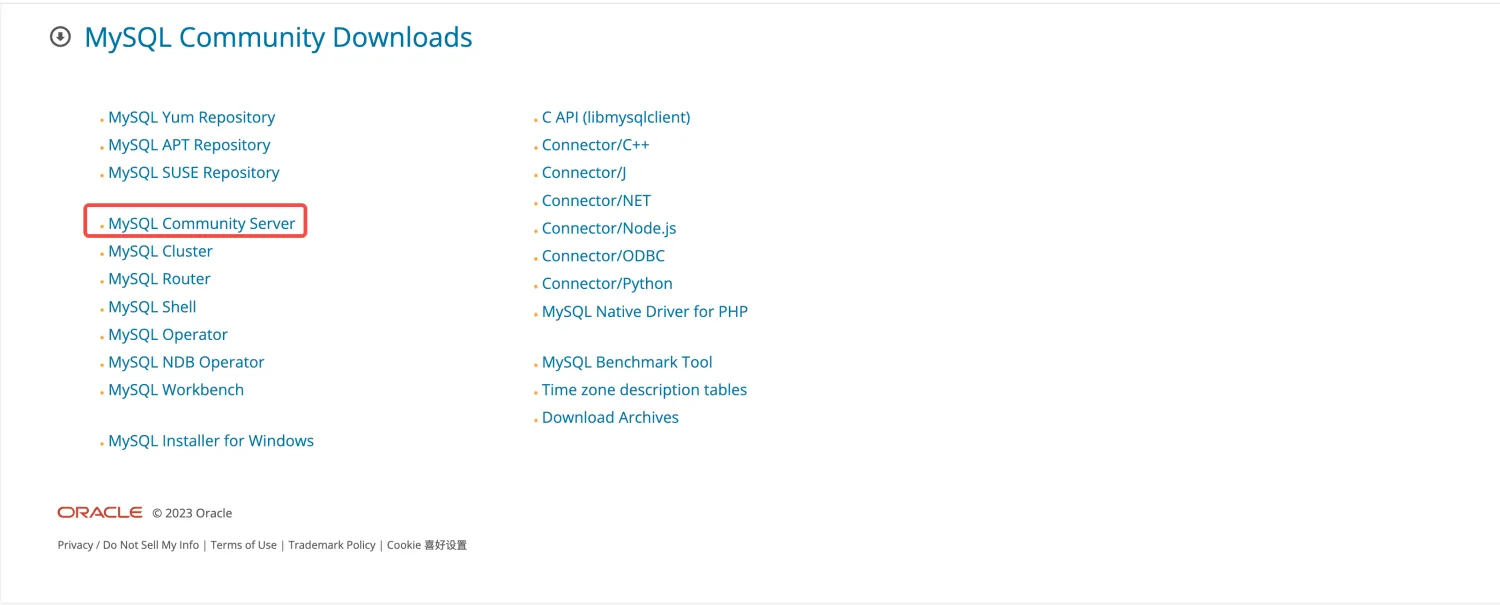
3、点击 MySQL Community Server。
4、点击 Archives 选项卡,选择下载版本,复制下载链接。
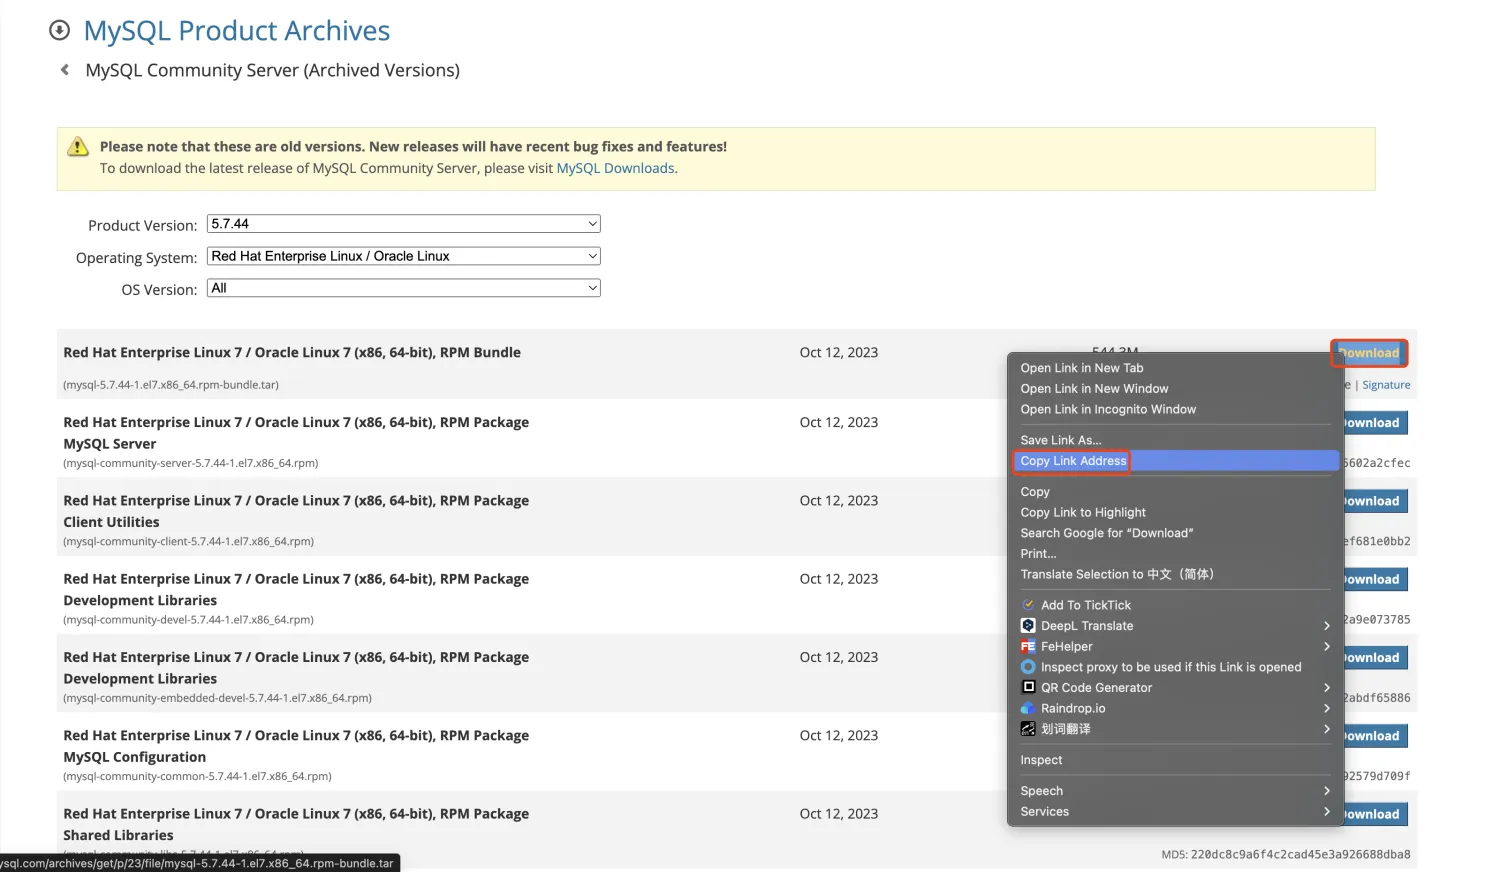
5、终端执行下载。
wget https://downloads.mysql.com/archives/get/p/23/file/mysql-5.7.44-1.el7.x86_64.rpm-bundle.tar
1.2解压
tar -xvf mysql-5.7.44-1.el7.x86_64.rpm-bundle.tar
解压后文件清单:
mysql-community-client-5.7.44-1.el7.x86_64.rpm
mysql-community-common-5.7.44-1.el7.x86_64.rpm
mysql-community-devel-5.7.44-1.el7.x86_64.rpm
mysql-community-embedded-5.7.44-1.el7.x86_64.rpm
mysql-community-embedded-compat-5.7.44-1.el7.x86_64.rpm
mysql-community-embedded-devel-5.7.44-1.el7.x86_64.rpm
mysql-community-libs-5.7.44-1.el7.x86_64.rpm
mysql-community-libs-compat-5.7.44-1.el7.x86_64.rpm
mysql-community-server-5.7.44-1.el7.x86_64.rpm
mysql-community-test-5.7.44-1.el7.x86_64.rpm
1.3安装
安装过程中,mysql-community-server 和 mysql-community-client 是最重要的两个包,安装顺序也至关重要,安装这两个包之前需要先安装 common 包。
1、安装 common 包。
rpm -ivh mysql-community-common-5.7.44-1.el7.x86_64.rpm
2、安装 libs 包 (非 libs-compat 包)。
rpm -ivh mysql-community-libs-5.7.44-1.el7.x86_64.rpm
如果出现以下错误信息,说明系统可能存在 Mariadb:
warning: mysql-community-libs-5.7.44-1.el7.x86_64.rpm: Header V4 RSA/SHA256 Signature, key ID 3a79bd29: NOKEY
error: Failed dependencies:
      mysql-community-common(x86-64) >= 5.7.9 is needed by mysql-community-libs-5.7.44-1.el7.x86_64
      mariadb-libs is obsoleted by mysql-community-libs-5.7.44-1.el7.x86_64
需要先使用以下命令删除 Mariadb:
rpm -qa | grep mariadb
rpm -e --nodeps mariadb-libs-5.5.68-1.el7.x86_64
--nodeps表示不检查依赖关系。
删除完 Mariadb 后重新安装 libs 包:
rpm -ivh mysql-community-libs-5.7.44-1.el7.x86_64.rpm
如果仍然出现以下错误信息,说明存在签名校验问题:
warning: mysql-community-libs-5.7.44-1.el7.x86_64.rpm: Header V4 RSA/SHA256 Signature, key ID 3a79bd29: NOKEY
error: Failed dependencies:
      mysql-community-common(x86-64) >= 5.7.9 is needed by mysql-community-libs-5.7.44-1.el7.x86_64
可以选择不校验签名,强制安装 libs 包:
rpm -ivh --force --nodeps mysql-community-libs-5.7.44-1.el7.x86_64.rpm
3、安装 MySQL Client。
rpm -ivh mysql-community-client-5.7.44-1.el7.x86_64.rpm
4、安装 MySQL Server
rpm -ivh mysql-community-server-5.7.44-1.el7.x86_64.rpm
如果出现以下错误信息,说明缺少依赖包,需要安装依赖包:
warning: mysql-community-server-5.7.44-1.el7.x86_64.rpm: Header V4 RSA/SHA256 Signature, key ID 3a79bd29: NOKEY
error: Failed dependencies:
      /usr/bin/perl is needed by mysql-community-server-5.7.44-1.el7.x86_64
      libaio.so.1()(64bit) is needed by mysql-community-server-5.7.44-1.el7.x86_64
      libaio.so.1(LIBAIO_0.1)(64bit) is needed by mysql-community-server-5.7.44-1.el7.x86_64
      libaio.so.1(LIBAIO_0.4)(64bit) is needed by mysql-community-server-5.7.44-1.el7.x86_64
      mysql-community-common(x86-64) = 5.7.44-1.el7 is needed by mysql-community-server-5.7.44-1.el7.x86_64
      perl(Getopt::Long) is needed by mysql-community-server-5.7.44-1.el7.x86_64
      perl(strict) is needed by mysql-community-server-5.7.44-1.el7.x86_64
安装依赖包:
yum install -y perl net-tools libaio
重新安装 MySQL Server:
rpm -ivh mysql-community-server-5.7.44-1.el7.x86_64.rpm
如果仍然出现以下错误信息,说明存在签名校验问题,可以使用以下命令强制安装:
rpm -ivh --force --nodeps mysql-community-server-5.7.44-1.el7.x86_64.rpm
5、验证。
mysql
如果出现以下错误信息,说明 MySQL Server 尚未启动,无法通过 MySQL Client 连接:
ERROR 2002 (HY000): Can't connect to local MySQL server through socket '/var/lib/mysql/mysql.sock' (2)
6、安装小结。
如果没有依赖、签名等阻碍,可以使用以下命令快速安装:
wget https://downloads.mysql.com/archives/get/p/23/file/mysql-5.7.44-1.el7.x86_64.rpm-bundle.tar
tar -xvf mysql-5.7.44-1.el7.x86_64.rpm-bundle.tar
yum install -y perl net-tools libaio
rpm -ivh mysql-community-common-5.7.44-1.el7.x86_64.rpm
rpm -ivh mysql-community-libs-5.7.44-1.el7.x86_64.rpm
rpm -ivh mysql-community-client-5.7.44-1.el7.x86_64.rpm
rpm -ivh mysql-community-server-5.7.44-1.el7.x86_64.rpm
1.4启动连接
1、设置无密码登录。
MySQL 默认配置路径是 /etc/my.cnf,打开该文件,在 [mysqld] 下面添加一行 skip-grant-tables:
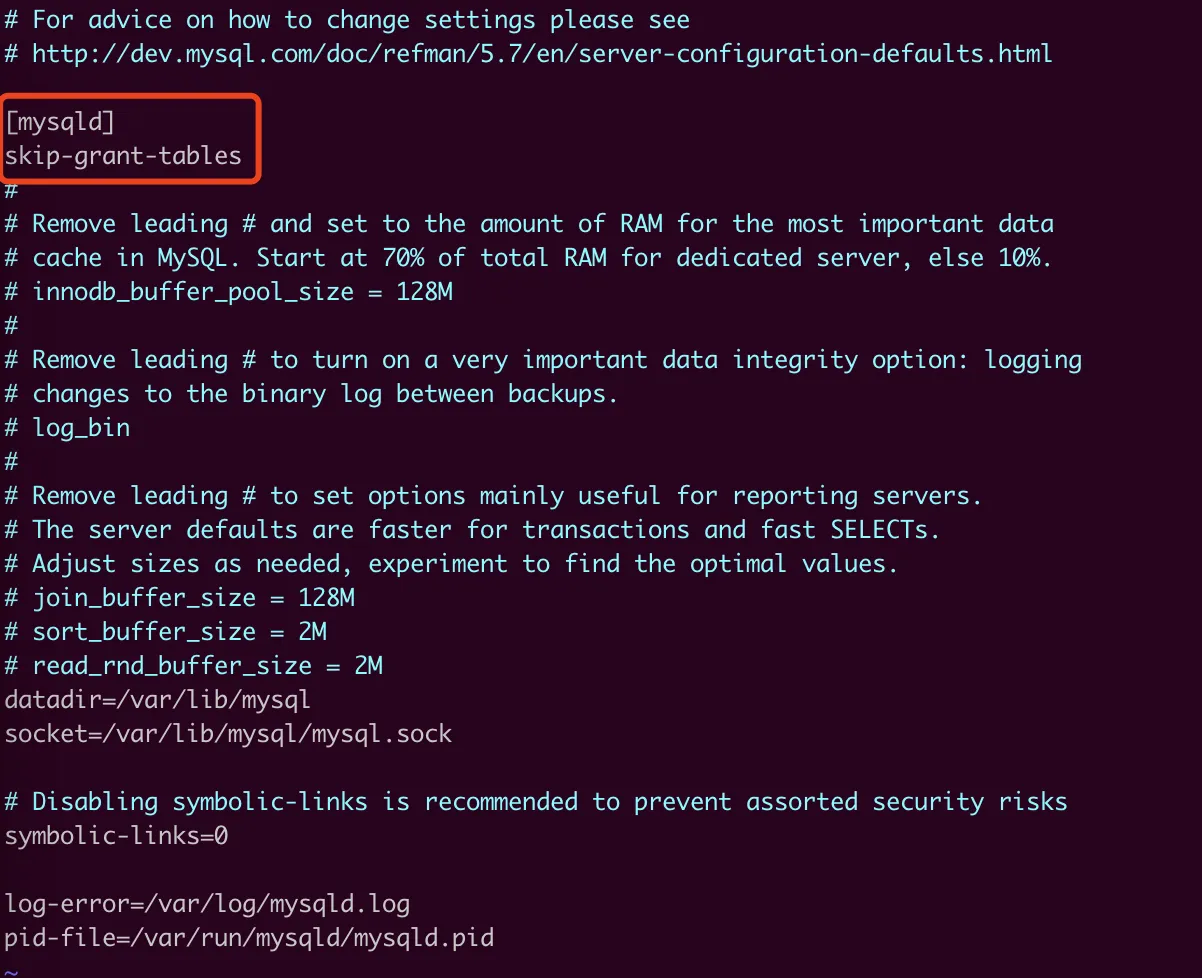
skip-grant-tables 的作用是跳过校验,原因是 MySQL 5.7 在启动时会设置一个默认的 root 密码,需要查看日志文件才能找到 root 密码,添加 skip-grant-tables 可以直接进入 MySQL 修改密码。
生产环境切记不可使用此方法,因为开放这段时间容易被攻击。
2、启动服务。
systemctl start mysqld.service
3、连接服务。
此时不会经过任何校验,可直接连接 MySQL。
mysql
4、设置 root 密码。
update mysql.user set authentication_string=password('123123') where user='root';
flush privileges;
5、退出客户端,重启服务。
重启前,需要将 /etc/my.cnf 配置文件中的 skip-grant-tables 删除,然后重启 MySQL Server。
systemctl restart mysqld.service
6、密码连接。
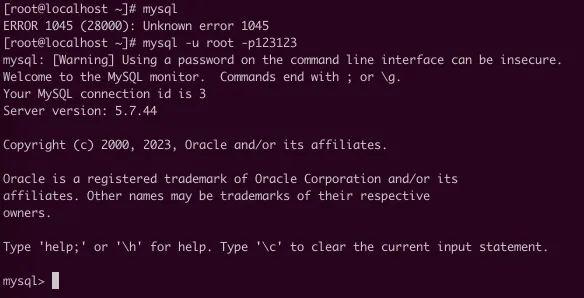
重启后,再尝试使用 mysql 命令直接连接 MySQL,发现无法连接,此时应该使用密码连接:
mysql -u root -p123123
7、可能遇到的错误。
2024.10.10 更新:使用 mysql 命令直接连接 MySQL 错误信息截图:

unknown error 1045 是 MySQL 数据库的一个常见错误,通常与访问权限有关。错误消息的全文可能是 “Access denied for user ‘username’@‘hostname’ (using password: YES)”,这意味着尝试连接到 MySQL 服务器的用户没有提供正确的用户名、密码、或没有从给定主机连接的权限。与更新后的截图提示是一个意思。
此时如果下发查询 SQL 语句会发现无法执行,则需要设置密码策略和密码长度:

2024.10.10 更新:下发SQL错误信息截图:
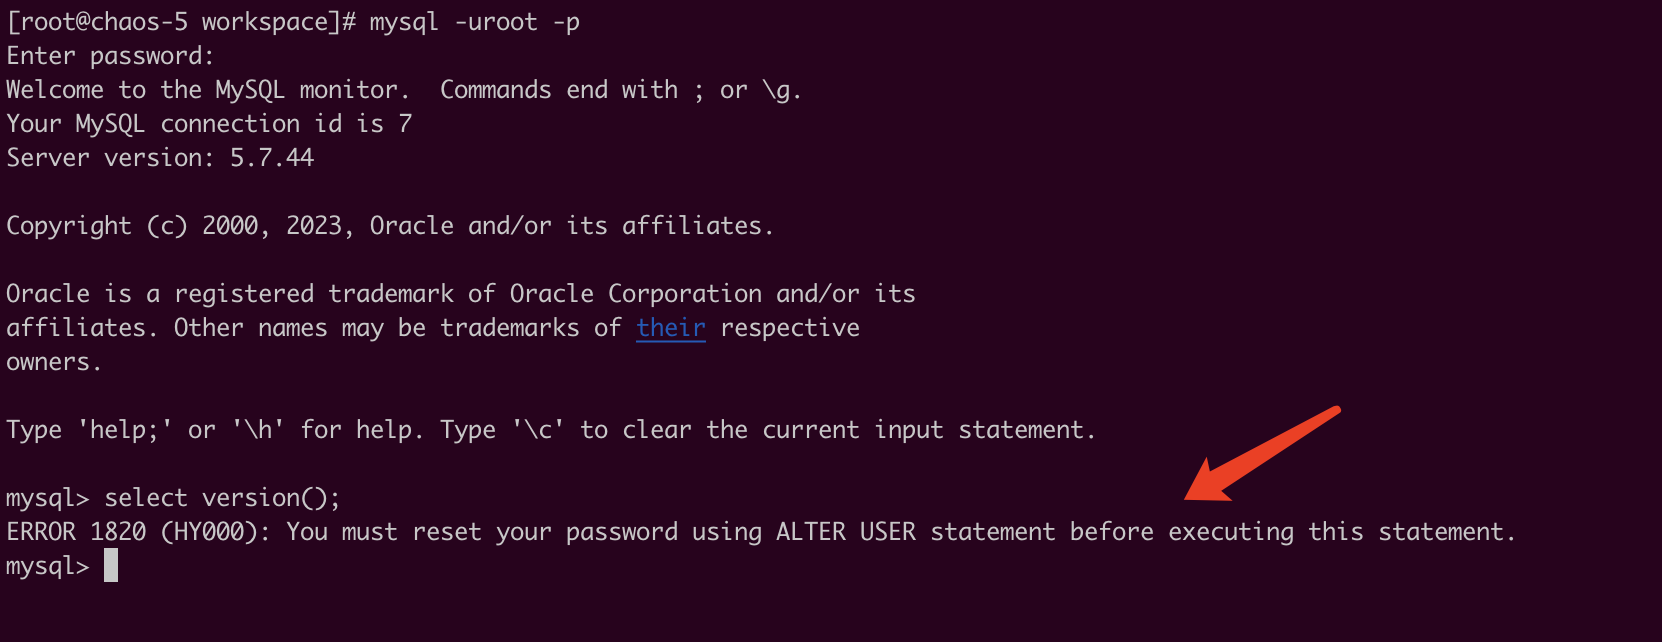
MySQL 中的 unknown error 1820 错误通常与安全性或权限问题相关,主要是在用户的密码过期时出现。具体来说,这个错误通常是因为 MySQL 的用户密码策略要求用户必须在一定时间内更新自己的密码,但该用户尝试执行数据库操作时密码已过期。与更新后的截图提示是一个意思。
8、设置密码策略和密码长度 (仅用于开发学习)。
set global validate_password_policy=LOW;
set global validate_password_length=4;
设置完密码策略和密码长度后,重新设置密码:
set password=password('123123');
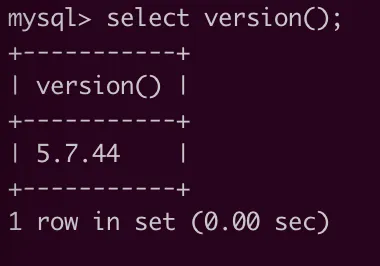
现在再重新下发查询 SQL 语句就可以正常执行了:
1.5远程连接
比如使用 Navicat 连接 MySQL 时会发现连接不上:
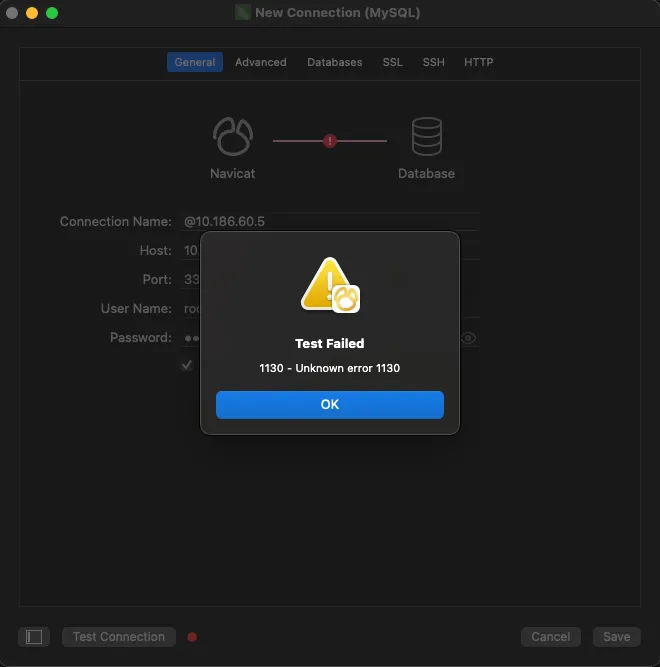
这是因为系统(如CentOS)存在防火墙,可以进入 CentOS 设置防火墙开放 3306 端口:
systemctl status firewalld
firewall-cmd --zone=public --add-port=3306/tcp --permanent
firewall-cmd --reload
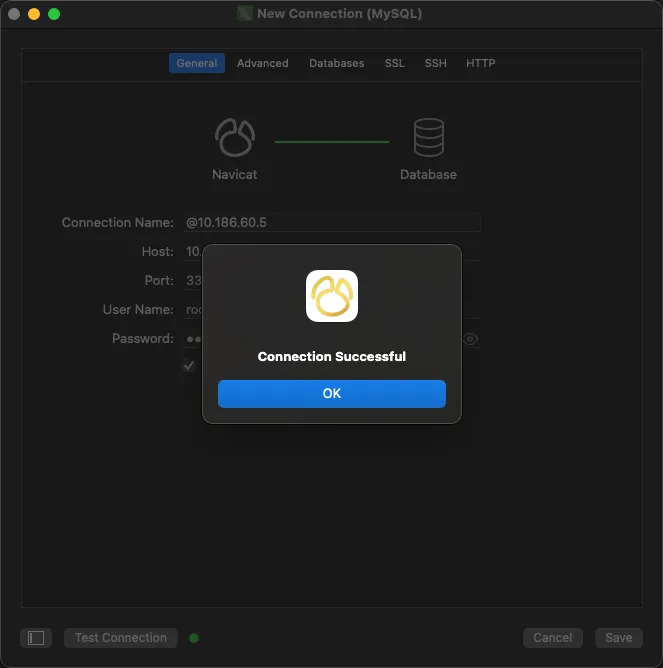
若开放端口后依然无法连接服务,可能是 MySQL 未开启允许远程登录,需要在 MySQL 中执行如下操作:
grant all privileges on *.* to 'root'@'%' identified by '123123' with grant option;
意思是使用 “root” 用户和 “123123” 密码可以远程登录 MySQL,然后重新尝试连接就可以成功连接了:
注意
- 以上步骤仅供参考,实际安装过程中可能需要根据具体情况进行调整。
- 在生产环境中,请勿使用
skip-grant-tables方式启动 MySQL,并设置更复杂的密码策略和密码长度。 - 为了安全起见,建议使用更安全的密码管理方式,例如使用密钥文件或 SSH 连接。
- 保持服务器安全,定期更新 MySQL 版本和安全补丁。
一些其他细节
- 可以使用
systemctl enable mysql.service将 MySQL 设置为开机启动。 - 建议在生产环境中使用更安全的密码管理方式,例如密钥文件或 SSH 连接。
- 确保防火墙允许 MySQL 端口(3306)的访问。
2TAR Archive 方式
2.1下载
wget https://downloads.mysql.com/archives/get/p/23/file/mysql-8.0.32-linux-glibc2.17-aarch64.tar.gz
2.2解压
tar zxvf mysql-8.0.32-linux-glibc2.17-aarch64.tar.gz
2.3移动
mv mysql-8.0.32-linux-glibc2.17-aarch64 /usr/local/mysql
2.4添加 MySQL 用户组
groupadd mysql
2.5创建系统用户
useradd -r -g mysql -s /bin/false mysql
-r:表示创建系统账号,不创建用户 home 目录-g mysql:指定用户组为mysql-s /bin/false:指定用户登录 shell 为/bin/false,使其无法登录,即该用户不能登录。
2.6创建 MySQL 目录
mkdir -p /data/mysql
mkdir -p /data/mysql/{binlog,data,log,tmpdir,conf}
binlog:存放二进制日志目录data:存放数据目录log:存放错误日志、慢日志目录tmpdir:存放临时文件目录conf:存放配置文件目录
2.7修改目录属主
chown -R mysql:mysql /data/mysql
chown -R mysql:mysql /usr/local/mysql
2.8添加配置文件
vim /data/mysql/conf/my.cnf
配置文件内容参考: /data/mysql/conf/my.cnf
2.9初始化并获取临时密码
/usr/local/mysql/bin/mysqld --defaults-file=/data/mysql/conf/my.cnf --user=mysql --initialize
--user=mysql:表示 MySQL 进程运行时使用的用户。- 初始化过程会:
- 创建默认库(在
/data/mysql/data目录下查看)。 - 生成一个随机过期密码的超级用户,并将用户和密码记录在错误日志中。
- 创建默认库(在
- 查看临时密码例如:
grep password /data/mysql/log/mysql.err2024-06-23T07:47:08.980554Z 6 [Note] [MY-010454] [Server] A temporary password is generated for root@localhost: qwD7j*cFl.1u
2.10配置启动脚本
1、复制示例文件。
cp /usr/local/mysql/support-files/mysql.server /etc/init.d/
2、编辑启动脚本。
vim /etc/init.d/mysql.server
找到
datadir并配置:datadir=/data/mysql/data confdir=/data/mysql/conf搜索并替换
# 替换 `mysqld_safe`,找到这样:$bindir/mysqld_safe --datadir="$datadir" --pid-file="$mysqld_pid_file_path" $other_args >/dev/null &
# 修改为:
$bindir/mysqld_safe --defaults-file=$confdir/my.cnf --datadir="$datadir" --pid-file="$mysqld_pid_file_path" $other_args >/dev/null &

# 搜索 `datadir=\*`,找到这样:--datadir=*)  datadir=`echo "$arg" | sed -e 's/^[^=]*=//'`
# 修改为:
--datadir=*)  datadir="/data/mysql/data"
2.11启动 MySQL
1、启动
/etc/init.d/mysql.server start
2、查看是否启动成功
ps -ef | grep mysql
2.12设置环境变量
vim /etc/profile
在最后添加:
MYSQL_HOME=/usr/local/mysql
PATH=$PATH:$MYSQL_HOME/bin
export PATH MYSQL_HOME
保存退出后执行 source /etc/profile。执行命令测试,如查看 MySQL 版本:
# mysql --version
mysql  Ver 8.0.32 for Linux on aarch64 (MySQL Community Server - GPL)
2.13使用临时密码登录
#  grep password /data/mysql/log/mysql.err
2024-06-23T07:47:08.980554Z 6 [Note] [MY-010454] [Server] A temporary password is generated for root@localhost: qwD7j*cFl.1u
[root@chaos-1 data]# mysql -uroot -p'qwD7j*cFl.1u'
mysql: [Warning] Using a password on the command line interface can be insecure.
Welcome to the MySQL monitor.  Commands end with ; or \g.
Your MySQL connection id is 8
Server version: 8.0.32

Copyright (c) 2000, 2023, Oracle and/or its affiliates.

Oracle is a registered trademark of Oracle Corporation and/or its
affiliates. Other names may be trademarks of their respective
owners.

Type 'help;' or '\h' for help. Type '\c' to clear the current input statement.

mysql> show databases;
ERROR 1820 (HY000): You must reset your password using ALTER USER statement before executing this statement.
mysql>
这是临时的超级用户,登录后并不能正常工作,需要先修改密码。
2.14修改密码
1、修改密码
mysql> alter user user() identified by '123123';
Query OK, 0 rows affected (0.01 sec)

mysql>
在 MySQL 中,USER() 是一个内置函数,用于返回当前会话的用户名和主机名,它的返回值通常是“用户名@主机名”的形式。
2、退出并使用新密码登录。
[root@chaos-1 data]# mysql -uroot -p
Enter password: [这里输入的是刚才设置的密码]
Welcome to the MySQL monitor.  Commands end with ; or \g.
Your MySQL connection id is 11
Server version: 8.0.32 MySQL Community Server - GPL

Copyright (c) 2000, 2023, Oracle and/or its affiliates.

Oracle is a registered trademark of Oracle Corporation and/or its
affiliates. Other names may be trademarks of their respective
owners.

Type 'help;' or '\h' for help. Type '\c' to clear the current input statement.

mysql>
mysql> show databases;
+--------------------+
| Database           |
+--------------------+
| information_schema |
| mysql              |
| performance_schema |
| sys                |
+--------------------+
4 rows in set (0.01 sec)

mysql>
2.15关闭 MySQL
[root@chaos-1 data]# /etc/init.d/mysql.server stop
Shutting down MySQL.. SUCCESS!
检查是否关闭:
ps -ef | grep mysql
2.16清理 MySQL
rm -rf /usr/local/mysql
rm -rf /data/mysql
rm -rf /etc/init.d/mysql/server
userdel -r mysql
清理 /etc/profile 中设置的环境变量
3Shell脚本方式
3.1准备
创建脚本部署目录:
#我提前将文件下载下来了
mkdir -p /opt/install_mysql8
cp /opt/shared/db/mysql/scripts/install_mysql/my.cnf /opt/install_mysql8
cp /opt/shared/db/mysql/scripts/install_mysql/mysql.server /opt/install_mysql8
cp /opt/shared/db/mysql/scripts/install_mysql/mysql-8.0.32-linux-glibc2.17-aarch64.tar.gz /opt/install_mysql8
3.2编辑安装脚本
/opt/install_mysql8/install.sh:
#!/bin/bash

# 解压
if [ -d "/usr/local/mysql" ]; then
	echo "/usr/local/mysql 文件夹已存在,请确认是否安装了 MySQL"
	exit
fi

echo "正在解压压缩包..."
tar xf mysql-8.0.32-linux-glibc2.17-aarch64.tar.gz
mv mysql-8.0.32-linux-glibc2.17-aarch64 /usr/local/mysql
echo "压缩包解压结束"

# 创建MySQL目录
if [ -d "/data/mysql/" ]; then
	echo "/data/mysql 文件夹已存在,请确认是否安装了 MySQL"
	exit
fi
mkdir -p /data/mysql/{binlog,data,log,tmpdir,conf}

# 判断MySQL进程是否启动
mysql_pid=`ps -ef | grep mysqld | wc -l`
if [ $mysql_pid -eq 1 ]; then
	echo "MySQL 进程不存在"
else
	echo "存在 MySQL 运行进程,请检查"
	exit
fi

# 创建MySQL用户
mysql_user=`cat /etc/passwd | grep -w mysql | wc -l`
if [ $mysql_user -eq 1 ]; then
	echo "MySQL 用户已存在"
else
	echo "MySQL 用户不存在,开始添加 MySQL 用户"
	groupadd mysql
	useradd -r -g mysql -s /bin/false mysql
	echo "添加 MySQL 用户成功"
fi

# 修改权限
chown -R mysql:mysql /data/mysql
chown -R mysql:mysql /usr/local/mysql

# 添加配置文件
cp ./my.cnf /data/mysql/conf/

# 初始化
echo "开始初始化"
/usr/local/mysql/bin/mysqld --defaults-file=/data/mysql/conf/my.cnf --user=mysql --initialize

# 判断初始化是否成功
mysql_init=`cat /data/mysql/log/mysql.err | grep -i "root@localhost:" | wc -l`
if [ $mysql_init -eq 1 ]; then
	echo "MySQL 初始化成功"
else
	echo "MySQL 初始化失败"
	exit
fi

# 初始化临时密码
tmp_pwd=$(grep 'temporary password' /data/mysql/log/mysql.err)
## 过滤临时密码
pwd=${tmp_pwd##* }
echo "临时密码: ${pwd}"

# 配置启动脚本
if [ ! -f "/etc/init.d/mysql.server" ]; then
	cp mysql.server /etc/init.d/ -rf
	chmod 700 /etc/init.d/mysql.server
fi

# 启动MySQL
/etc/init.d/mysql.server start

# 添加环境变量
mysql_path=`grep 'export PATH=$PATH:/usr/local/mysql/bin' /etc/profile | wc -l`
if [ $mysql_path -eq 0 ]; then
	echo "export PATH=\$PATH:/usr/local/mysql/bin" >> /etc/profile
	source /etc/profile
fi

## 使用临时密码登录 MySQL,并修改密码
mysql -uroot -p${pwd} --connect-expired-password -e "alter user user() identified by '123123';"
echo "MySQL8 安装完成"
为脚本授予可执行权限:
chmod +x /opt/install_mysql8/install.sh
3.3执行
./install.sh
正在解压压缩包...
压缩包解压结束
MySQL 进程不存在
MySQL 用户已存在
开始初始化
MySQL 初始化成功
临时密码: 0uozxGqdF_BU
Starting MySQL... SUCCESS!
mysql: [Warning] Using a password on the command line interface can be insecure.
MySQL8 安装完成
3.4登录
# source /etc/profile
# mysql -uroot -p
Enter password:
Welcome to the MySQL monitor.  Commands end with ; or \g.
Your MySQL connection id is 10
Server version: 8.0.32 MySQL Community Server - GPL

Copyright (c) 2000, 2023, Oracle and/or its affiliates.

Oracle is a registered trademark of Oracle Corporation and/or its
affiliates. Other names may be trademarks of their respective
owners.

Type 'help;' or '\h' for help. Type '\c' to clear the current input statement.

mysql>
mysql> show databases;
+--------------------+
| Database           |
+--------------------+
| information_schema |
| mysql              |
| performance_schema |
| sys                |
+--------------------+
4 rows in set (0.01 sec)

mysql>
脚本仍存在很多优化空间,后续需要对配置脚本优化。
4Docker方式部署
1、拉取MySQL镜像
docker search mysql
2、查看可用MySQL版本
docker pull mysql:latest
3、拉取镜像
* 拉取最新版本镜像
```bash
docker pull mysql:latest
```

* 拉取指定版本 8.0.32 镜像

```bash
docker pull mysql:8.0.25
```
4、查看本地:
docker images
5、运行容器:
docker run --name mysql-test -p 3316:3306 -e MYSQL_ROOT_PASSWORD=123 mysql:8.0.32
-e表示设置环境变量
6、查看容器
docker ps
7、登录MySQL
mysql -h 127.0.0.1 -uroot -p
8、停止容器:
docker stop 26e553587b34
9、删除容器:
docker rm 26e553587b34
5AI 协作安装
Prompt
在CentOS7上通过安装包安装MySQL8.0.32这个小版本
当前路径已经有 mysql-8.0.32-linux-glibc2.17-aarch64.tar.gz 这个压缩包了
MySQL 基础目录为 /var/mysql
数据目录是 /var/mysql/data
日志目录是 /var/mysql/log
配置文件是 /var/mysql/conf/my.cnf
配置文件不要使用复制的方式生成,而是直接写入内容
初始化和启动时,需要指定配置文件
安装过程的命令不要加sudo
增加修改 root 密码的操作