
业务背景与场景定位
在 SCRM(客户关系管理)或者多商户 SaaS 平台中,核心需求是:让客户(包括企业自身或其他入驻商家)把他们的微信公众号一键托管到你的平台,由平台统一管理这些公众号的粉丝、消息、菜单和数据。
在微信官方规范中,这种模式有且仅有一种标准架构——微信开放平台·第三方平台代公众号授权模式(像微盟、有赞、JINGdigital 等商业 SCRM 系统全部采用这种模式)。
对于使用你平台的客户/运营人员而言,他们完全不需要懂技术,不需要登录微信公众平台后台去配置什么 URL、Token 或代码,全靠手机微信“扫码一键授权”完成接管。
核心接入流程(端到端时序)
整个接管闭环涉及四方:客户 (C)、SCRM 前端 (F)、SCRM 后端 (B) 与 微信开放平台 (W):
1. 发起授权:用户在平台点击【一键接入公众号】 -> 前端请求后端获取授权链接
2. 生成凭据:后端用 component_access_token 向微信换取 pre_auth_code,拼接 auth_url 下发
3. 扫码确认:前端展示二维码 -> 管理员微信扫码 -> 勾选权限并点击【同意授权】
4. 换证入库:微信带 auth_code 回跳 -> 后端换取永久凭证 authorizer_refresh_token 并落库
5. 业务接管:微信向平台推送代管公众号的粉丝消息与事件 -> 平台解密并分发处理
终端交互全貌(用户视角)
用户在系统后台的实际交互极其轻量:
- 第一步:在公众号管理页点击 【一键接入微信公众号】。
- 第二步:网页弹出微信官方授权二维码,管理员手机微信扫码。
- 第三步:手机端弹出官方权限列表,点击 【同意授权】。
- 第四步:手机端显示“授权成功”并于 3 秒后自动关闭;PC 端监听到授权完成自动刷新列表,显示刚刚接管的公众号信息。
核心凭证与名词速查表
微信开放平台涉及多个不同作用域与有效期的 Token,记住这条核心凭证流通链即可理清整条调用关系:
核心凭证链:
component_verify_ticket(微信心跳推) →component_access_token(平台令牌) →pre_auth_code(预授权码) →auth_code(扫码兑换券) →authorizer_refresh_token(公众号永久托管密钥)
| 凭证名称 | 作用说明 | 获取方式 | 有效期 | 存储要求 |
|---|---|---|---|---|
ComponentAppID | 第三方平台自身的“身份证号” | 开放平台创建第三方平台时分配 | 长期 | 写入项目代码配置 |
ComponentAppSecret | 第三方平台通信密钥(只展示一次) | 开放平台后台生成并由管理员扫码查看 | 长期(泄露可重置) | 写入项目代码配置 |
component_verify_ticket | 微信向平台发送的心跳票据,一切凭证的前提 | 微信每 10 分钟自动推送到授权事件接收 URL | 滚动更新(最新有效) | 必须存入 Redis / DB |
component_access_token | 第三方平台自身的全局调用凭证 | 后端携带最新 ticket + 平台凭证向微信换取 | 约 2 小时 | Redis 缓存并自动刷新 |
pre_auth_code | 预授权码,用于拼装管理员扫码授权链接 | 后端携带 component_access_token 调微信接口换取 | 约 10 分钟 | 临时使用 |
auth_code | 扫码成功后微信回传的一次性授权码 | 管理员手机点击“同意授权”后微信带回 | 一次性(短时有效) | 立即向微信换取正式凭证 |
authorizer_refresh_token | 被托管公众号的永久凭据(接管核心) | 后端用 auth_code 向微信官方换取 | 长期(直至公众号取消授权) | 必须落库持久化 |
| 授权测试公众号列表 | 开发阶段允许扫码授权的白名单 | 开放平台后台手动登记微信号/原始ID | 开发期专用 | 必配,未全网发布前防拦截 |
微信开放平台应用创建与参数配置
在编写任何业务代码前,必须先在 微信开放平台(注意:是开放平台 open.weixin.qq.com,不是公众平台 mp.weixin.qq.com)创建第三方平台应用主体并完成参数配置。
1.创建第三方平台应用与权限集声明
登录微信开放平台,进入「第三方平台」管理,点击「创建第三方平台」,填写平台基本信息并提交:
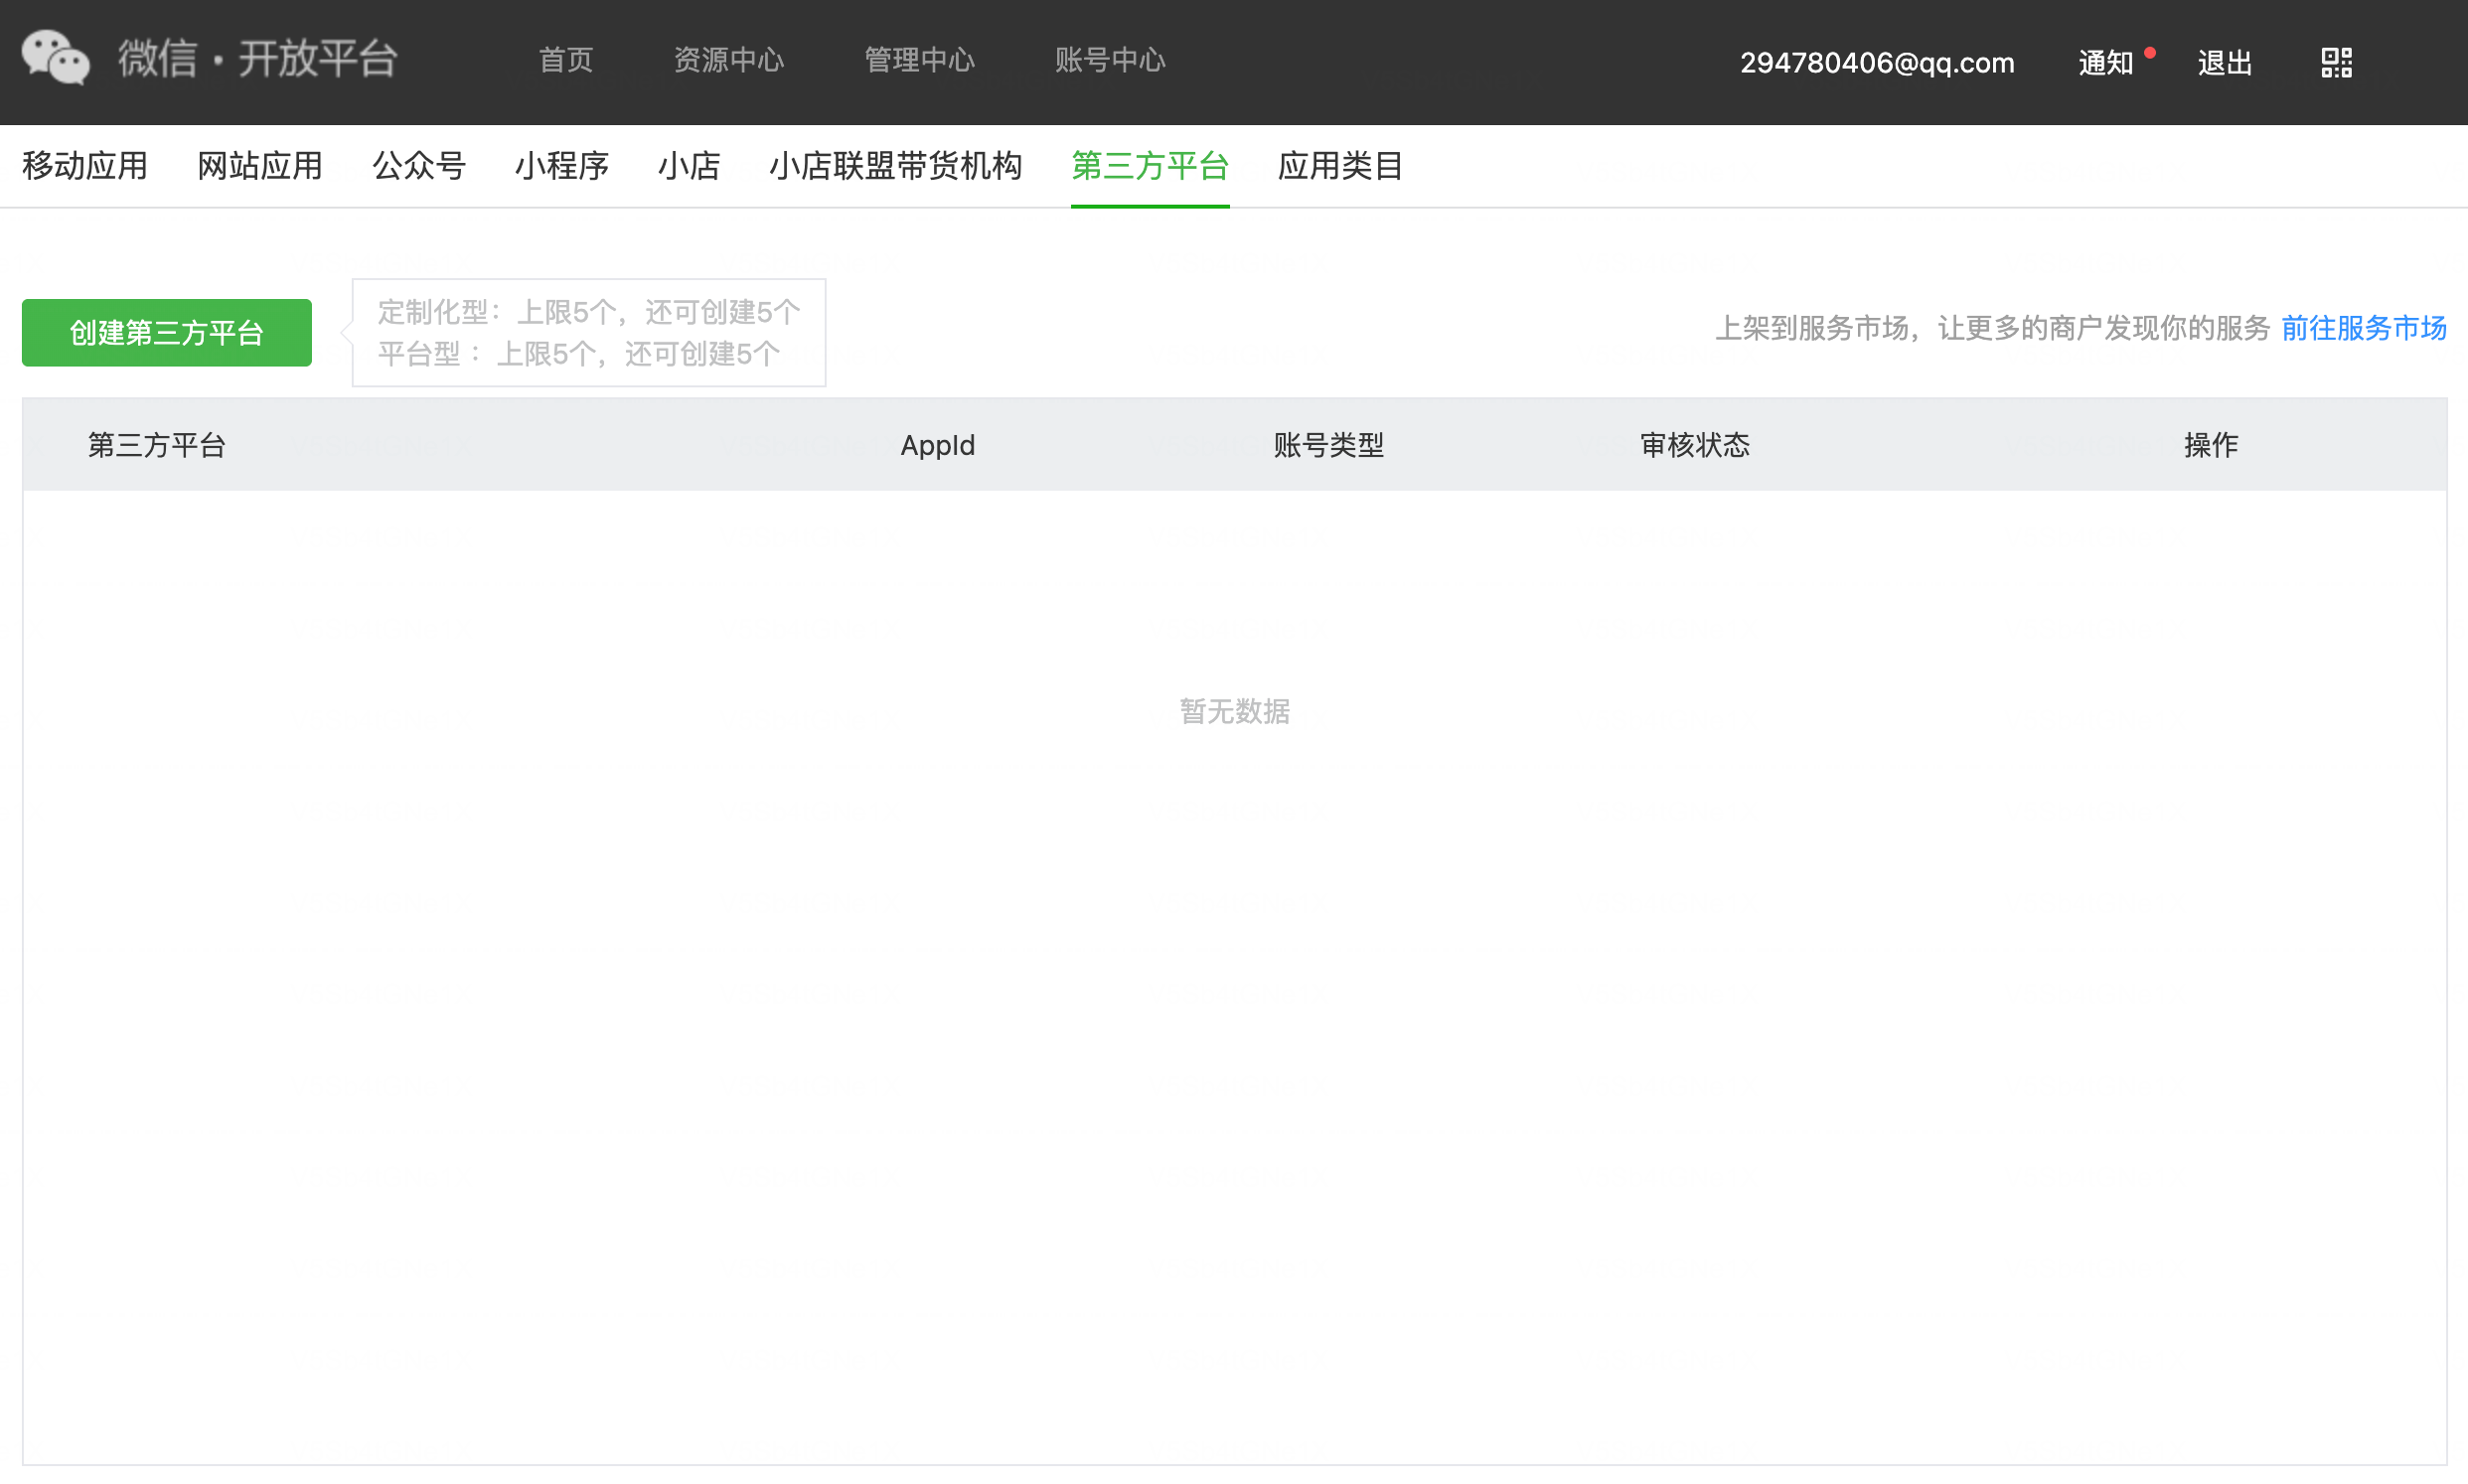
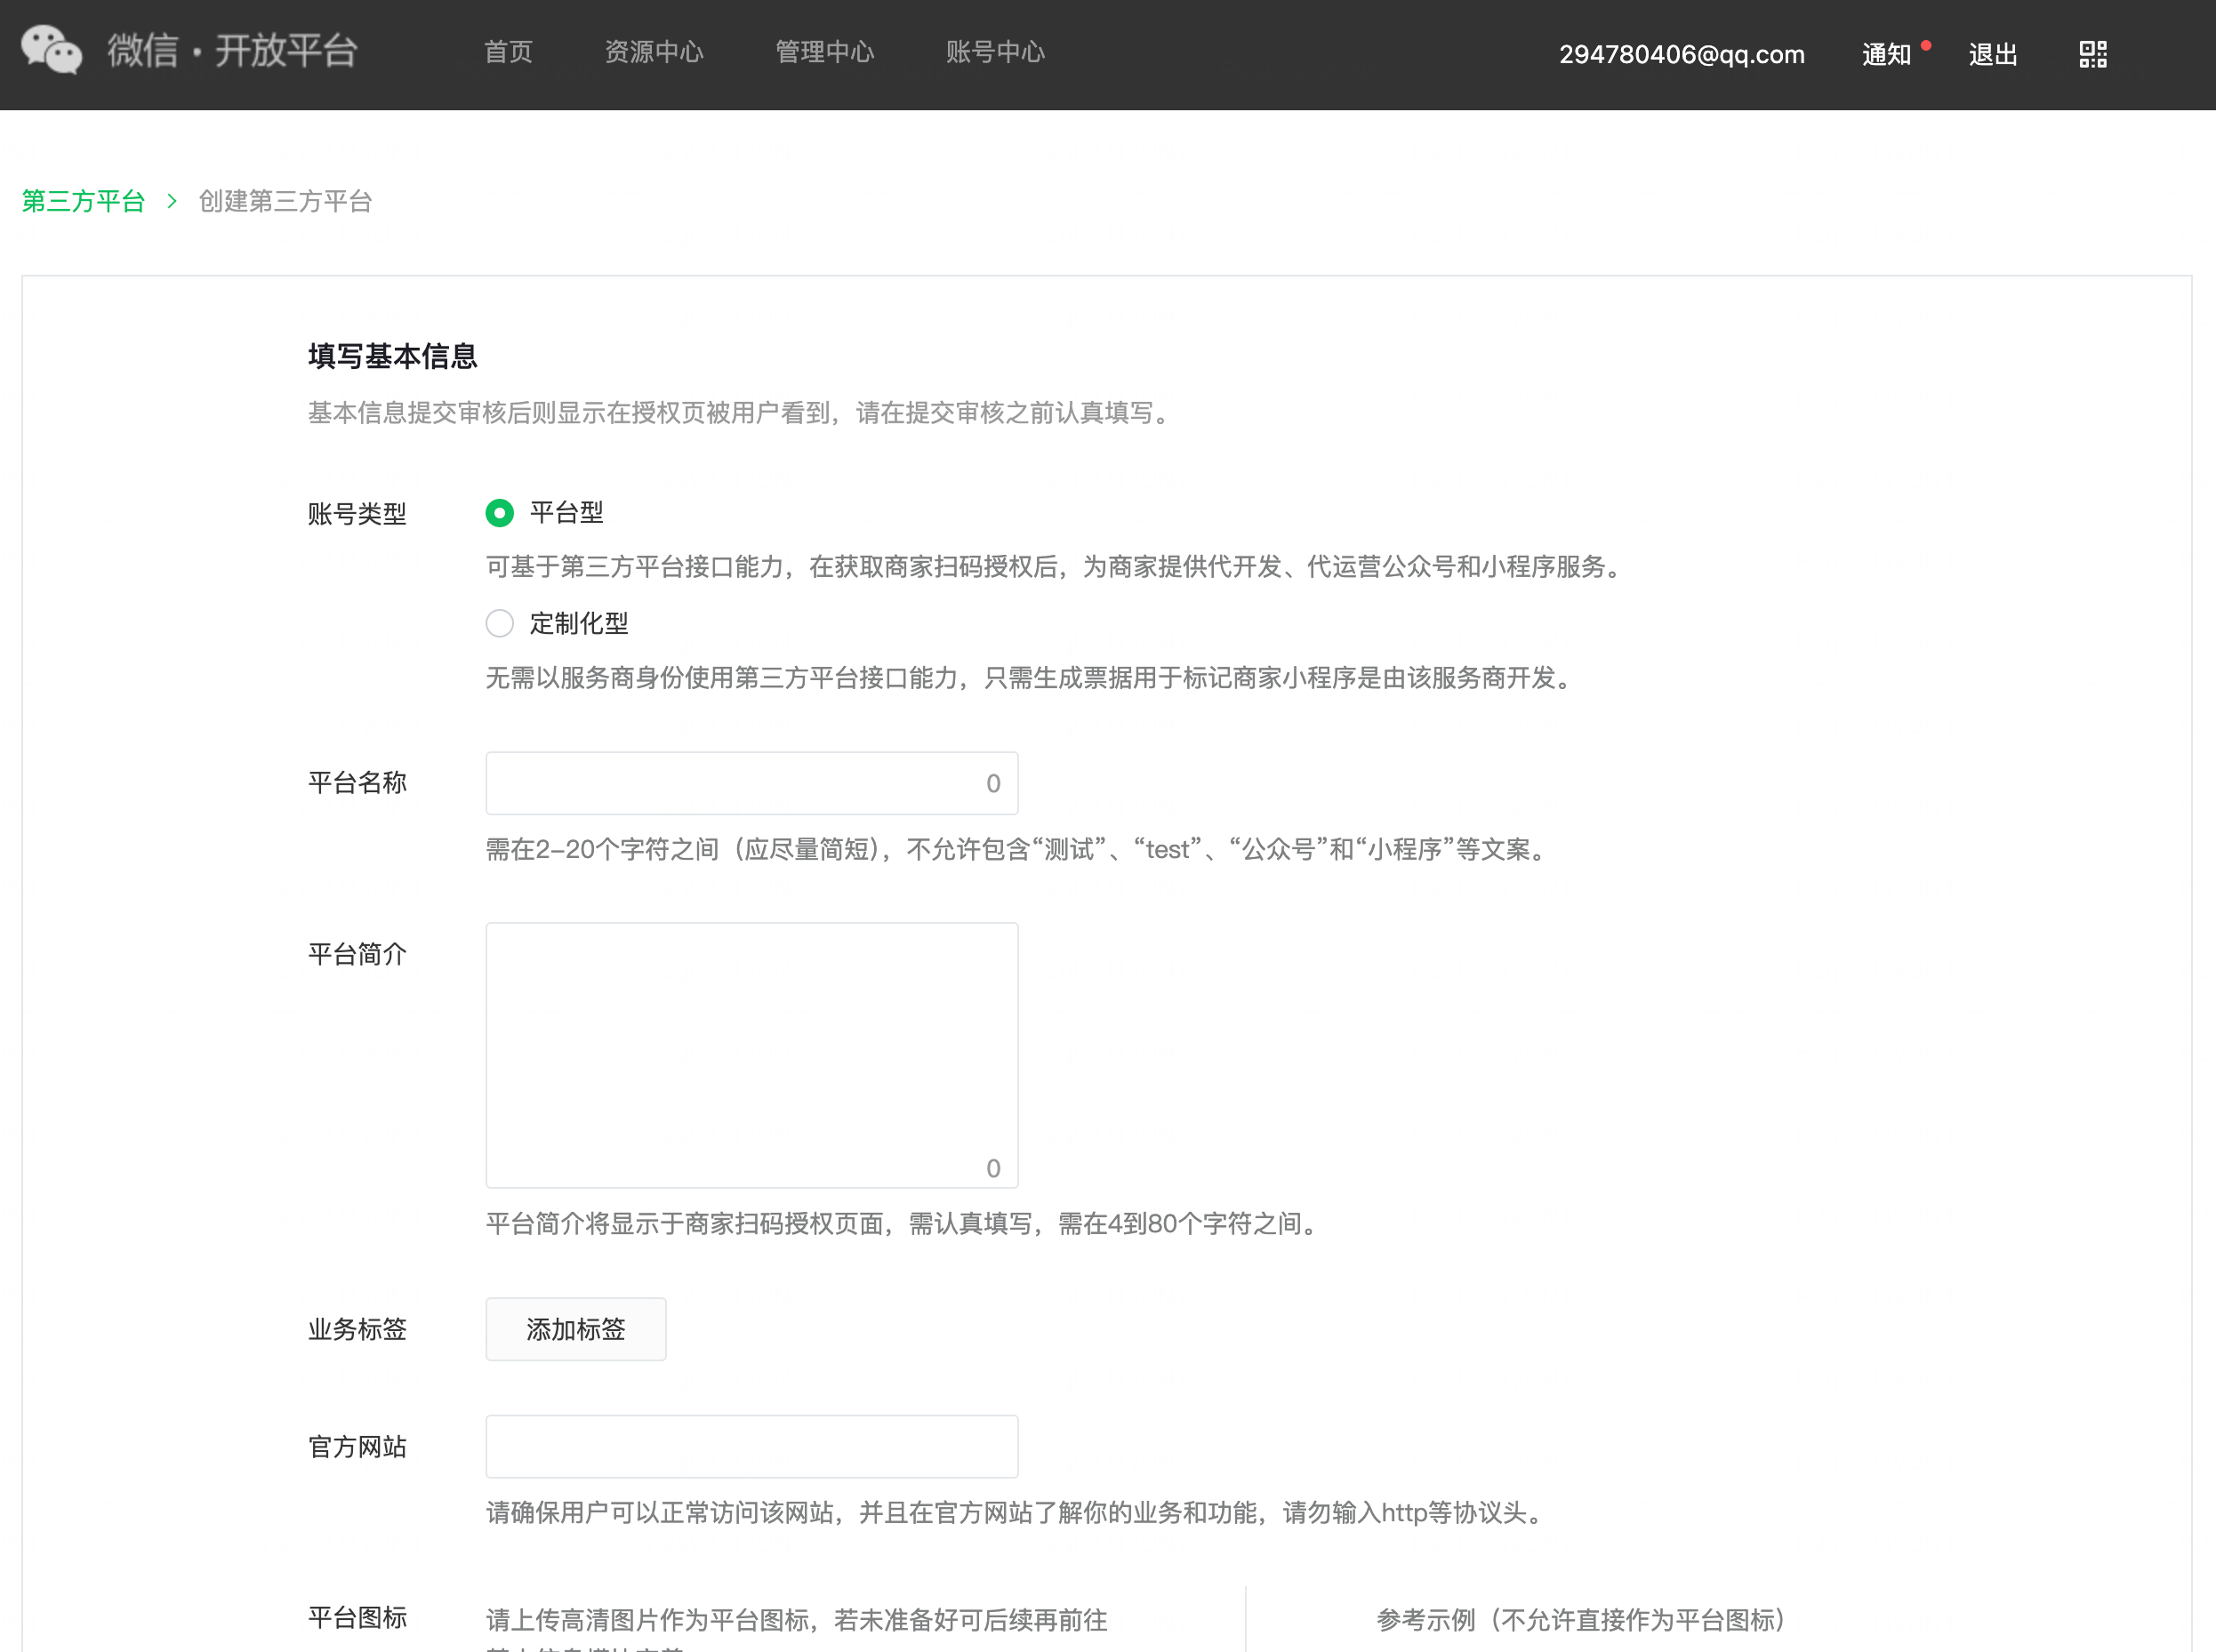
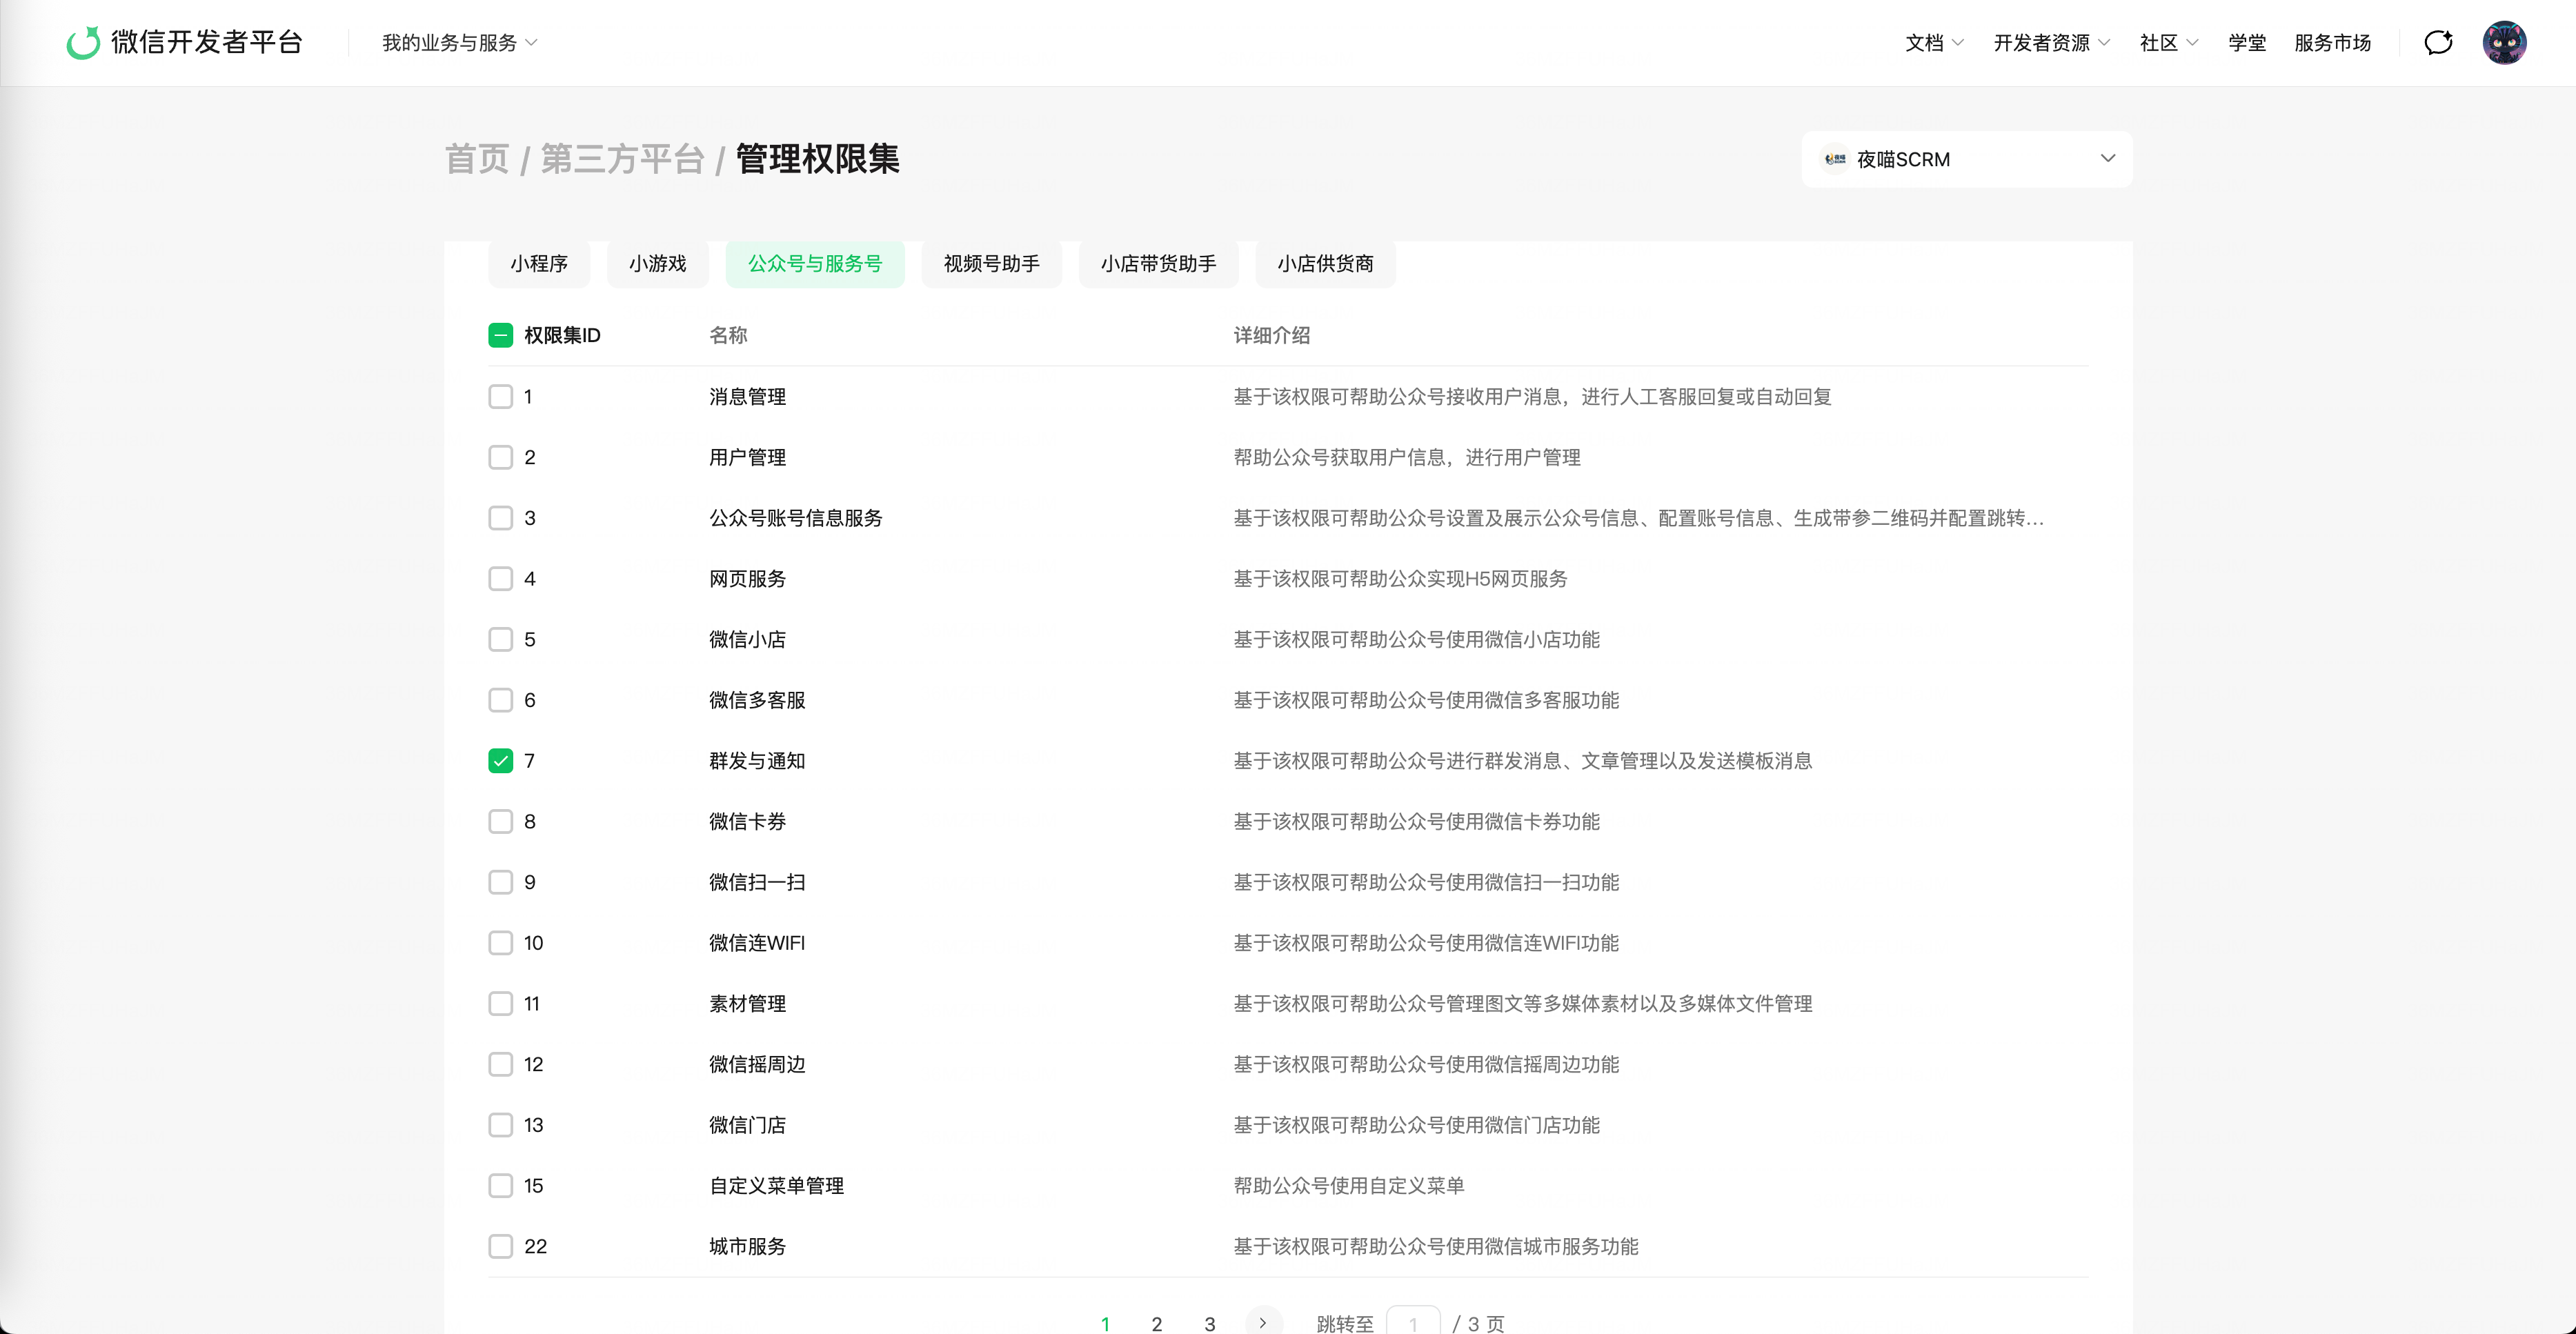
创建完成后,需要声明你的 SCRM 平台要代公众号行使哪些管理权限(如消息收发、自定义菜单、粉丝管理等):
- 点击「权限集」的【编辑】按钮,选择「公众号与服务号权限集」:
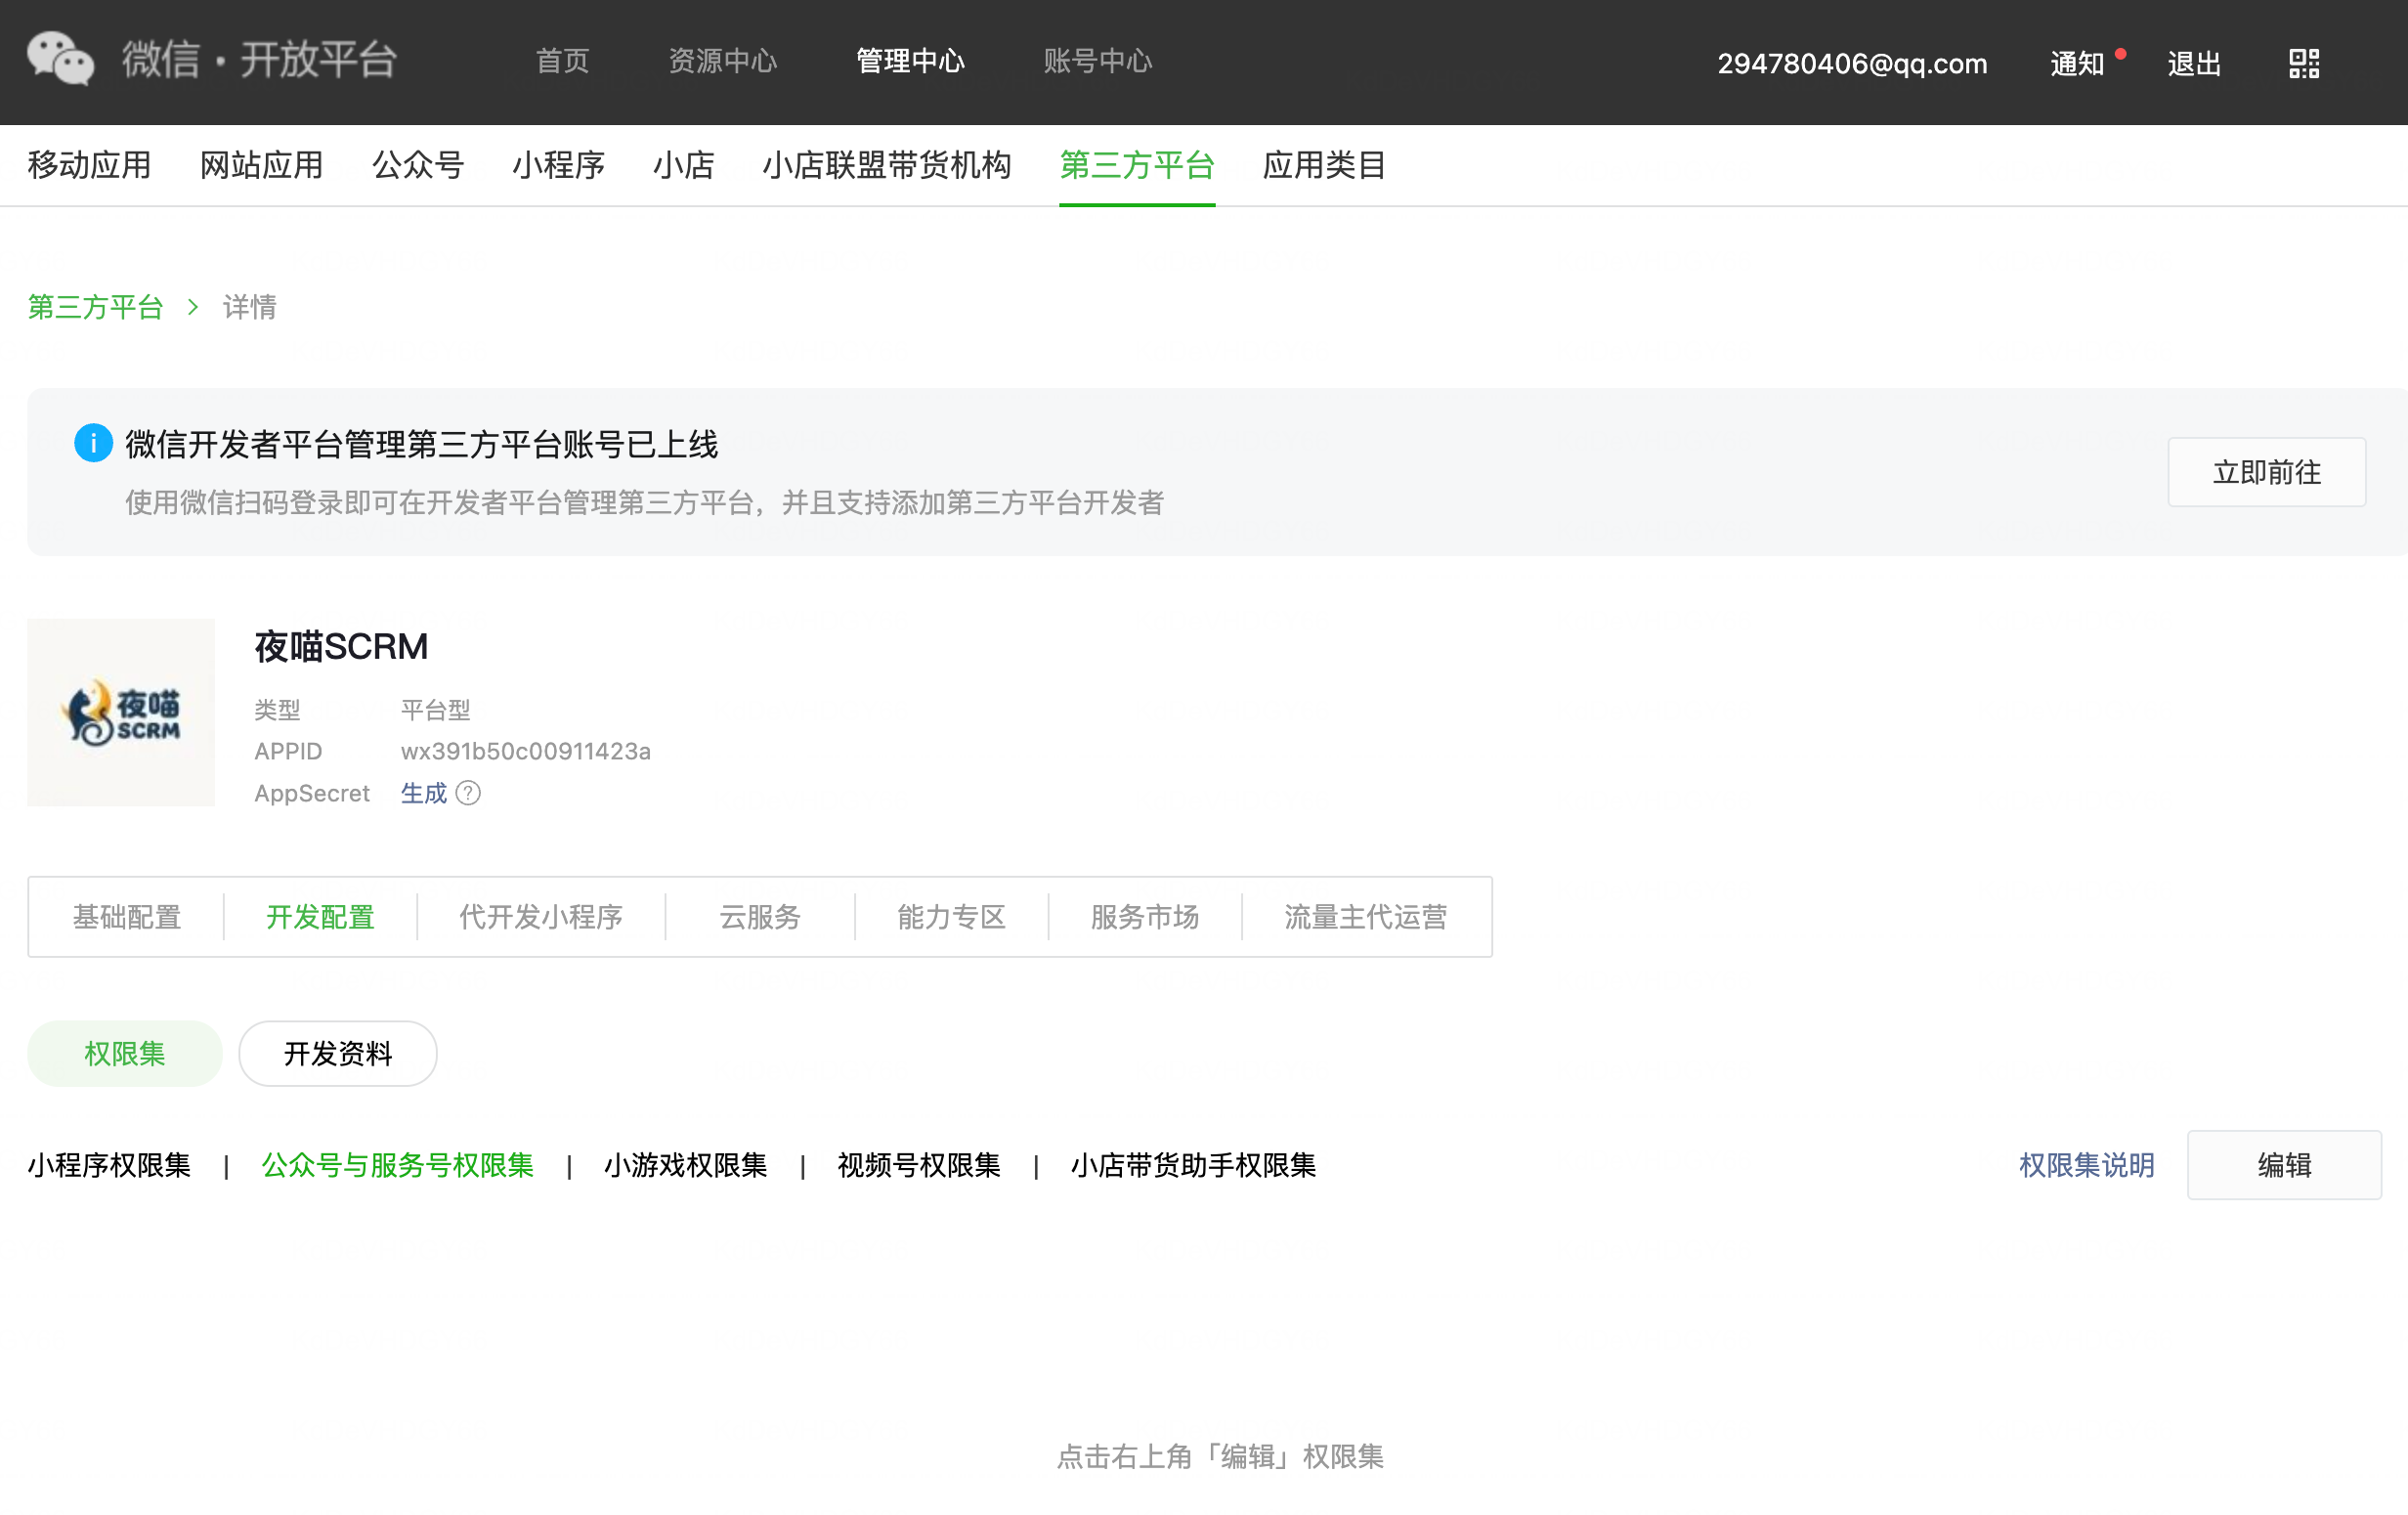
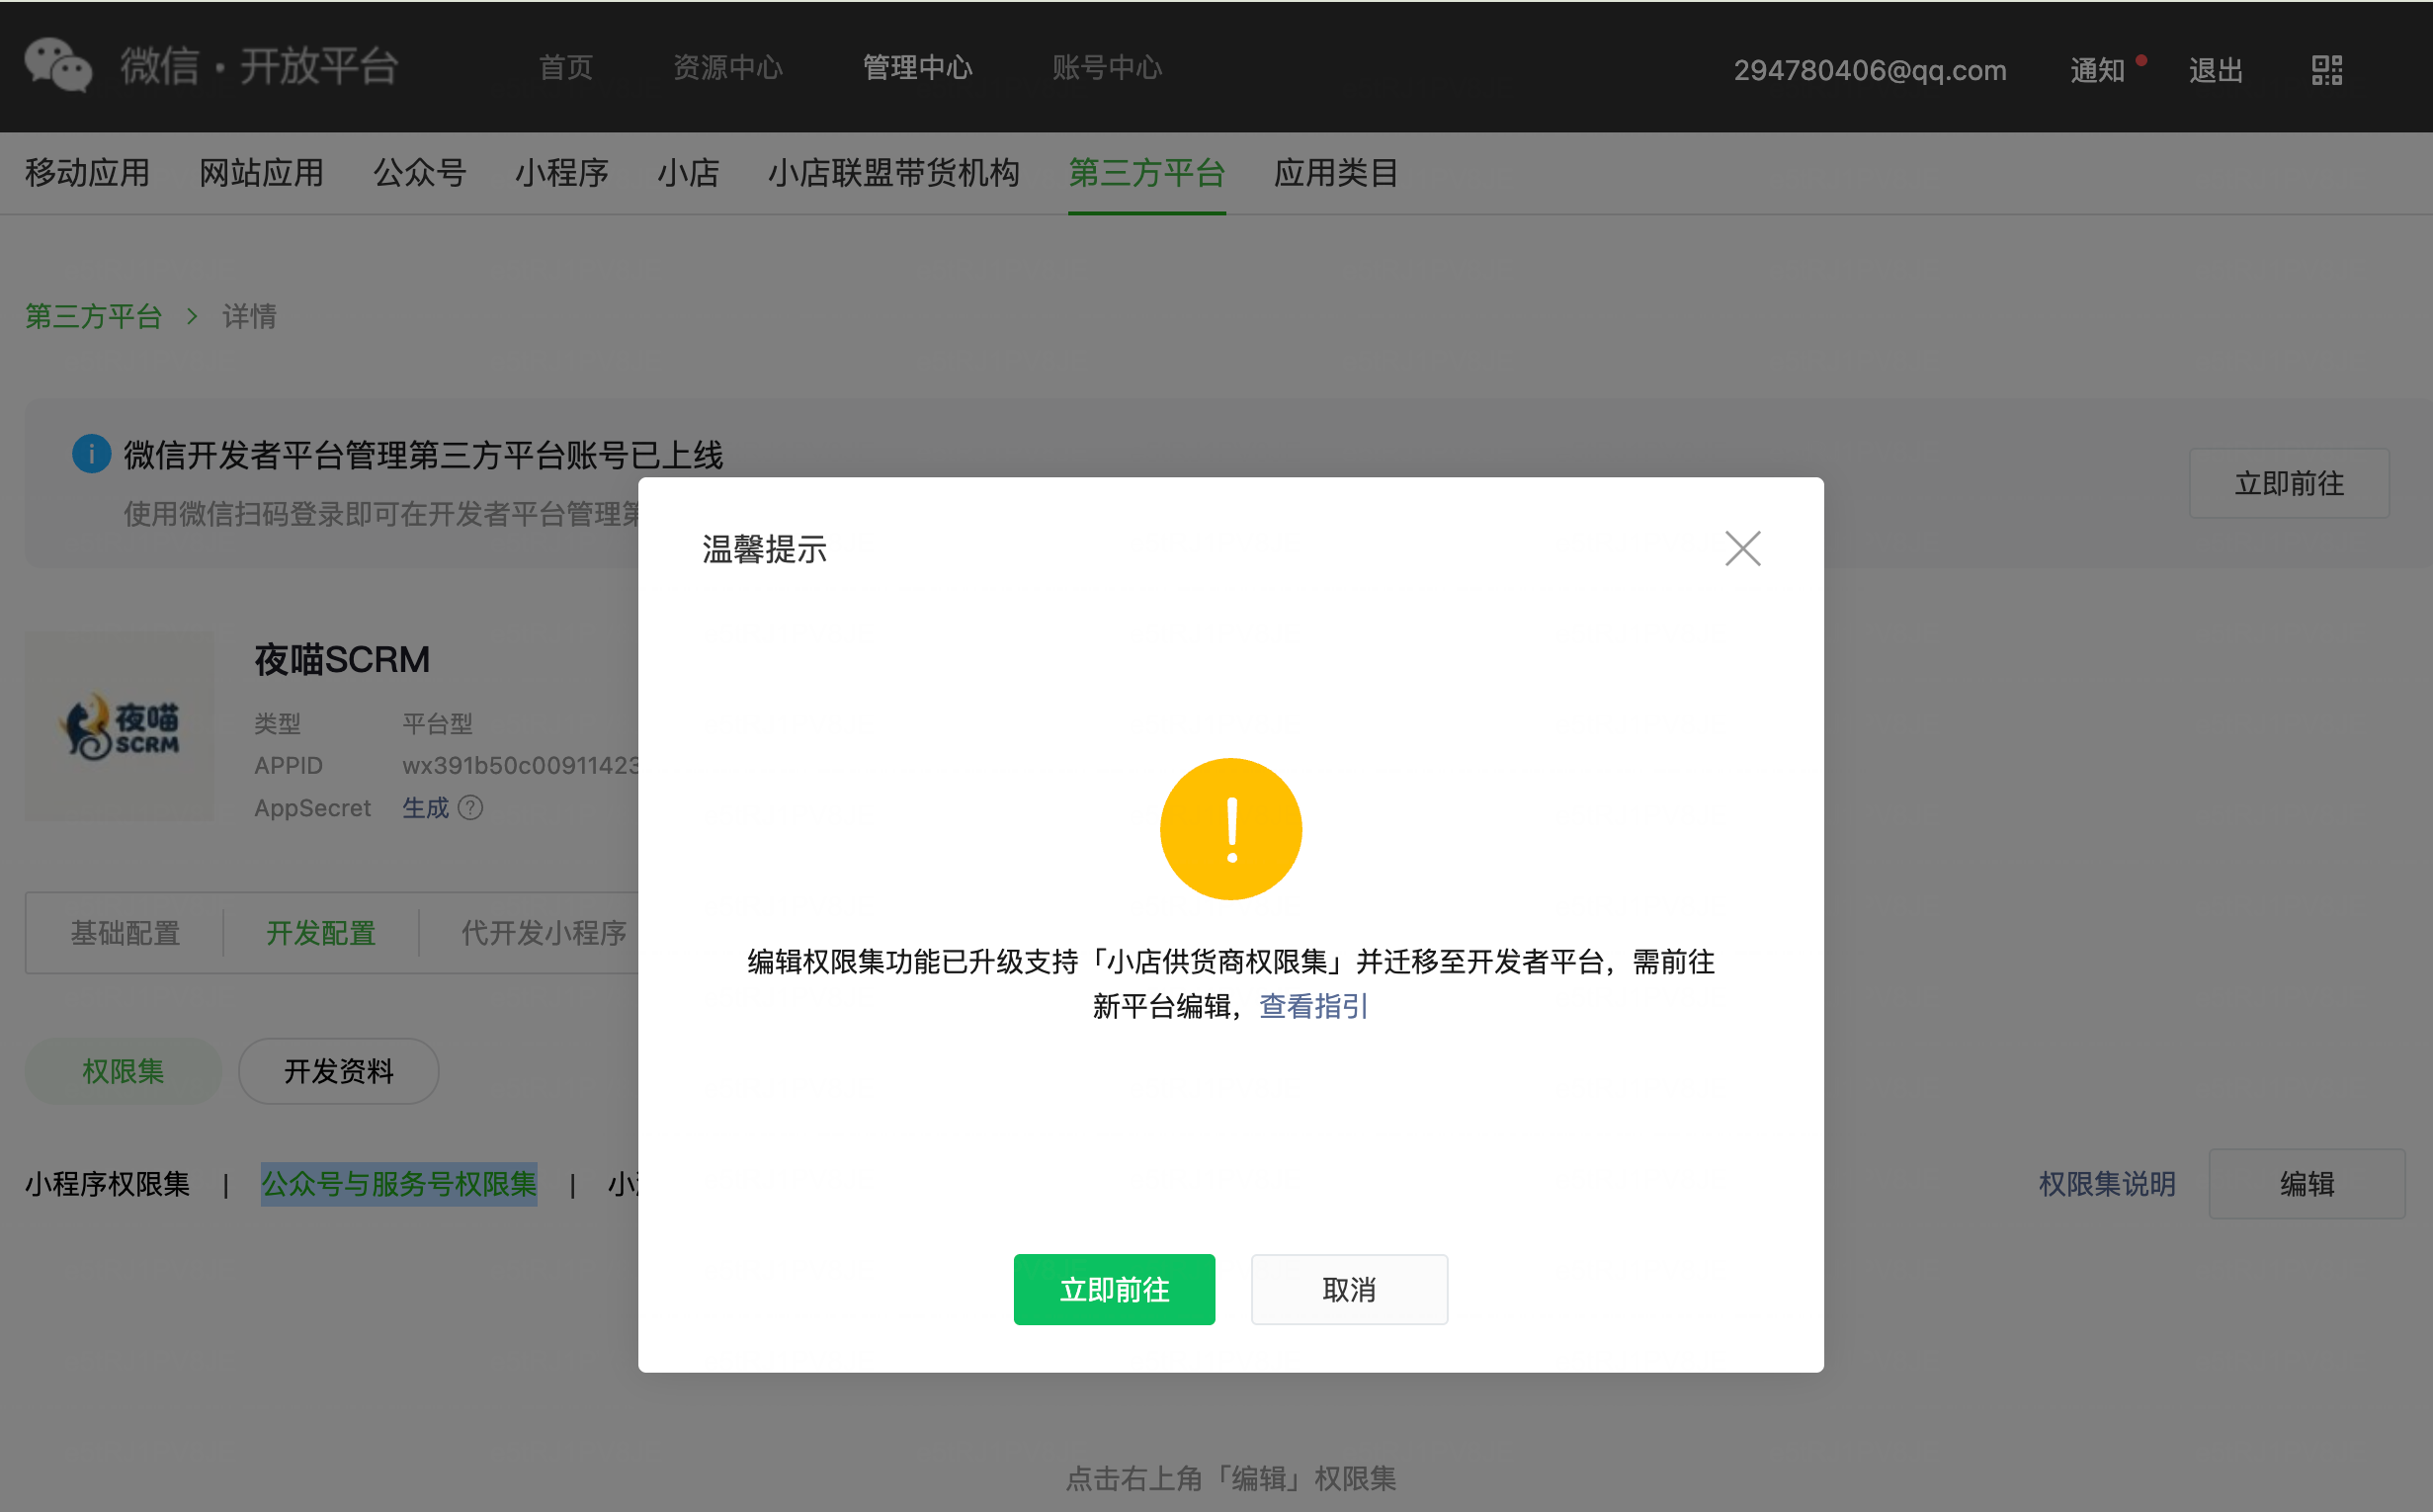
- 左上角「我的业务与服务」下拉选择「第三方平台」,绑定平台管理员个人微信号:
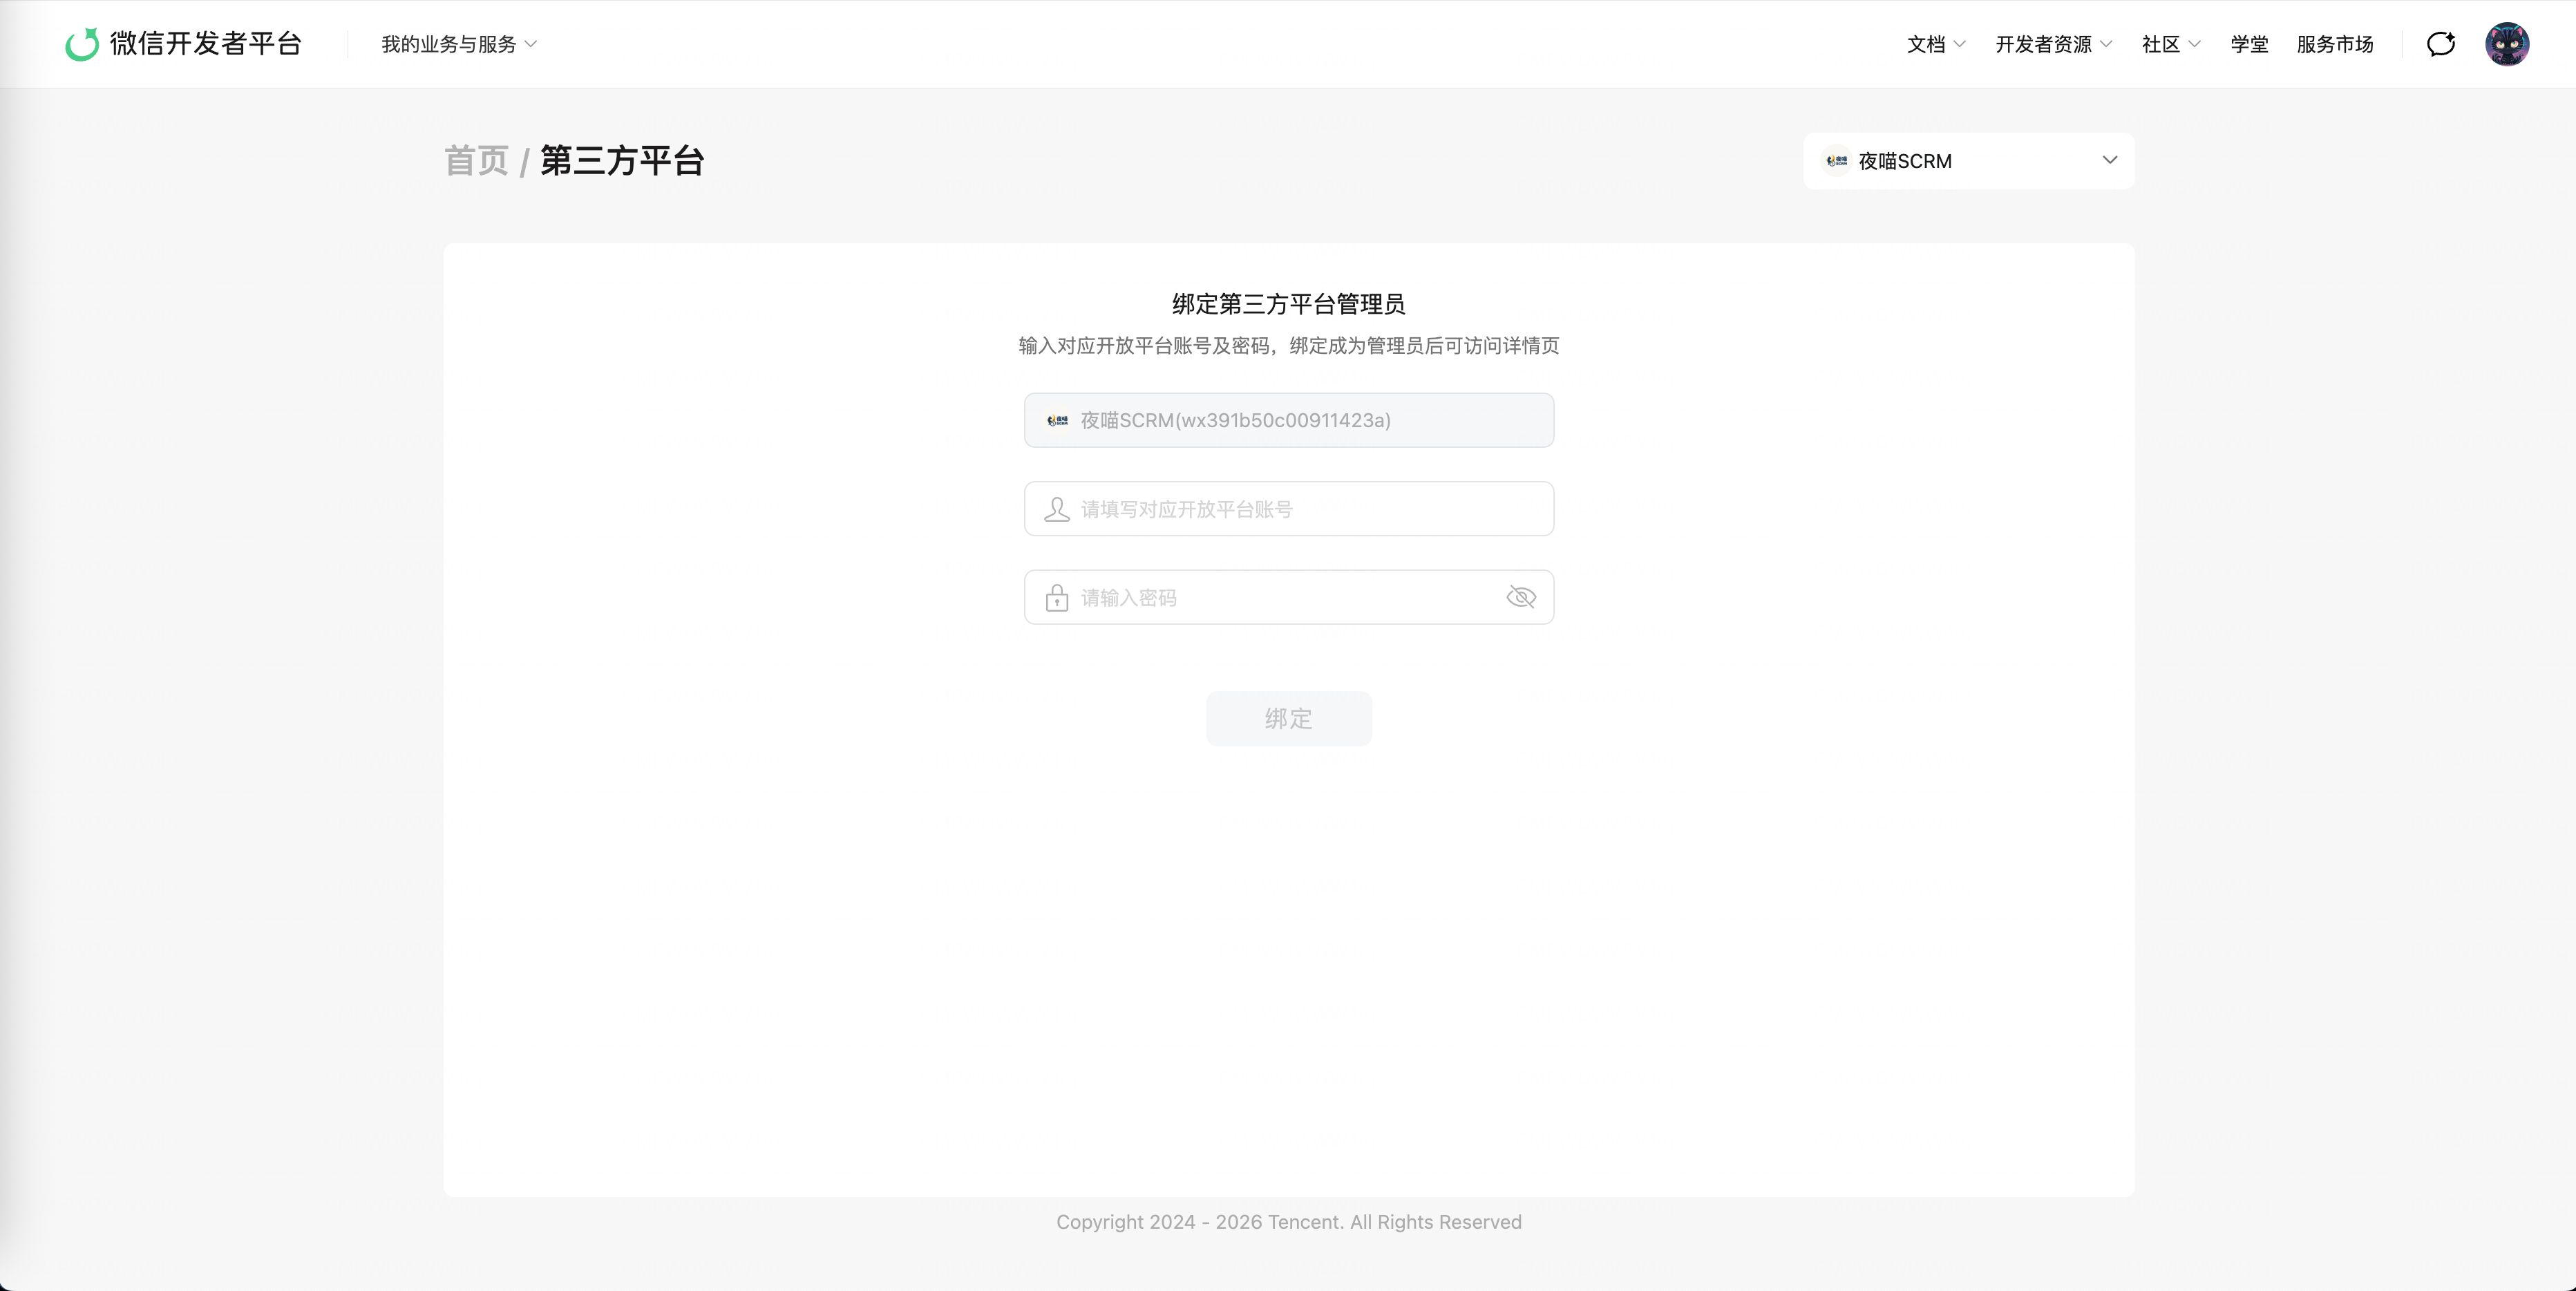
- 点击【添加权限集】,根据业务场景勾选所需权限:
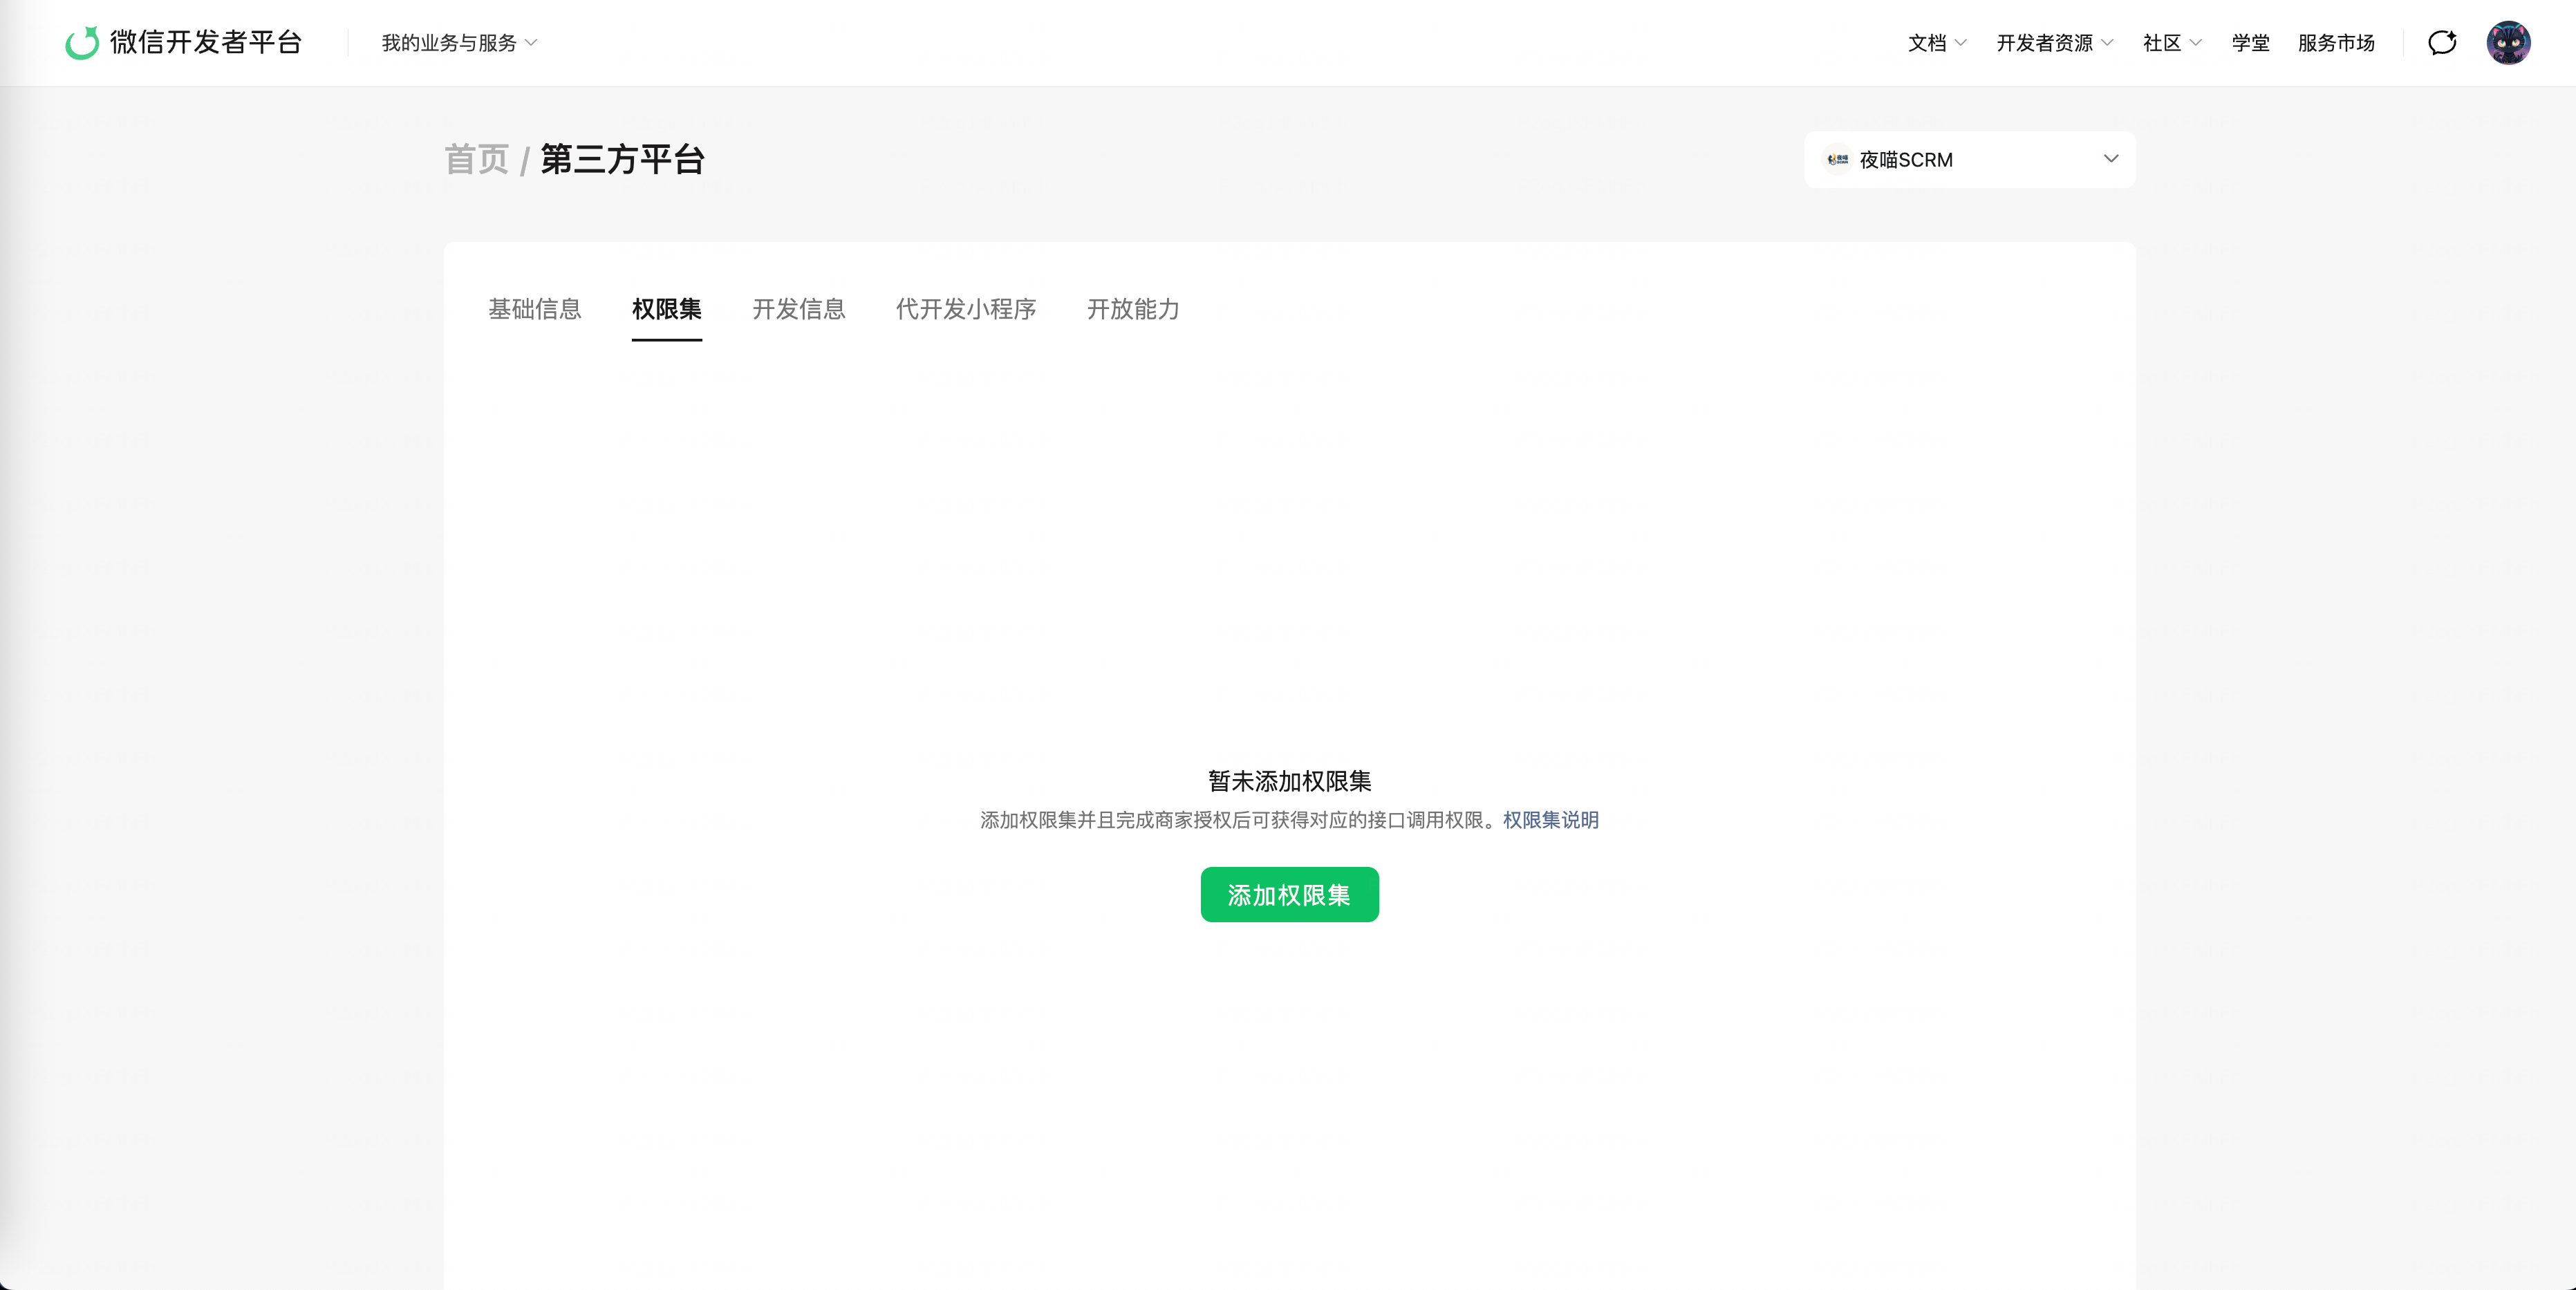
创建并配置完权限后,平台进入详情管理页。接下来在开放平台后台把关键开发参数一一配置齐全:
[微信开放平台后台详情页 - 关键配置一览]
   ├── 1. 记下凭据:开发者ID (AppId) & 开发者密码 (AppSecret)
   ├── 2. 配置白名单:把本地电脑的公网出口 IP 加入【IP白名单】
   ├── 3. 基础安全配置:消息校验Token & 消息加解密Key (EncodingAESKey)
   ├── 4. 核心回调配置:授权事件接收URL & 公众号消息接收URL
   └── 5. 开发沙箱配置:在【测试公众号列表】中绑定你的测试公众号
2.获取并保存开发者凭据(AppId / AppSecret)
- 开发者ID (AppId):也就是
ComponentAppID,直接复制保存。 - 开发者密码 (AppSecret):也就是
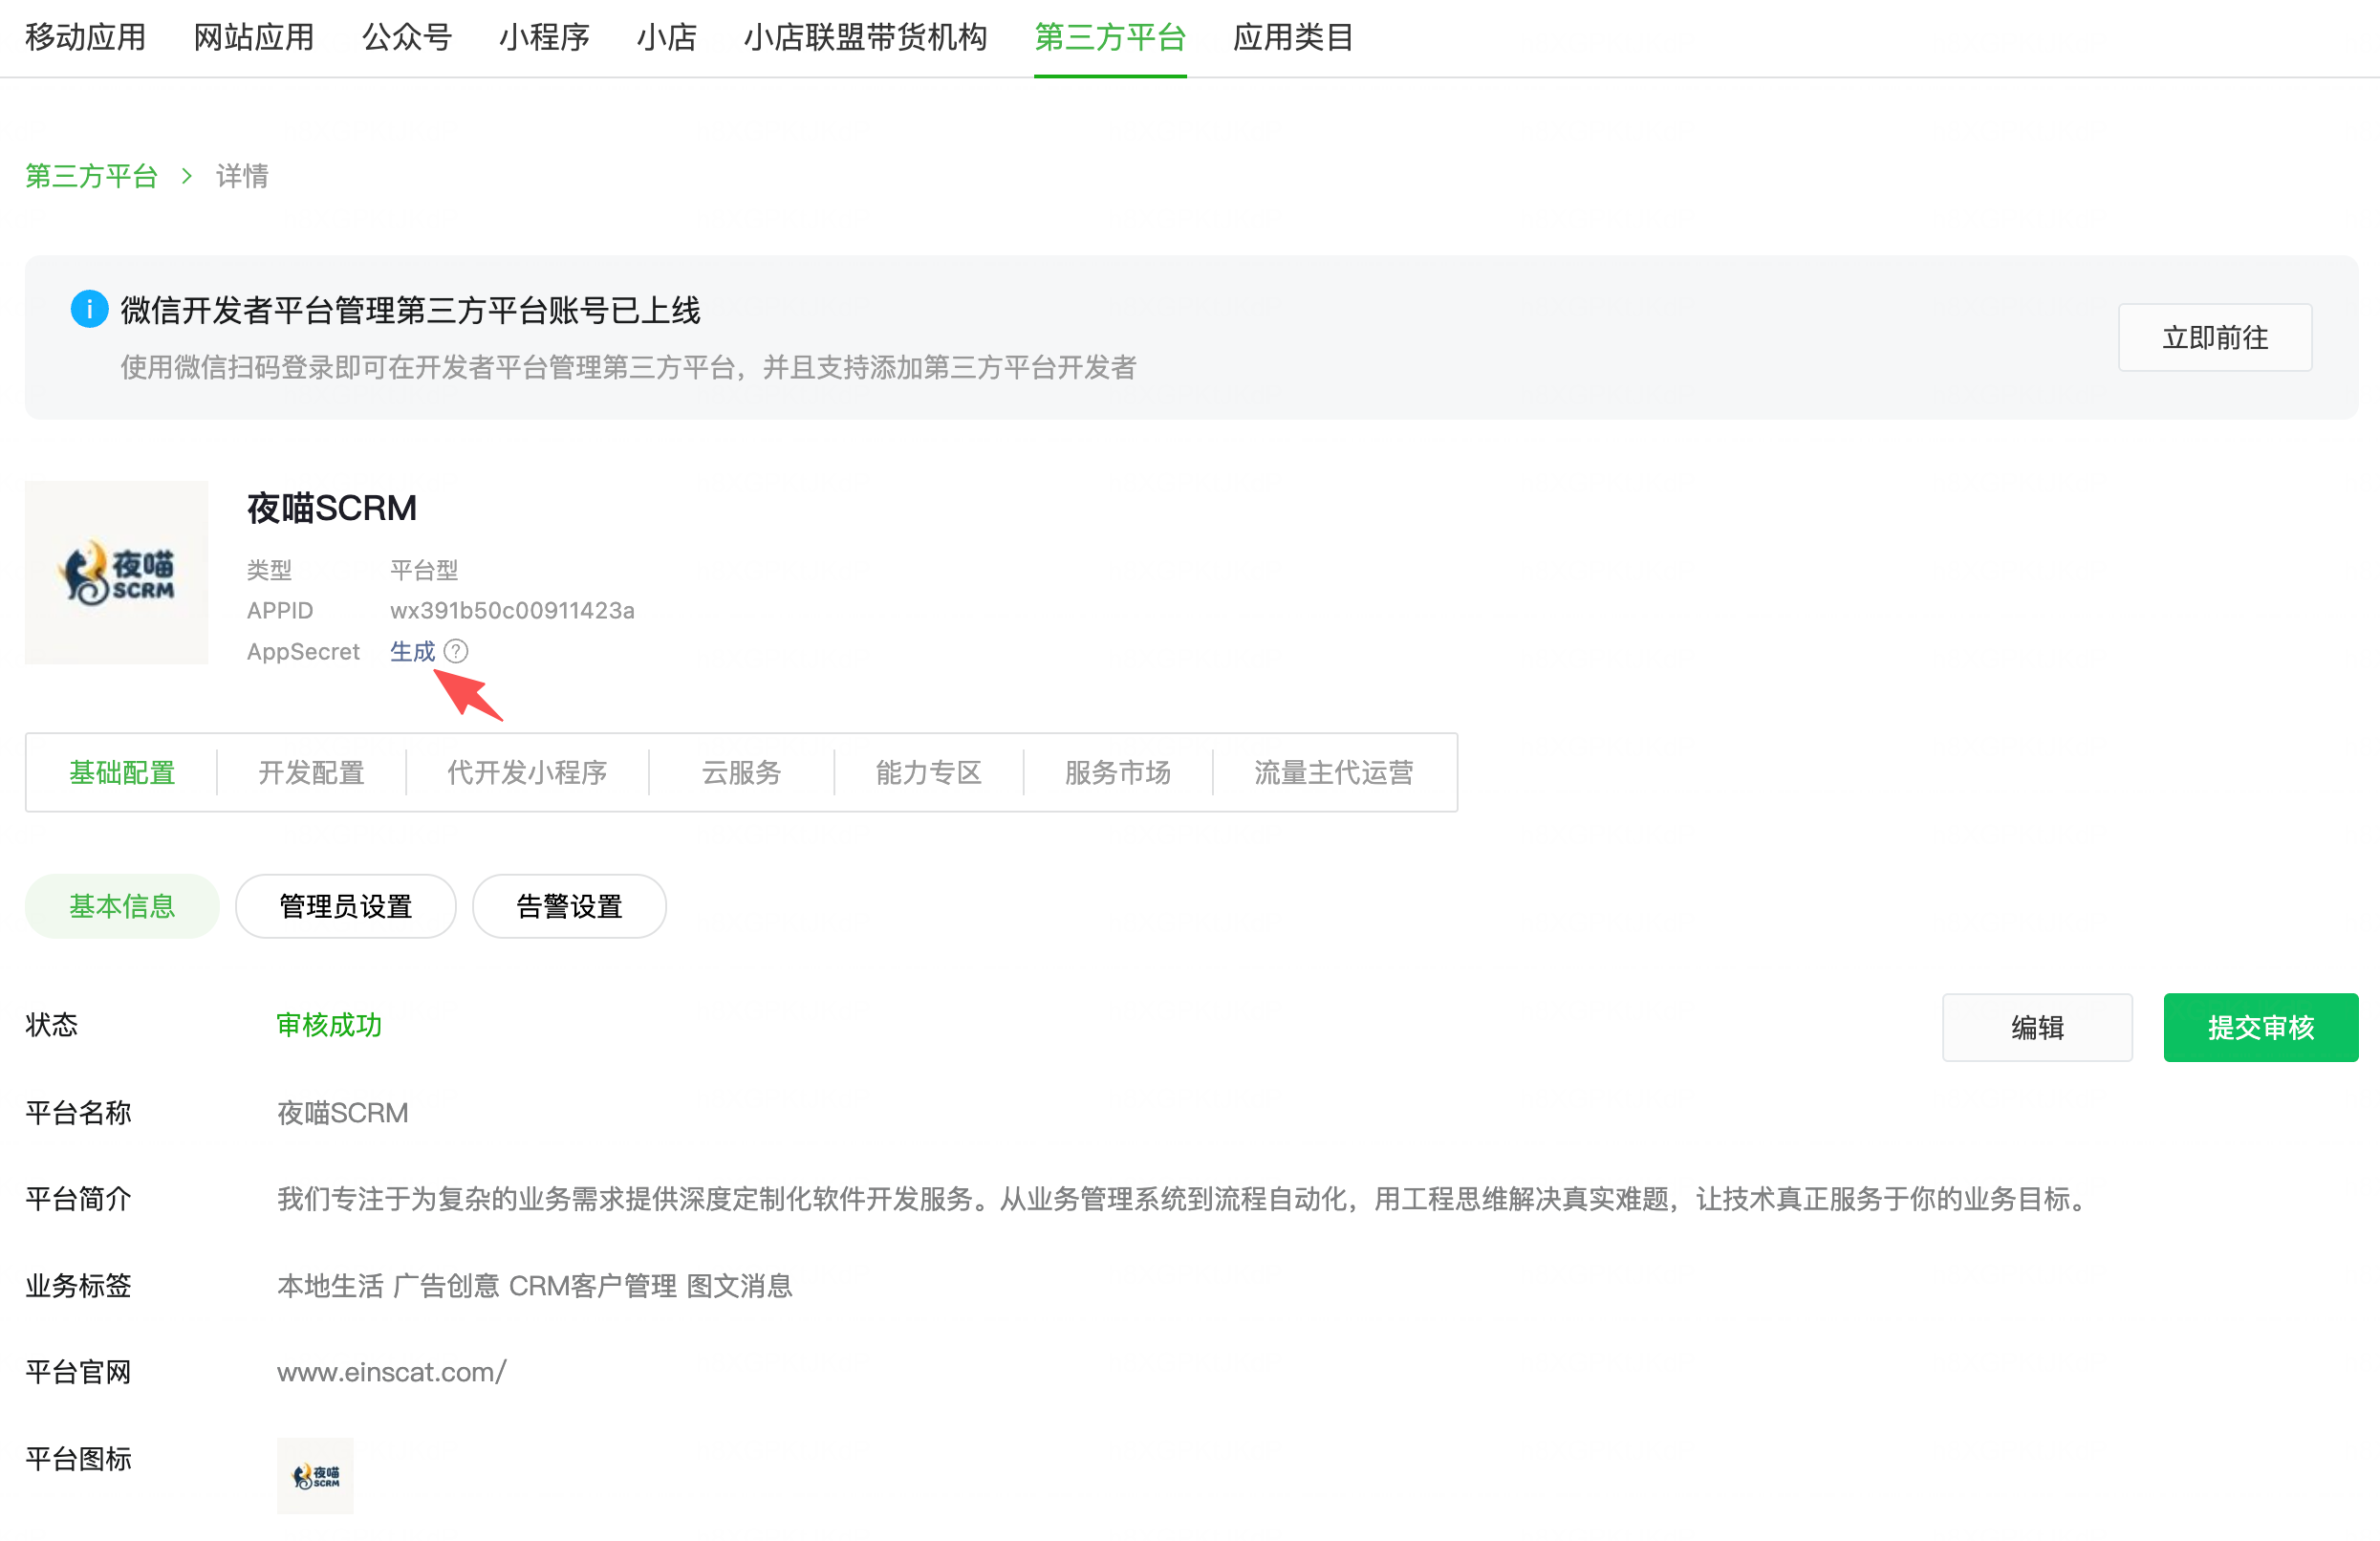
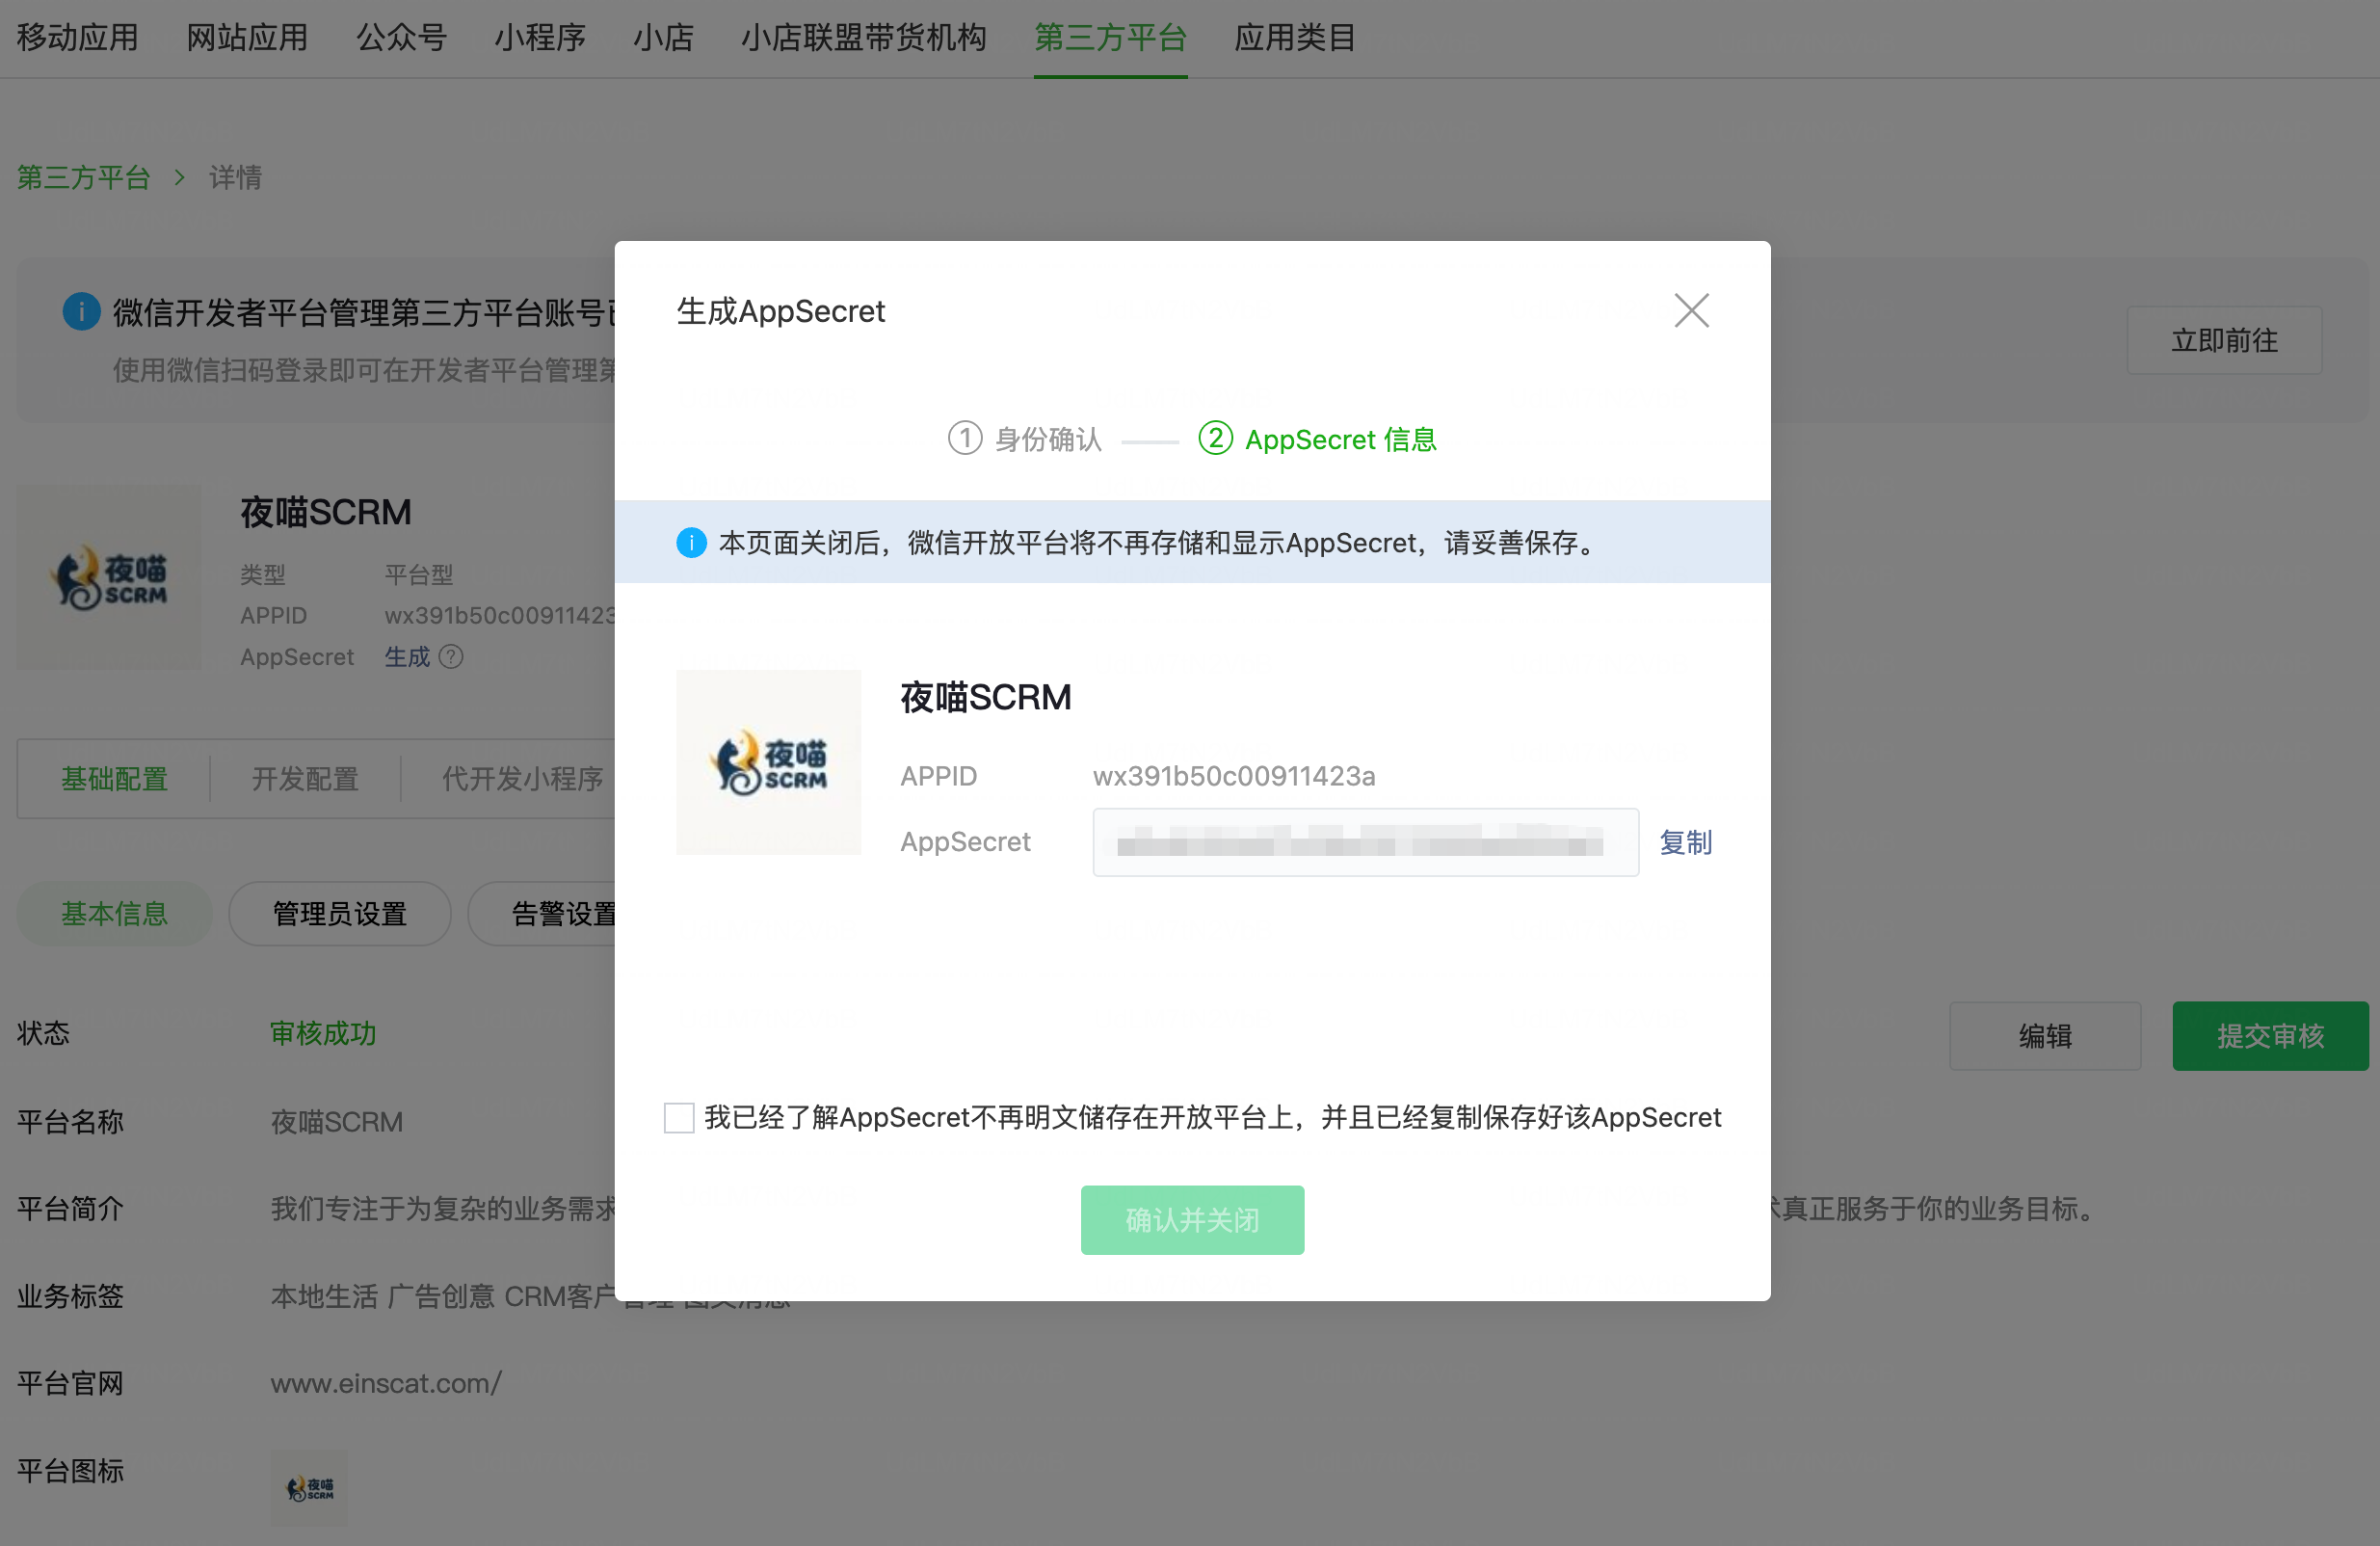
ComponentAppSecret。点击“生成”按钮,微信会让你用管理员微信扫码验证,验证通过后屏幕会展示一串 32 位的密钥。必须立刻复制保存! 微信只展示这一次,关掉窗口后就无法再查看,只能重置。
「详情」页面可以查看到 APPID,首次获取 AppSecret 需要在此页面中生成:
3.配置出口 IP 白名单(防 61004 / 40164 拦截)
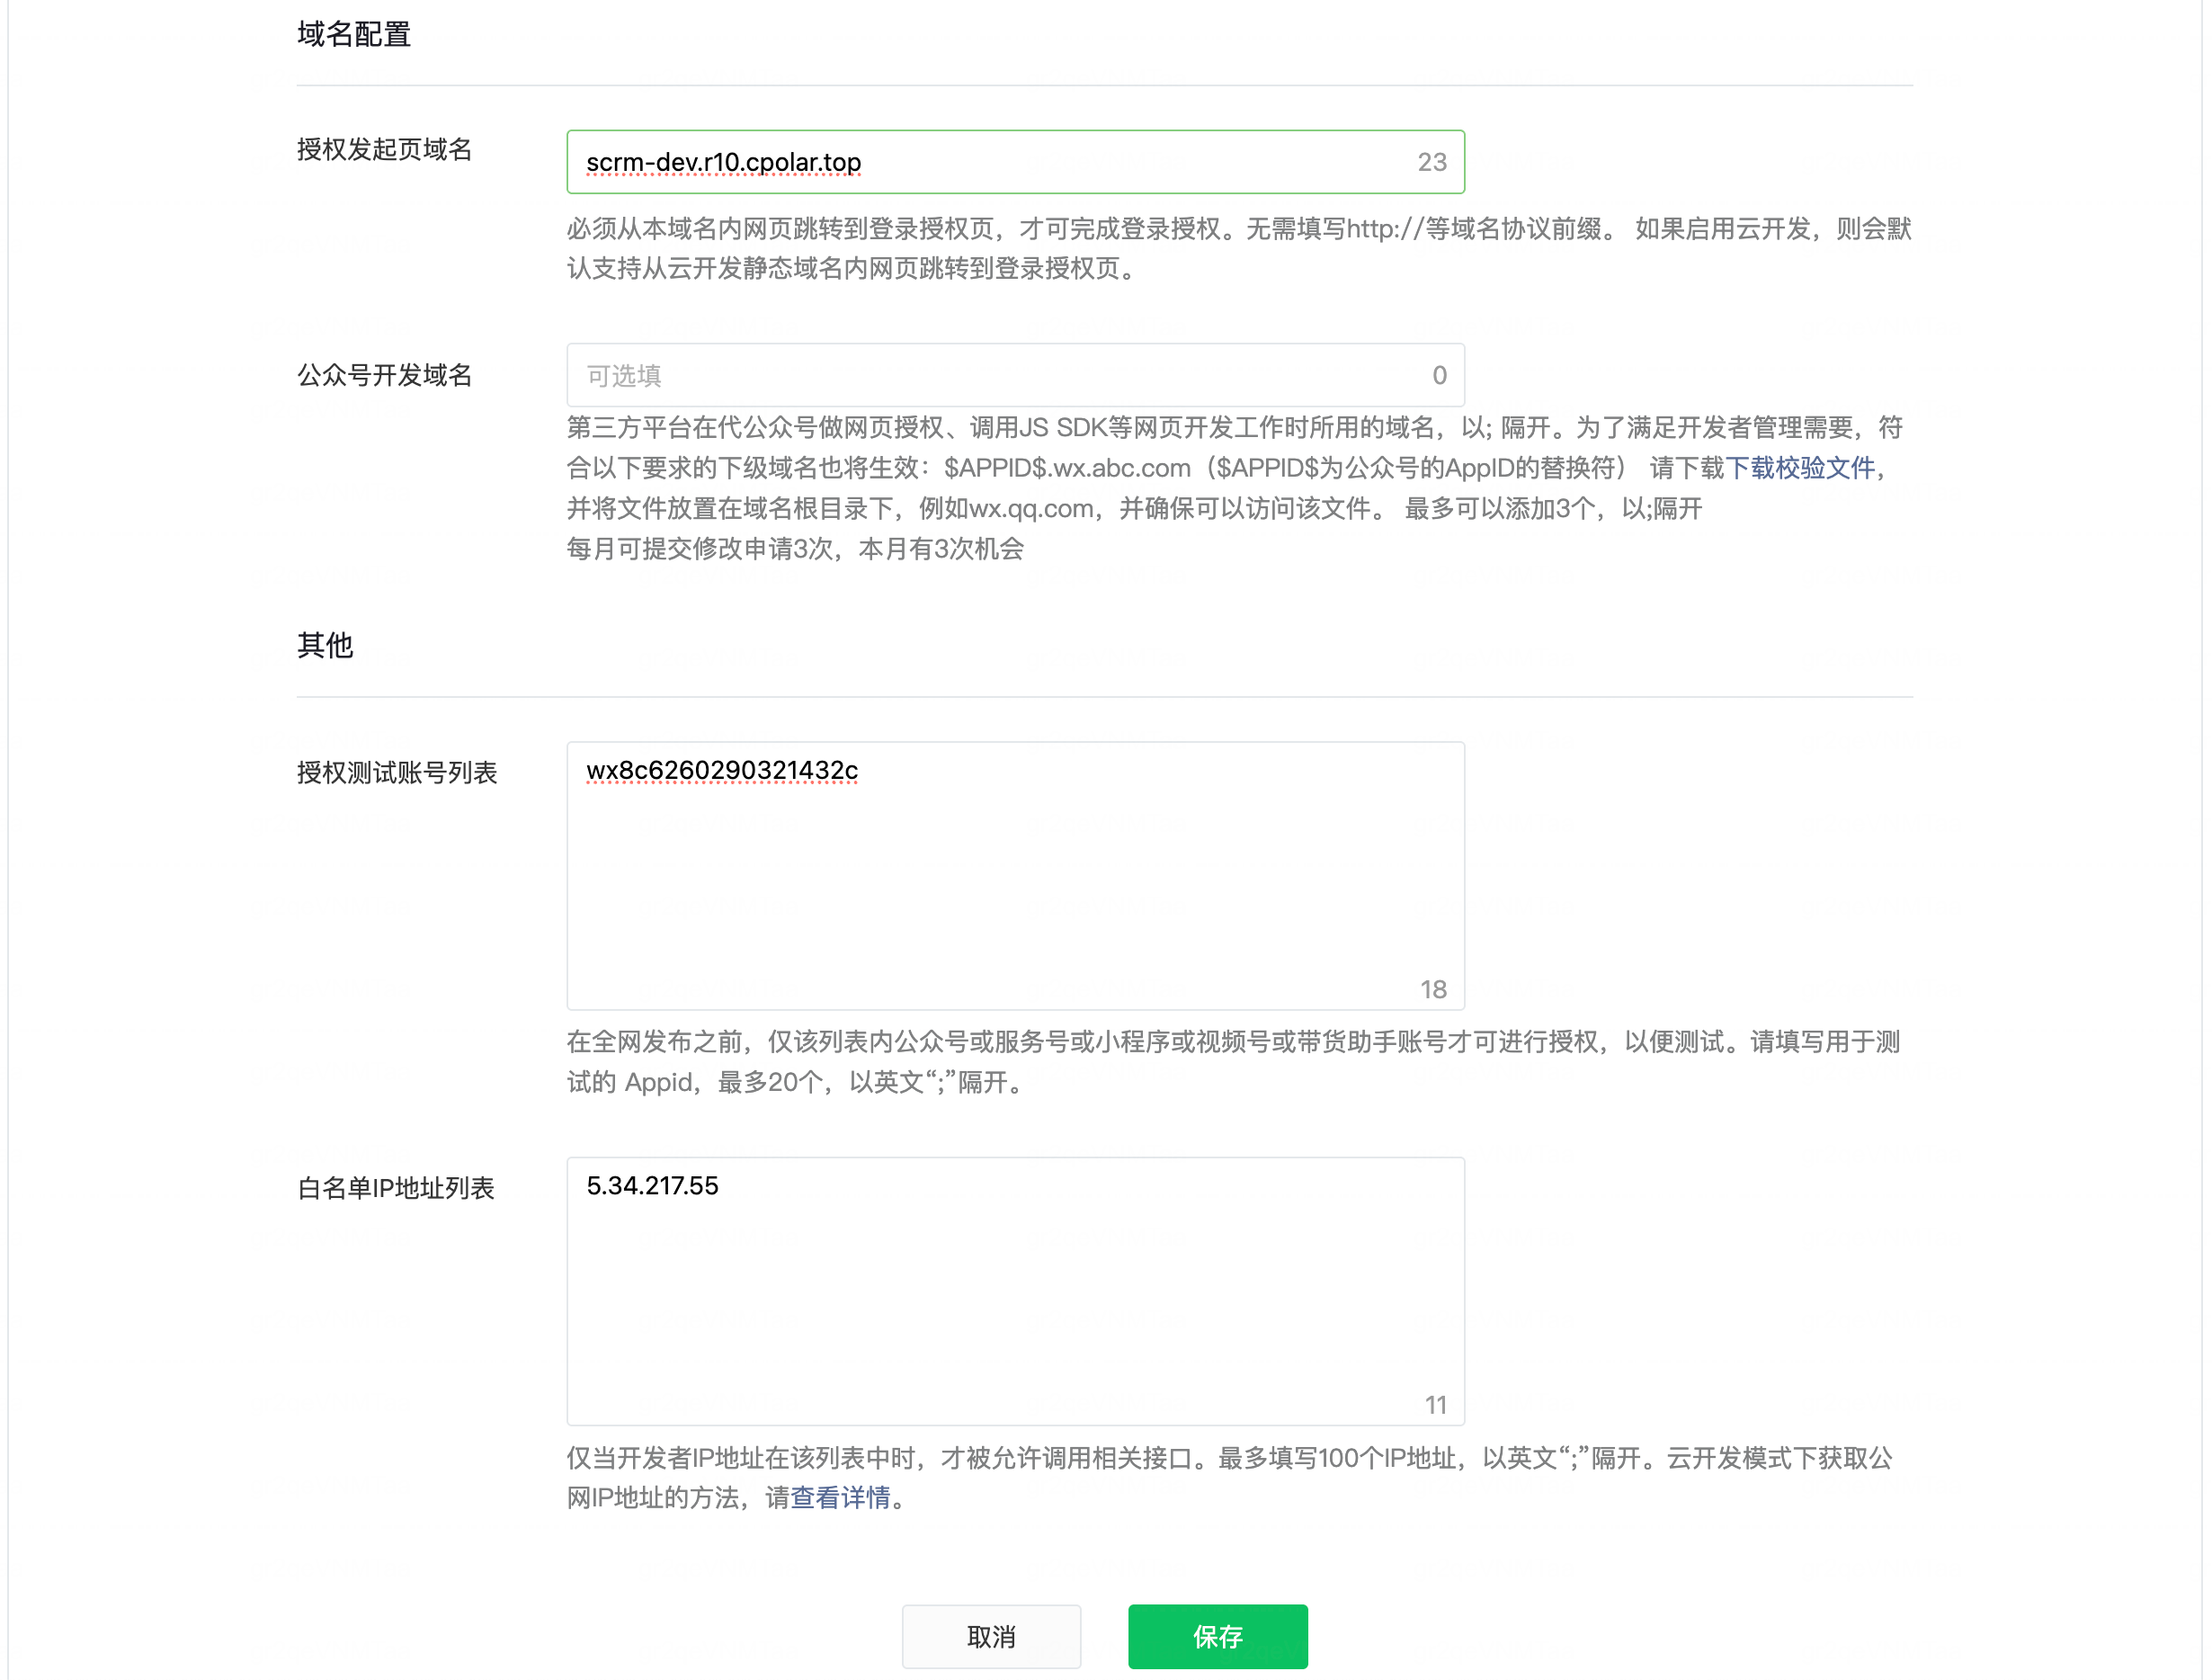
微信限制只有在白名单内的 IP 地址,才能调用获取 Token 的接口。
- 打开你的本地终端,查看你当前的公网出口 IP:
curl ifconfig.me # 会输出你的公网 IP,比如 114.88.23.45 - 回到开放平台后台找到 「详情」-「开发配置」-「开发资料」,点击编辑,在 【白名单IP地址列表】 中把这个 IP 填进去保存。
4.配置基础安全密钥(Token 与 EncodingAESKey)
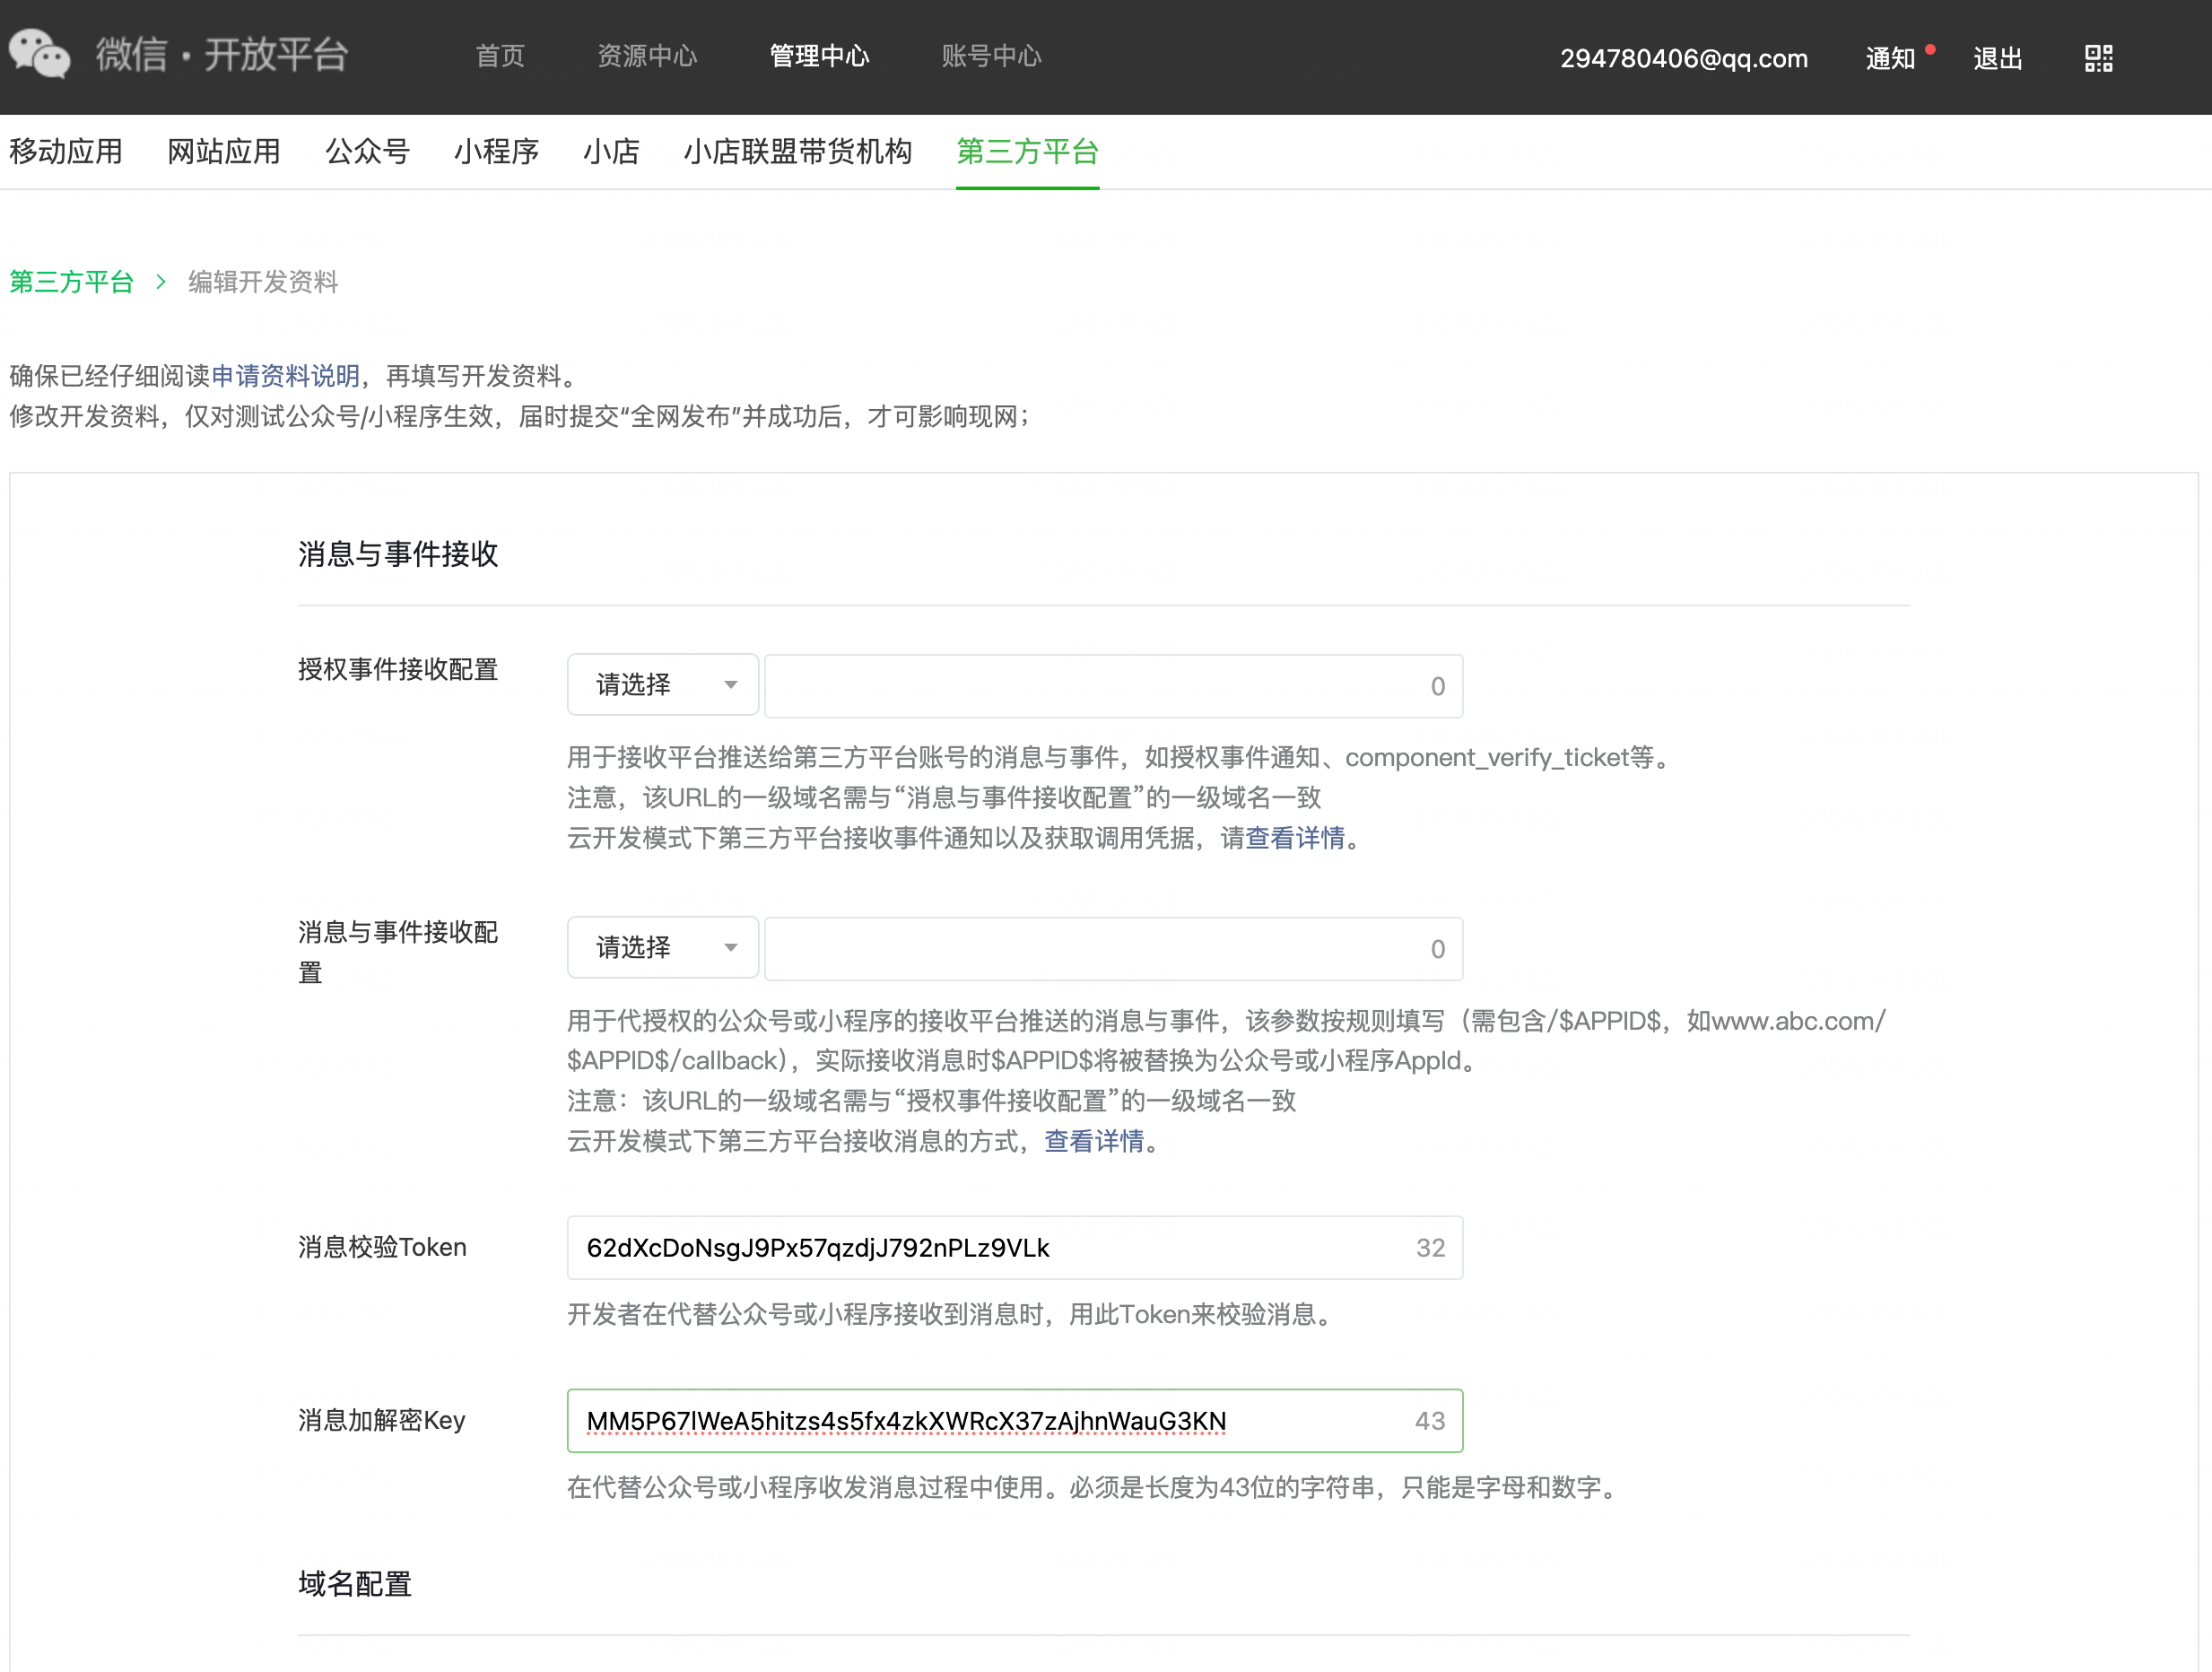
在 「详情」-「开发配置」-「开发资料」-「编辑开发资料」 下:
- 消息校验 Token:自己随意输入一串英文或数字(例如
my_scrm_token_2026)。 - 消息加解密 Key(EncodingAESKey):可以使用工具随机生成一串 43 位的密钥。
填写示例:
5.内网穿透与登记两大核心回调 URL
由于微信要把心跳 Ticket、授权结果以及被接管公众号的粉丝消息推送到你的电脑,所以需要用内网穿透把本地服务暴露出去。
5.1本地打开终端,启动内网穿透:
(注意:比如我的项目 config/dev.yaml 中配置的本地端口是 4307)
cpolar http 4307
终端会输出一个临时的 HTTPS 地址,例如:
Forwarding https://scrm-dev.r10.cpolar.top -> http://localhost:4307
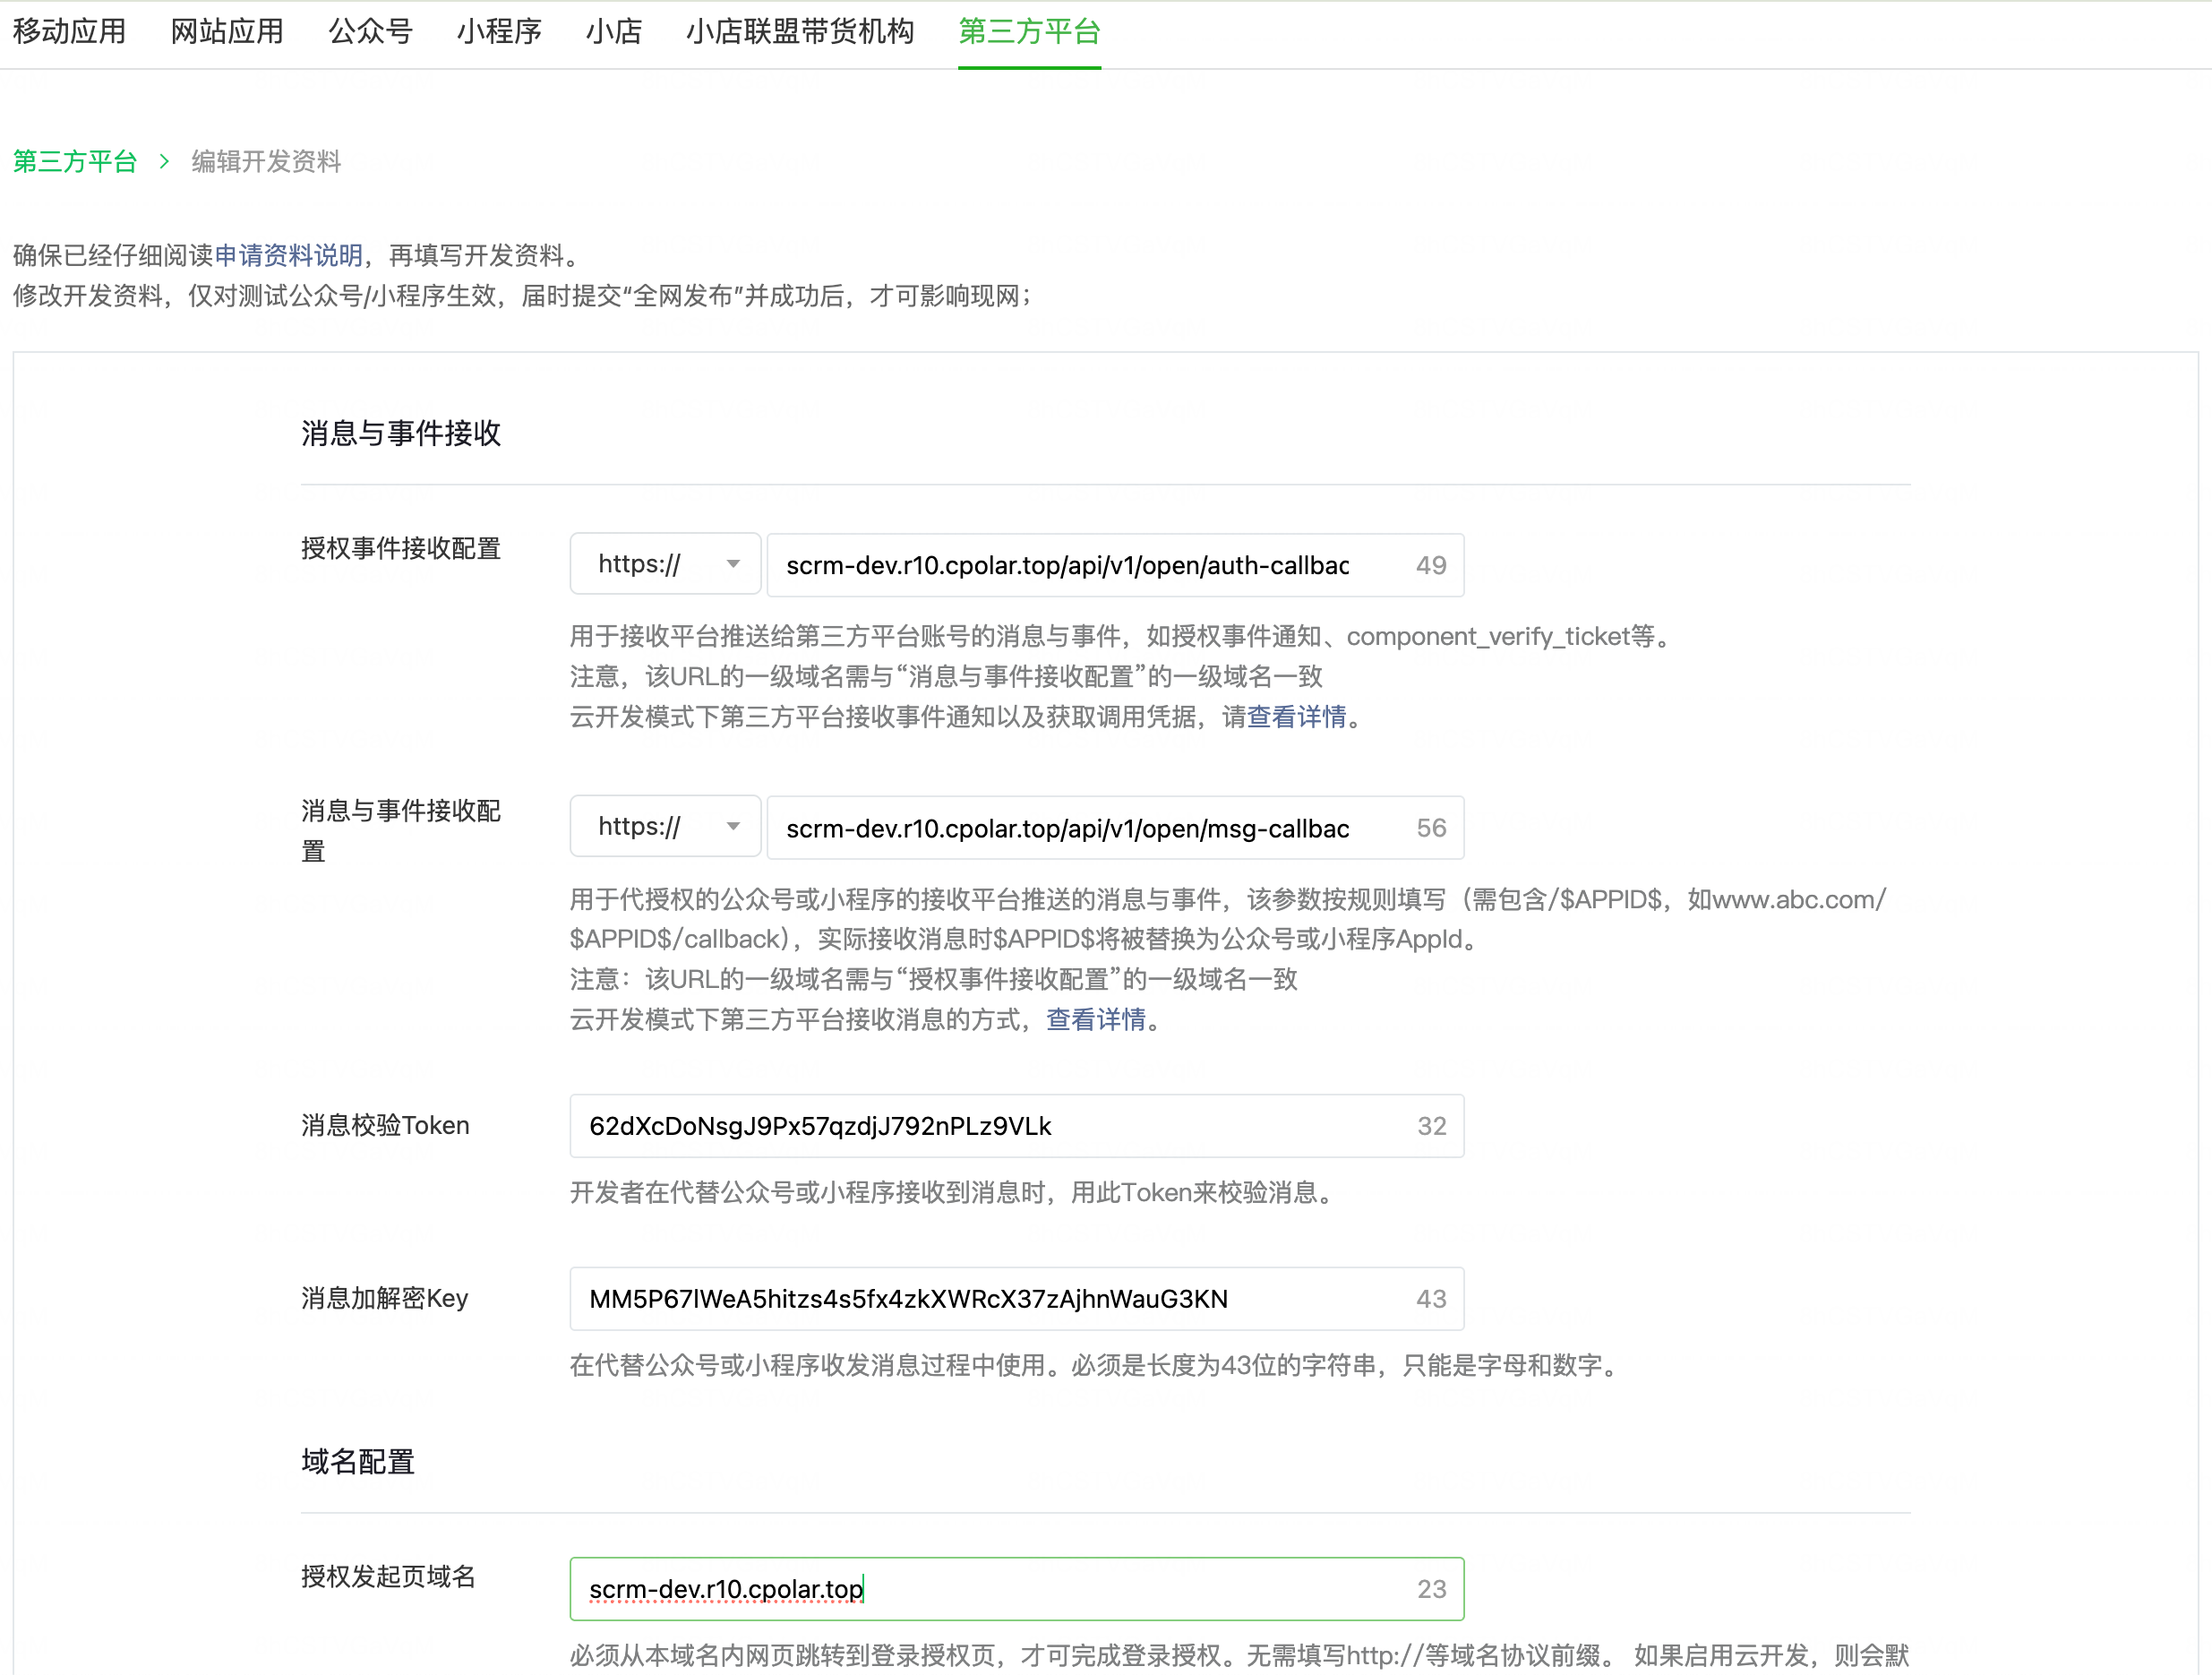
5.2回到微信后台填写以下 3 个输入框:
- 授权事件接收 URL:
- 必须填写,这是接收心跳 Ticket 和扫码授权结果的关键地址!
- 填入:
https://scrm-dev.r10.cpolar.top/v1/open/auth-callback
- 公众号开发域名 / 授权发起页域名:
- 填写你前端项目的域名(不需要加
https://)。 - 本地测试时,直接填你的穿透域名即可,例如:
scrm-dev.r10.cpolar.top
- 填写你前端项目的域名(不需要加
- 消息与事件接收配置:
- 点击添加或修改,URL 填入:
https://scrm-dev.r10.cpolar.top/v1/open/msg-callback/$APPID$注意:末尾的
$APPID$必须原样一字不差写上!微信在推流时,会自动把$APPID$替换成具体发生事件的公众号真实 AppID。
- 点击添加或修改,URL 填入:
6.添加授权测试公众号白名单(开发期防拦截必备)
刚创建的第三方平台属于 “开发中/未全网发布” 状态。
在微信规则中:未发布的平台,任何外来公众号扫码都会被拦截报错“该平台尚未全网发布,无法授权”。
微信专门为开发者开放了测试白名单:
- 在开放平台详情页找到 【授权测试账号列表】。
- 点击添加,把你平时自己用的测试公众号的微信号或**公众号原始ID(gh_xxxxxxxx)**填进去。
- 只有加到这个名单里的公众号,接下来测试扫码才能成功授权!
工程落地:服务配置与两大微信回调网关实现
完成微信开放平台的应用创建与参数配置后,微信官方实际上只向我们的服务端发起两类核心 HTTP POST 回调:
- 平台级授权事件回调:接收每 10 分钟一次的心跳票据
component_verify_ticket及商户授权变更通知。 - 业务级代管消息回调:接收所有被接管公众号的粉丝聊天消息与交互事件(URL 动态匹配
:appid)。
这两大网关是整个 SCRM 系统运作的底层基础设施,我们在发起商户扫码前,必须先在服务端将这两套接收与分发链路搭建就绪。
1.服务配置注入 (config/dev.yaml)
回到本地代码仓库,打开 config/dev.yaml,将你在开放平台后台获取的凭证与密钥一一填入:
open_platform:
  app_id: "wx58xxxxxxxxxxxxxx"                   # 开发者ID (AppId)
  app_secret: "22a91933f4664a4119118bfd2dacd489" # 开发者密码 (AppSecret)
  token: "my_scrm_token_2026"                    # 消息校验 Token
  encoding_aes_key: "xxx"                        # 消息加解密 Key (EncodingAESKey)
2.网关一:授权事件与心跳 Ticket 接收网关(平台生命线)
这是整个系统的生命线:只有稳定接收并解密微信推过来的 component_verify_ticket,后端才能换取到后续所有接口必需的 component_access_token。微信服务器推过来的 XML 报文是经过 AES 加密的,后端必须使用创建平台时配置的 Token 和 EncodingAESKey 完成验签与解密。
2.1路由层:接收微信推送事件 (web/openplatform.go)
// ReceiveAuthEvent 处理微信推送的 component_verify_ticket 及授权变更事件
func (h *OpenPlatformHandler) ReceiveAuthEvent(ctx *gin.Context) {
	msgSignature := ctx.Query("msg_signature")
	timestamp := ctx.Query("timestamp")
	nonce := ctx.Query("nonce")

	body, err := io.ReadAll(ctx.Request.Body)
	if err != nil {
		h.l.Error("读取授权事件请求体失败", zap.Error(err))
		ctx.String(http.StatusBadRequest, "fail")
		return
	}

	event, err := h.svc.ReceiveVerifyTicket(ctx, msgSignature, timestamp, nonce, body)
	if err != nil {
		h.l.Warn("解析授权事件失败", zap.Error(err))
		ctx.String(http.StatusOK, "success") // 无论成功失败均回复 success,避免微信重发风暴
		return
	}

	h.l.Info("处理微信开放平台授权事件成功", zap.String("infoType", event.InfoType))
	ctx.String(http.StatusOK, "success")
}
2.2业务层:解密并将 Ticket 写入 Redis (service/openplatform.go)
// TicketXML 微信开放平台推送事件报文结构
type TicketXML struct {
	XMLName               xml.Name `xml:"xml"`
	AppId                 string   `xml:"AppId"`
	CreateTime            int64    `xml:"CreateTime"`
	InfoType              string   `xml:"InfoType"`
	ComponentVerifyTicket string   `xml:"ComponentVerifyTicket"`
	AuthorizerAppid       string   `xml:"AuthorizerAppid"`
	AuthorizationCode     string   `xml:"AuthorizationCode"`
}

func (s *openPlatformService) ReceiveVerifyTicket(ctx context.Context, msgSignature, timestamp, nonce string, encryptedXML []byte) (*TicketXML, error) {
	appID := s.cfg.OpenPlatform.AppId
	token := s.cfg.OpenPlatform.Token
	aesKey := s.cfg.OpenPlatform.EncodingAESKey

	// 1. 初始化微信加解密工具包
	crypt, err := crypto.NewWXBizMsgCrypt(token, aesKey, appID)
	if err != nil {
		return nil, fmt.Errorf("create wxbizmsgcrypt failed: %w", err)
	}

	// 2. 验签并解密 XML 载荷
	decrypted, err := crypt.DecryptMsg(msgSignature, timestamp, nonce, encryptedXML)
	if err != nil {
		return nil, fmt.Errorf("decrypt msg failed: %w", err)
	}

	var event TicketXML
	if err := xml.Unmarshal(decrypted, &event); err != nil {
		return nil, fmt.Errorf("unmarshal decrypted ticket xml failed: %w", err)
	}

	// 3. 提取 component_verify_ticket 并持久化至 Redis(缓存 12 小时滚动更新)
	if event.InfoType == "component_verify_ticket" && event.ComponentVerifyTicket != "" {
		s.l.Info("成功接收并解析微信 component_verify_ticket", zap.String("appId", event.AppId))
		if err := s.repo.SetVerifyTicket(ctx, event.AppId, event.ComponentVerifyTicket, 12*time.Hour); err != nil {
			s.l.Error("保存 component_verify_ticket 至缓存失败", zap.Error(err))
			return &event, err
		}
	}

	return &event, nil
}
加解密:
package crypto

import (
	"bytes"
	"crypto/aes"
	"crypto/cipher"
	"crypto/rand"
	"crypto/sha1"
	"encoding/base64"
	"encoding/binary"
	"encoding/hex"
	"encoding/xml"
	"errors"
	"fmt"
	"io"
	"sort"
)

// CDATA 结构
type CDATA struct {
	Value string `xml:",cdata"`
}

// EncryptedXMLMsg 微信加密 XML 消息通用外层结构
type EncryptedXMLMsg struct {
	XMLName    xml.Name `xml:"xml"`
	ToUserName string   `xml:"ToUserName"`
	AppId      string   `xml:"AppId"`
	Encrypt    string   `xml:"Encrypt"`
}

// ResponseXMLMsg 被动回复加密 XML 结构
type ResponseXMLMsg struct {
	XMLName      xml.Name `xml:"xml"`
	Encrypt      CDATA    `xml:"Encrypt"`
	MsgSignature CDATA    `xml:"MsgSignature"`
	TimeStamp    string   `xml:"TimeStamp"`
	Nonce        CDATA    `xml:"Nonce"`
}

// WXBizMsgCrypt 微信消息加解密处理器
type WXBizMsgCrypt struct {
	token          string
	encodingAESKey string
	appID          string
	aesKey         []byte
}

func NewWXBizMsgCrypt(token, encodingAESKey, appID string) (*WXBizMsgCrypt, error) {
	if len(encodingAESKey) != 43 {
		return nil, errors.New("EncodingAESKey 长度必须为 43 位")
	}
	aesKey, err := base64.StdEncoding.DecodeString(encodingAESKey + "=")
	if err != nil {
		return nil, fmt.Errorf("decode aesKey failed: %w", err)
	}
	return &WXBizMsgCrypt{
		token:          token,
		encodingAESKey: encodingAESKey,
		appID:          appID,
		aesKey:         aesKey,
	}, nil
}

// CalcSignature 计算微信签名
func CalcSignature(token, timestamp, nonce, msgEncrypt string) string {
	params := []string{token, timestamp, nonce, msgEncrypt}
	sort.Strings(params)
	h := sha1.New()
	for _, p := range params {
		h.Write([]byte(p))
	}
	return hex.EncodeToString(h.Sum(nil))
}

// VerifySignature 验证签名
func (c *WXBizMsgCrypt) VerifySignature(msgSignature, timestamp, nonce, msgEncrypt string) bool {
	sig := CalcSignature(c.token, timestamp, nonce, msgEncrypt)
	return sig == msgSignature
}

// DecryptMsg 解密微信加密报文,返回明文字节
func (c *WXBizMsgCrypt) DecryptMsg(msgSignature, timestamp, nonce string, postData []byte) ([]byte, error) {
	var encMsg EncryptedXMLMsg
	if err := xml.Unmarshal(postData, &encMsg); err != nil {
		return nil, fmt.Errorf("unmarshal encrypted xml failed: %w", err)
	}

	if !c.VerifySignature(msgSignature, timestamp, nonce, encMsg.Encrypt) {
		return nil, errors.New("signature verification failed")
	}

	cipherBytes, err := base64.StdEncoding.DecodeString(encMsg.Encrypt)
	if err != nil {
		return nil, fmt.Errorf("base64 decode encrypt failed: %w", err)
	}

	block, err := aes.NewCipher(c.aesKey)
	if err != nil {
		return nil, fmt.Errorf("aes new cipher failed: %w", err)
	}

	if len(cipherBytes) < aes.BlockSize || len(cipherBytes)%aes.BlockSize != 0 {
		return nil, errors.New("cipher text length is invalid")
	}

	iv := c.aesKey[:16]
	mode := cipher.NewCBCDecrypter(block, iv)
	plainBytes := make([]byte, len(cipherBytes))
	mode.CryptBlocks(plainBytes, cipherBytes)

	// PKCS#7 unpad
	plainBytes = pkcs7Unpad(plainBytes)
	if len(plainBytes) < 20 {
		return nil, errors.New("plain text length too short")
	}

	// 报文结构: 16B 随机字符串 + 4B msg_len (网络字节序) + msg + appid
	msgLen := binary.BigEndian.Uint32(plainBytes[16:20])
	totalLen := len(plainBytes)
	if totalLen < 20+int(msgLen) {
		return nil, errors.New("invalid msg len in decrypted content")
	}

	xmlContent := plainBytes[20 : 20+msgLen]
	appIDFromMsg := string(plainBytes[20+msgLen:])

	if c.appID != "" && appIDFromMsg != c.appID {
		return nil, fmt.Errorf("appID mismatch: expected %s, got %s", c.appID, appIDFromMsg)
	}

	return xmlContent, nil
}

// EncryptMsg 加密回复明文并组装成加密 XML
func (c *WXBizMsgCrypt) EncryptMsg(replyXML []byte, timestamp, nonce string) ([]byte, error) {
	rand16 := make([]byte, 16)
	if _, err := io.ReadFull(rand.Reader, rand16); err != nil {
		return nil, fmt.Errorf("generate random bytes failed: %w", err)
	}

	msgLenBytes := make([]byte, 4)
	binary.BigEndian.PutUint32(msgLenBytes, uint32(len(replyXML)))

	var rawBuf bytes.Buffer
	rawBuf.Write(rand16)
	rawBuf.Write(msgLenBytes)
	rawBuf.Write(replyXML)
	rawBuf.WriteString(c.appID)

	padded := pkcs7Pad(rawBuf.Bytes(), aes.BlockSize)

	block, err := aes.NewCipher(c.aesKey)
	if err != nil {
		return nil, fmt.Errorf("aes new cipher failed: %w", err)
	}

	iv := c.aesKey[:16]
	mode := cipher.NewCBCEncrypter(block, iv)
	cipherText := make([]byte, len(padded))
	mode.CryptBlocks(cipherText, padded)

	encryptB64 := base64.StdEncoding.EncodeToString(cipherText)
	signature := CalcSignature(c.token, timestamp, nonce, encryptB64)

	res := ResponseXMLMsg{
		Encrypt:      CDATA{Value: encryptB64},
		MsgSignature: CDATA{Value: signature},
		TimeStamp:    timestamp,
		Nonce:        CDATA{Value: nonce},
	}

	return xml.MarshalIndent(res, "", "  ")
}

func pkcs7Pad(data []byte, blockSize int) []byte {
	padding := blockSize - len(data)%blockSize
	padText := bytes.Repeat([]byte{byte(padding)}, padding)
	return append(data, padText...)
}

func pkcs7Unpad(data []byte) []byte {
	length := len(data)
	if length == 0 {
		return nil
	}
	padding := int(data[length-1])
	if padding > length || padding > 32 || padding == 0 {
		return data
	}
	return data[:length-padding]
}
2.3Repository 抽象存储层与 Cache 实现
func (r *openPlatformRepository) SetVerifyTicket(ctx context.Context, platformAppID, ticket string, ttl time.Duration) error {
	return r.cache.SetVerifyTicket(ctx, platformAppID, ticket, ttl)
}

func (c *openPlatformCache) SetVerifyTicket(ctx context.Context, platformAppID, ticket string, ttl time.Duration) error {
	key := fmt.Sprintf("scrm:open:ticket:%s", platformAppID)
	return c.redis.Set(ctx, key, ticket, ttl).Err()
}
2.4凭据基石:换取平台令牌 component_access_token
一旦有了 Ticket,平台就可以调微信接口换取 component_access_token。为了防高并发击穿,采用 singleflight 锁保护:
func (s *openPlatformService) GetComponentAccessToken(ctx context.Context, platformAppID string) (string, error) {
	if platformAppID == "" {
		platformAppID = s.cfg.OpenPlatform.AppId
	}

	// 1. 优先查缓存
	token, err := s.repo.GetComponentAccessToken(ctx, platformAppID)
	if err == nil && token != "" {
		return token, nil
	}

	// 2. singleflight 保护并发请求,避免同一时间打穿微信接口
	val, err, _ := s.sf.Do("component_token:"+platformAppID, func() (any, error) {
		token, err := s.repo.GetComponentAccessToken(ctx, platformAppID)
		if err == nil && token != "" {
			return token, nil
		}

		ticket, err := s.repo.GetVerifyTicket(ctx, platformAppID)
		if err != nil || ticket == "" {
			return "", fmt.Errorf("未获取到 component_verify_ticket,请等待微信推送: %w", err)
		}

		reqBody, _ := json.Marshal(map[string]string{
			"component_appid":         platformAppID,
			"component_appsecret":     s.cfg.OpenPlatform.AppSecret,
			"component_verify_ticket": ticket,
		})

		url := "https://api.weixin.qq.com/cgi-bin/component/api_component_token"
		resp, err := s.httpClient.Post(url, "application/json", bytes.NewReader(reqBody))
		if err != nil {
			return "", fmt.Errorf("request api_component_token failed: %w", err)
		}
		defer resp.Body.Close()

		body, _ := io.ReadAll(resp.Body)
		var res struct {
			ComponentAccessToken string `json:"component_access_token"`
			ExpiresIn            int    `json:"expires_in"`
			ErrCode              int    `json:"errcode"`
			ErrMsg               string `json:"errmsg"`
		}
		_ = json.Unmarshal(body, &res)
		if res.ErrCode != 0 || res.ComponentAccessToken == "" {
			return "", fmt.Errorf("wechat api_component_token error [%d]: %s", res.ErrCode, res.ErrMsg)
		}

		// 提前 200 秒过期以平滑续期
		ttl := time.Duration(res.ExpiresIn-200) * time.Second
		_ = s.repo.SetComponentAccessToken(ctx, platformAppID, res.ComponentAccessToken, ttl)
		return res.ComponentAccessToken, nil
	})

	if err != nil {
		return "", err
	}
	return val.(string), nil
}
2.5启动服务与心跳联通状态验证
确保本地 Redis(localhost:6379)和 MySQL 已经启动,然后启动本地服务(默认端口 4307)。
微信服务器每隔 10 分钟会自动向你的 https://你的域名/v1/open/auth-callback 发送一次心跳 POST 请求。
快速触发心跳技巧:在微信开放平台后台,随便修改一下任意无关配置并点击保存,微信服务器就会立即向你的回调接口主动推送一次测试报文!
查看本地服务终端日志,应该能看到:
2026-09-05T01:48:58.587+0800 INFO service/openplatform.go:100 成功接收并解析微信 component_verify_ticket {"appId": "wx391b50c00911423a"} 2026-09-05T01:48:58.599+0800 INFO web/openplatform.go:75 处理微信开放平台授权事件成功 {"infoType": "component_verify_ticket"} [GIN] 2026/09/05 - 01:48:58 | 200 | 113.86ms | 101.35.214.209 | POST "/v1/open/auth-callback?signature=fb9ee37d39bdff141b8b68ecd53f014f79163b97×tamp=1788544138&nonce=1611377474&encrypt_type=aes&msg_signature=d4438745e75a84aaf0c0fde4909039378e9766df"查看 Redis: 打开 Redis 客户端,执行:
KEYS scrm:open:*
# 会看到键:scrm:open:ticket:wx58xxxxxxxxxxxxxx
GET scrm:open:ticket:wx58xxxxxxxxxxxxxx
# 会输出一串以 ticket@@@ 开头的字符串
👉 看到这一步,说明你的平台授权事件与心跳接收网关已经彻底与微信官方接通了!
3.网关二:代管公众号粉丝消息与事件分发网关(业务生命线)
商户公众号被授权给平台后,微信会将粉丝在该公众号里的所有交互推送到我们在后台登记的 https://你的域名/v1/open/msg-callback/$APPID$。这是 SCRM 实现粉丝画像、智能自动回复、菜单点击统计等业务的核心入口。
3.1消息推送机制与 5 秒超时规范
- URL 动态解析:微信在推流时会自动将
$APPID$替换为具体发生事件的公众号真实 AppID,发起请求:POST /v1/open/msg-callback/wx_authorizer_appid?msg_signature=xxx×tamp=xxx&nonce=xxx - 对称密文传输:推送消息体同样采用 AES 加密,使用的加解密密钥仍是第三方平台的
Token、EncodingAESKey和ComponentAppID。 - 5 秒极速回复:微信要求接收端必须在 5 秒内回复
success或空字符串,超时将触发 3 次重发,极易引发服务雪崩。因此必须采用非阻塞架构。
3.2路由与 Web 控制器实现 (web/openplatform.go)
// 注册微信消息接收端点,:appid 动态捕获当前触发事件的公众号 AppID
g.POST("/msg-callback/:appid", h.ReceiveMessage)

// ReceiveMessage 接收授权公众号的粉丝消息与事件推送
func (h *OpenPlatformHandler) ReceiveMessage(ctx *gin.Context) {
	authorizerAppID := ctx.Param("appid")
	msgSignature := ctx.Query("msg_signature")
	timestamp := ctx.Query("timestamp")
	nonce := ctx.Query("nonce")

	body, err := io.ReadAll(ctx.Request.Body)
	if err != nil {
		h.l.Error("读取微信公众号消息请求体失败", zap.String("authorizerAppID", authorizerAppID), zap.Error(err))
		ctx.String(http.StatusBadRequest, "fail")
		return
	}

	h.l.Debug("接收到微信公众号消息推送",
		zap.String("authorizerAppID", authorizerAppID),
		zap.String("msgSignature", msgSignature),
		zap.String("timestamp", timestamp),
		zap.String("nonce", nonce),
	)

	// 调用 Service 纯业务逻辑(参数解耦,不传递 gin.Context)
	if err := h.svc.HandleMessage(ctx.Request.Context(), authorizerAppID, msgSignature, timestamp, nonce, body); err != nil {
		h.l.Warn("处理微信公众号粉丝消息异常",
			zap.String("authorizerAppID", authorizerAppID),
			zap.Error(err),
		)
		// 微信官方规范:即便业务处理失败,也应回复 success 避免微信服务器 5 秒超时重发风暴
		ctx.String(http.StatusOK, "success")
		return
	}

	// 微信规定收到消息后必须回复 success 或空字符串
	ctx.String(http.StatusOK, "success")
}
3.3业务层解密与策略路由分发引擎 (service/openplatform.go)
在业务层,采用**策略/插件模式(Strategy Pattern)**与协程池异步消费:
// CommonMsgXML 微信公众号粉丝基础消息/事件 XML 结构
type CommonMsgXML struct {
	XMLName      xml.Name `xml:"xml"`
	ToUserName   string   `xml:"ToUserName"`   // 开发者微信号 / 公众号原始ID
	FromUserName string   `xml:"FromUserName"` // 发送方帐号(粉丝的 OpenID)
	CreateTime   int64    `xml:"CreateTime"`   // 消息创建时间
	MsgType      string   `xml:"MsgType"`      // 消息类型:text / image / event 等
	Event        string   `xml:"Event"`        // 事件类型:subscribe / unsubscribe / CLICK 等
	Content      string   `xml:"Content"`      // 文本消息内容
	EventKey     string   `xml:"EventKey"`     // 事件 KEY 值(如带参二维码参数)
}

// OpenPlatformMessageHandler 消息处理器插件接口
type OpenPlatformMessageHandler interface {
	Process(ctx context.Context, authorizerAppID string, rawXML []byte, msg map[string]string) error
}

// HandleMessage 解密并路由分发公众号消息与事件
func (s *openPlatformService) HandleMessage(
	ctx context.Context,
	authorizerAppID, msgSignature, timestamp, nonce string,
	body []byte,
) error {
	crypt, err := crypto.NewWXBizMsgCrypt(s.cfg.OpenPlatform.Token, s.cfg.OpenPlatform.EncodingAESKey, s.cfg.OpenPlatform.AppId)
	if err != nil {
		s.l.Error("初始化加解密失败", zap.Error(err))
		return err
	}

	decrypted, err := crypt.DecryptMsg(msgSignature, timestamp, nonce, body)
	if err != nil {
		s.l.Warn("解密粉丝消息失败", zap.String("authorizerAppID", authorizerAppID), zap.Error(err))
		return err
	}

	var msg CommonMsgXML
	if err := xml.Unmarshal(decrypted, &msg); err != nil {
		s.l.Error("反序列化消息明文失败", zap.String("authorizerAppID", authorizerAppID), zap.Error(err))
		return err
	}

	s.l.Info("收到授权公众号粉丝消息/事件",
		zap.String("authorizerAppID", authorizerAppID),
		zap.String("fromUser", msg.FromUserName),
		zap.String("msgType", msg.MsgType),
		zap.String("event", msg.Event),
		zap.String("content", msg.Content),
	)

	// 组装路由 Key(如 "text" 或 "event:subscribe")
	key := msg.MsgType
	if msg.Event != "" {
		key = fmt.Sprintf("%s:%s", msg.MsgType, msg.Event)
	}

	// 命中注册的处理器则异步分发执行,不阻塞当前 HTTP 响应
	if handlerVal, ok := s.handlers.Load(key); ok {
		handler := handlerVal.(OpenPlatformMessageHandler)
		m := map[string]string{
			"ToUserName":   msg.ToUserName,
			"FromUserName": msg.FromUserName,
			"MsgType":      msg.MsgType,
			"Event":        msg.Event,
			"Content":      msg.Content,
			"EventKey":     msg.EventKey,
		}
		go func() {
			if err := handler.Process(context.Background(), authorizerAppID, decrypted, m); err != nil {
				s.l.Error("处理器处理消息失败", zap.String("key", key), zap.Error(err))
			}
		}()
	}

	return nil
}

// RegisterMessageHandler 注册自定义事件监听器
func (s *openPlatformService) RegisterMessageHandler(msgType, eventType string, handler OpenPlatformMessageHandler) {
	key := msgType
	if eventType != "" {
		key = fmt.Sprintf("%s:%s", msgType, eventType)
	}
	s.handlers.Store(key, handler)
}
扫码授权接管与凭据持久化闭环
到此为止,服务端的两大微信回调网关均已全部就绪并正常运转。接下来进入最核心的商户授权闭环:生成授权链接 → 管理员扫码授权 → 换取凭证并持久化落库。
整个授权闭环按照严格的四个步骤推进:
步骤 1:生成授权链接与二维码
在商户后台点击【一键接入微信公众号】时,前端会先请求后端生成一条预授权链接。
1.1业务流程与核心逻辑
- 携带平台自身的
component_access_token调用微信接口创建预授权码pre_auth_code(10 分钟有效)。 - 拼接带有商户
account_id与pre_auth_code的微信官方扫码授权 URL。
1.2核心后端代码 (service/openplatform.go)
// 1. 向微信官方换取 pre_auth_code
func (s *openPlatformService) GetPreAuthCode(ctx context.Context, platformAppID string) (string, error) {
	if platformAppID == "" {
		platformAppID = s.cfg.OpenPlatform.AppId
	}
	compToken, err := s.GetComponentAccessToken(ctx, platformAppID)
	if err != nil {
		return "", fmt.Errorf("get component token failed: %w", err)
	}

	reqBody, _ := json.Marshal(map[string]string{
		"component_appid": platformAppID,
	})
	apiURL := fmt.Sprintf("https://api.weixin.qq.com/cgi-bin/component/api_create_preauthcode?component_access_token=%s", compToken)
	resp, err := s.httpClient.Post(apiURL, "application/json", bytes.NewReader(reqBody))
	if err != nil {
		return "", err
	}
	defer resp.Body.Close()

	body, _ := io.ReadAll(resp.Body)
	var res struct {
		PreAuthCode string `json:"pre_auth_code"`
		ErrCode     int    `json:"errcode"`
		ErrMsg      string `json:"errmsg"`
	}
	_ = json.Unmarshal(body, &res)
	if res.ErrCode != 0 || res.PreAuthCode == "" {
		return "", fmt.Errorf("wechat api_create_preauthcode error [%d]: %s", res.ErrCode, res.ErrMsg)
	}
	return res.PreAuthCode, nil
}

// 2. 拼装 PC 端与移动端适用的完整授权链接
func (s *openPlatformService) GenerateAuthURL(ctx context.Context, redirectURI, accountID string) (string, string, string, error) {
	platformAppID := s.cfg.OpenPlatform.AppId
	if redirectURI == "" {
		redirectURI = s.cfg.OpenPlatform.RedirectURI
	}

	// 生成会话追踪 ticket,并拼入 redirect_uri 中传递给微信
	ticket := uuid.NewV4().String()
	if parsed, err := url.Parse(redirectURI); err == nil {
		q := parsed.Query()
		if q.Get("account_id") == "" {
			q.Set("account_id", accountID)
		}
		q.Set("ticket", ticket)
		parsed.RawQuery = q.Encode()
		redirectURI = parsed.String()
	}

	preAuthCode, err := s.GetPreAuthCode(ctx, platformAppID)
	if err != nil {
		return "", "", "", err
	}

	// 电脑端打开的标准授权页面
	authURL := fmt.Sprintf(
		"https://mp.weixin.qq.com/cgi-bin/componentloginpage?component_appid=%s&pre_auth_code=%s&redirect_uri=%s&auth_type=1",
		platformAppID, preAuthCode, url.QueryEscape(redirectURI),
	)
	// 手机微信客户端直接扫码直达授权页
	scanURL := fmt.Sprintf(
		"https://open.weixin.qq.com/wxaopen/safe/bindcomponent?action=bindcomponent&auth_type=1&no_scan=1&component_appid=%s&pre_auth_code=%s&redirect_uri=%s#wechat_redirect",
		platformAppID, preAuthCode, url.QueryEscape(redirectURI),
	)
	return authURL, scanURL, ticket, nil
}
1.3极简验证:无需前端代码,用 Postman 或浏览器直接生成与扫码
作为后端或全栈开发者调试时,完全不需要提前去写复杂的前端代码,直接通过接口就能完成验证:
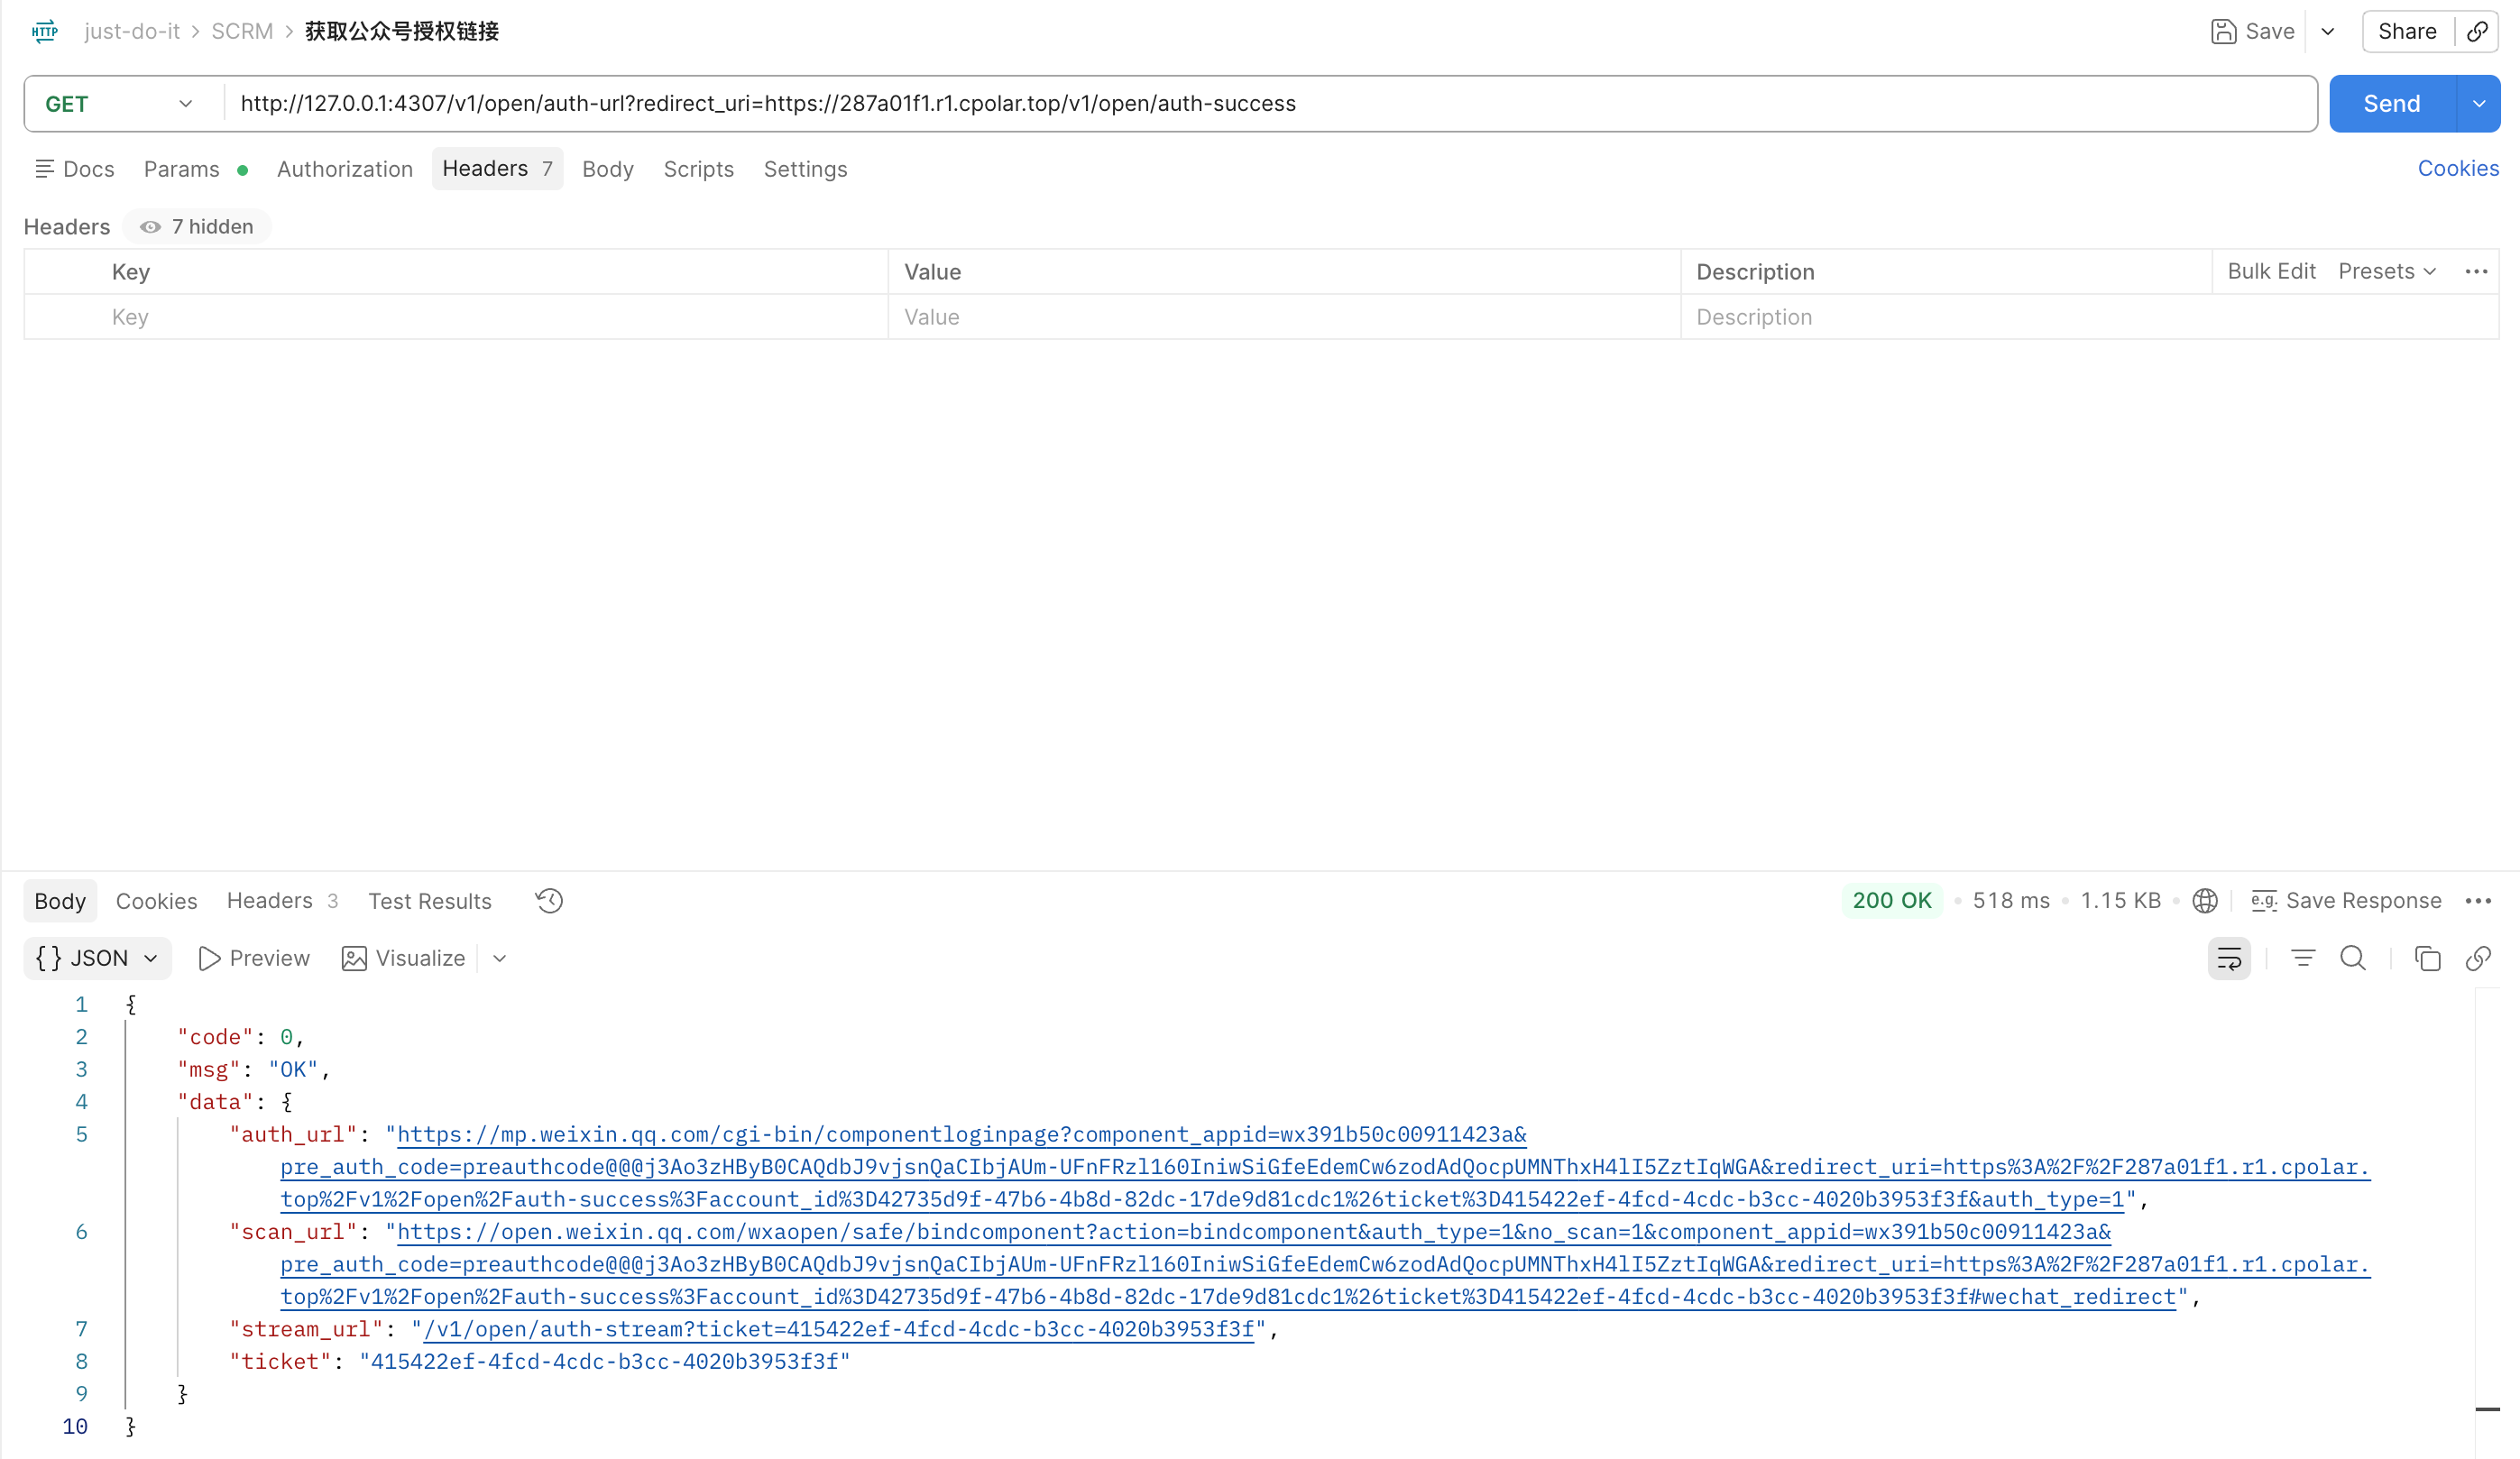
方式一:Postman / 浏览器调用接口获取链接
直接向你的服务发起 GET 请求(将 redirect_uri 替换为你的穿透域名回调地址):
GET http://127.0.0.1:4307/v1/open/auth-url?redirect_uri=https://scrm-dev.r10.cpolar.top/v1/open/auth-success
接口返回带有微信官方前缀的授权链接:
{
    "code": 0,
    "msg": "OK",
    "data": {
        "auth_url": "https://mp.weixin.qq.com/cgi-bin/componentloginpage?component_appid=wx391b50c00911423a&pre_auth_code=preauthcode@@@j3Ao3zHByB0CAQdbJ9vjsnQaCIbjAUm-UFnFRzl160IniwSiGfeEdemCw6zodAdQocpUMNThxH4lI5ZztIqWGA&redirect_uri=https%3A%2F%2F287a01f1.r1.cpolar.top%2Fv1%2Fopen%2Fauth-success%3Faccount_id%3D42735d9f-47b6-4b8d-82dc-17de9d81cdc1%26ticket%3D415422ef-4fcd-4cdc-b3cc-4020b3953f3f&auth_type=1",
        "scan_url": "https://open.weixin.qq.com/wxaopen/safe/bindcomponent?action=bindcomponent&auth_type=1&no_scan=1&component_appid=wx391b50c00911423a&pre_auth_code=preauthcode@@@j3Ao3zHByB0CAQdbJ9vjsnQaCIbjAUm-UFnFRzl160IniwSiGfeEdemCw6zodAdQocpUMNThxH4lI5ZztIqWGA&redirect_uri=https%3A%2F%2F287a01f1.r1.cpolar.top%2Fv1%2Fopen%2Fauth-success%3Faccount_id%3D42735d9f-47b6-4b8d-82dc-17de9d81cdc1%26ticket%3D415422ef-4fcd-4cdc-b3cc-4020b3953f3f#wechat_redirect",
        "stream_url": "/v1/open/auth-stream?ticket=415422ef-4fcd-4cdc-b3cc-4020b3953f3f",
        "ticket": "415422ef-4fcd-4cdc-b3cc-4020b3953f3f"
    }
}
方式二:直接扫码测试
- 电脑端浏览器直接打开
auth_url:屏幕上会直接展示微信官方的绿色授权二维码,掏出手机微信扫码即可。 - 手机微信直接访问
scan_url:或者把scan_url复制到微信“文件传输助手”中点击打开,可以直接调起授权页面,甚至连扫码都省了! - 在线二维码工具:也可以把
scan_url复制到任意在线二维码生成器(如草料二维码 cli.im)生成一个二维码直接扫。
💡 如果后续接入前端管理系统,前端也仅仅是拿
scan_url渲染成一个弹窗二维码而已,核心协议逻辑完全在后端。
步骤 2:管理员扫码授权与经典排坑
将生成的 auth_url 渲染为二维码后,管理员使用手机微信扫码。
2.1最经典的排坑:回调域名与【授权发起页域名】不一致
在本地开发调试阶段扫码后,大概率会先撞上一个微信官方的安全拦截页:
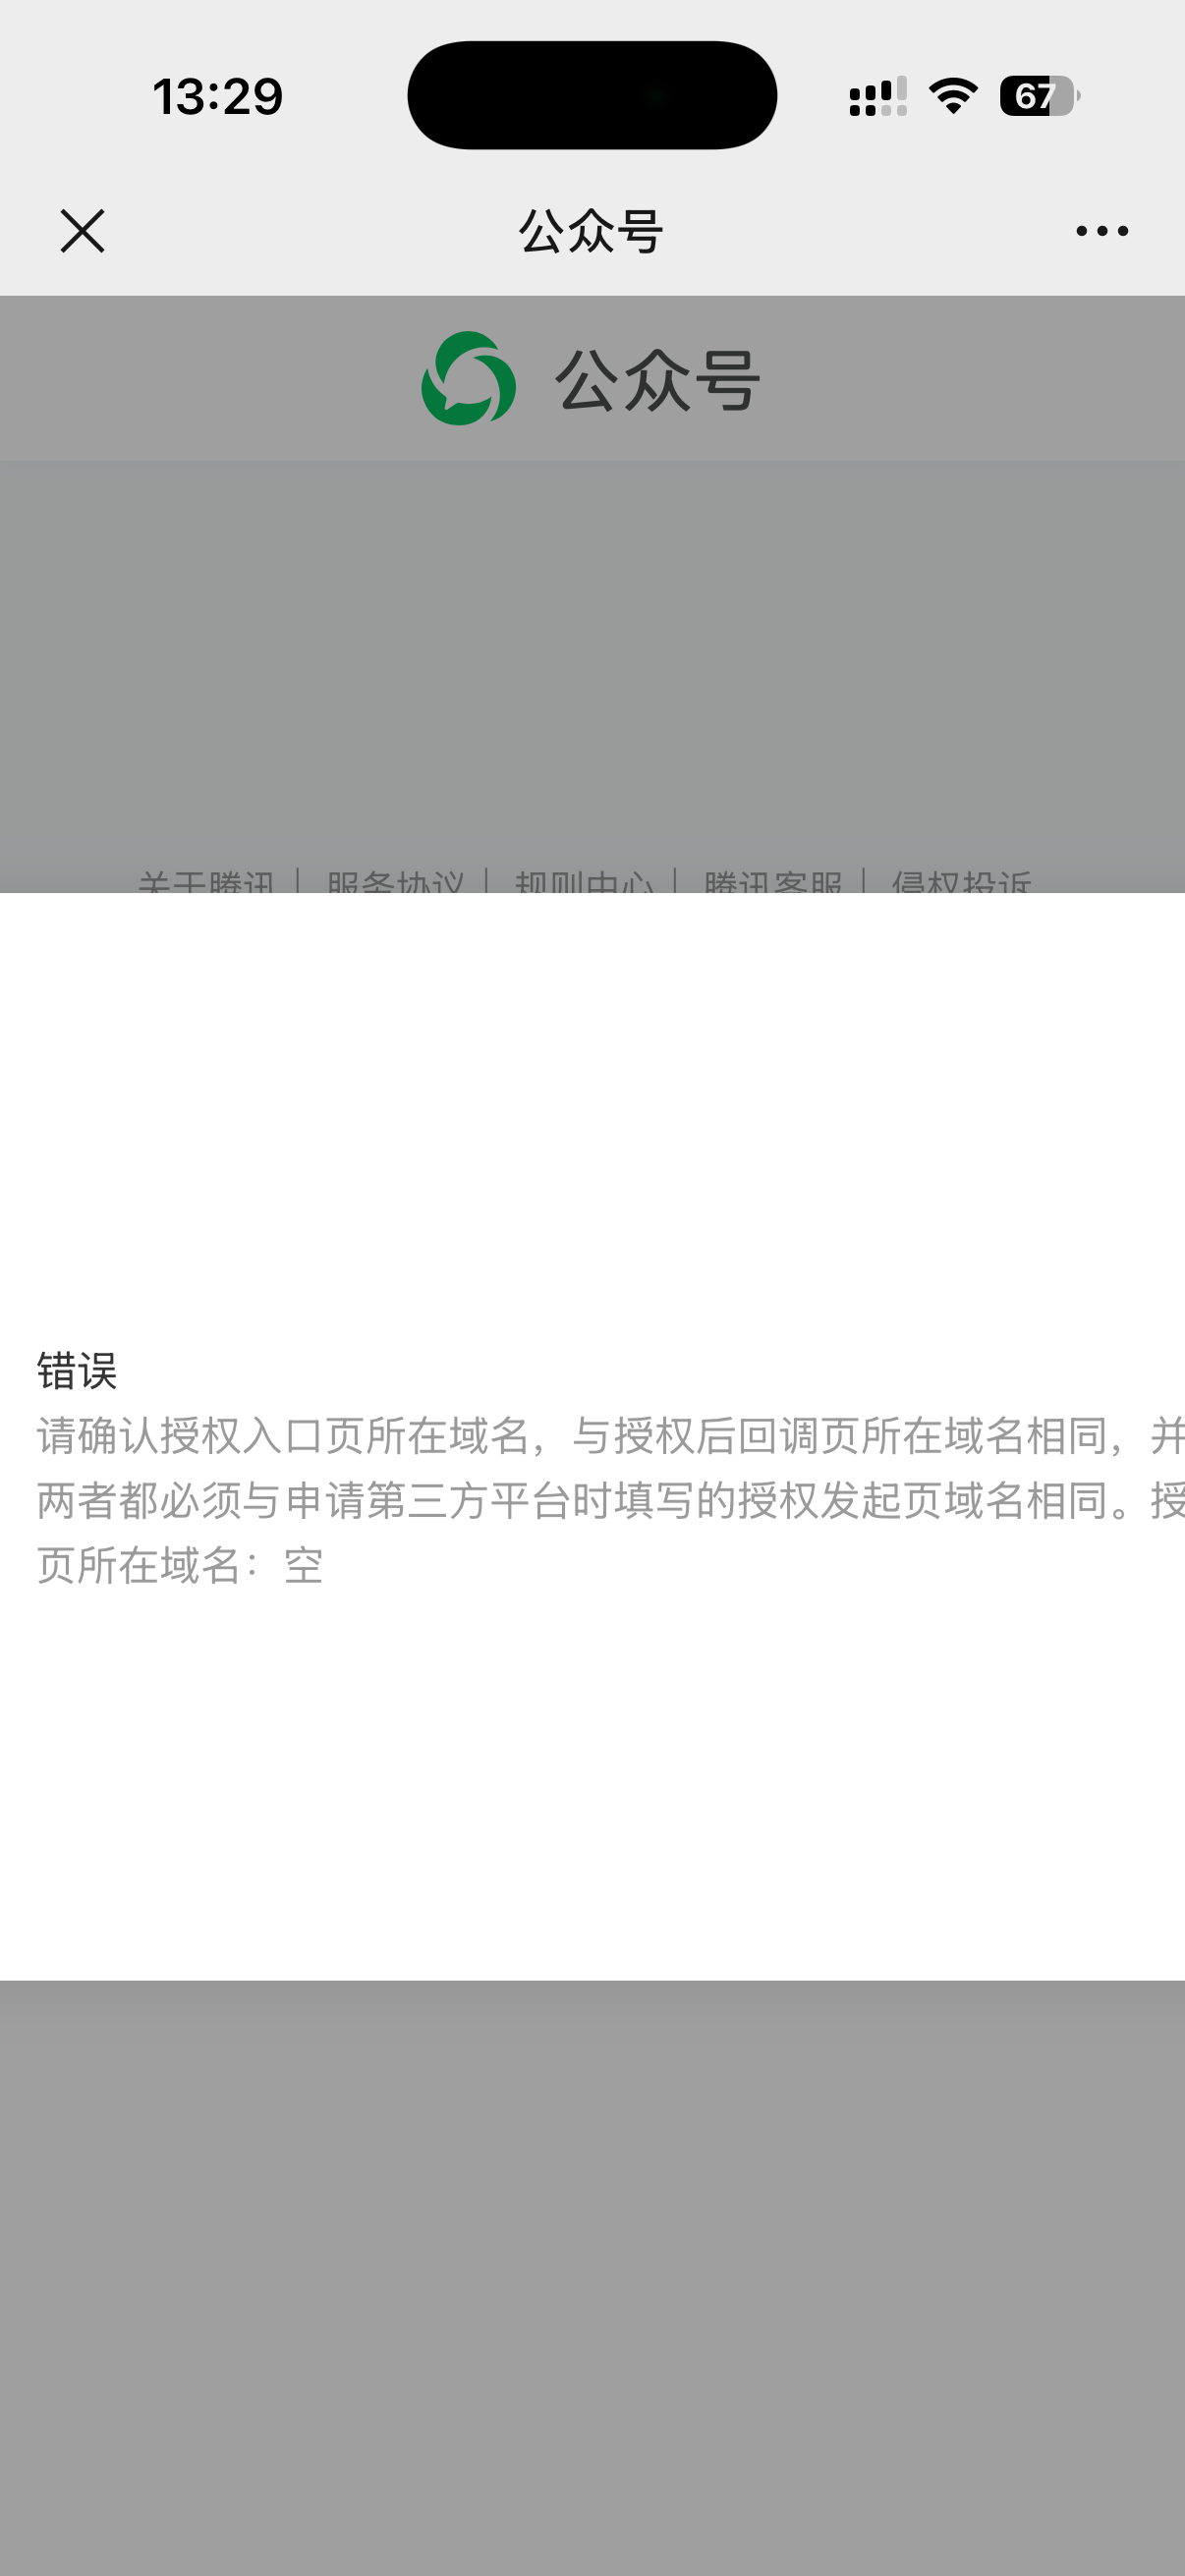
这个拦截其实是好消息:它说明你的
pre_auth_code已经成功生成,且成功连通了微信官方服务器,只差最后这一步“域名一致性”匹配。
为什么微信会拦截? 微信开放平台有一条非常严格的安全策略:
授权完成后的回调地址(
redirect_uri)的域名,必须与你在开放平台后台登记的【授权发起页域名】完全一致。
对比两边的域名配置,矛盾一目了然:
| 域名来源 | 错误的值示例 | 产生的冲突与原因 |
|---|---|---|
请求传给微信的 redirect_uri | http://localhost:4300/scrm/oa/list | 微信后台严禁登记 localhost 作为授权域名 |
| 微信后台【开发配置】登记的域名 | scrm-dev.r10.cpolar.top | 本地测试填的是内网穿透公网域名,与 localhost 冲突 |
冲突根源:手机微信扫码后,发现授权成功要重定向的目标是 localhost,与后台登记的安全域名不匹配。为防止第三方恶意钓鱼劫持授权码,微信直接阻断并提示:“请确认授权入口页所在域名与授权后回调页所在域名相同”。
解决方案:调用 auth-url 接口时,将 redirect_uri 显式传为与后台登记完全一致的内网穿透公网地址:
GET http://127.0.0.1:4307/v1/open/auth-url?redirect_uri=https://scrm-dev.r10.cpolar.top/v1/open/auth-success
2.2正常授权流程的三步交互
域名匹配成功后,手机微信扫码后会依次经历以下标准界面:
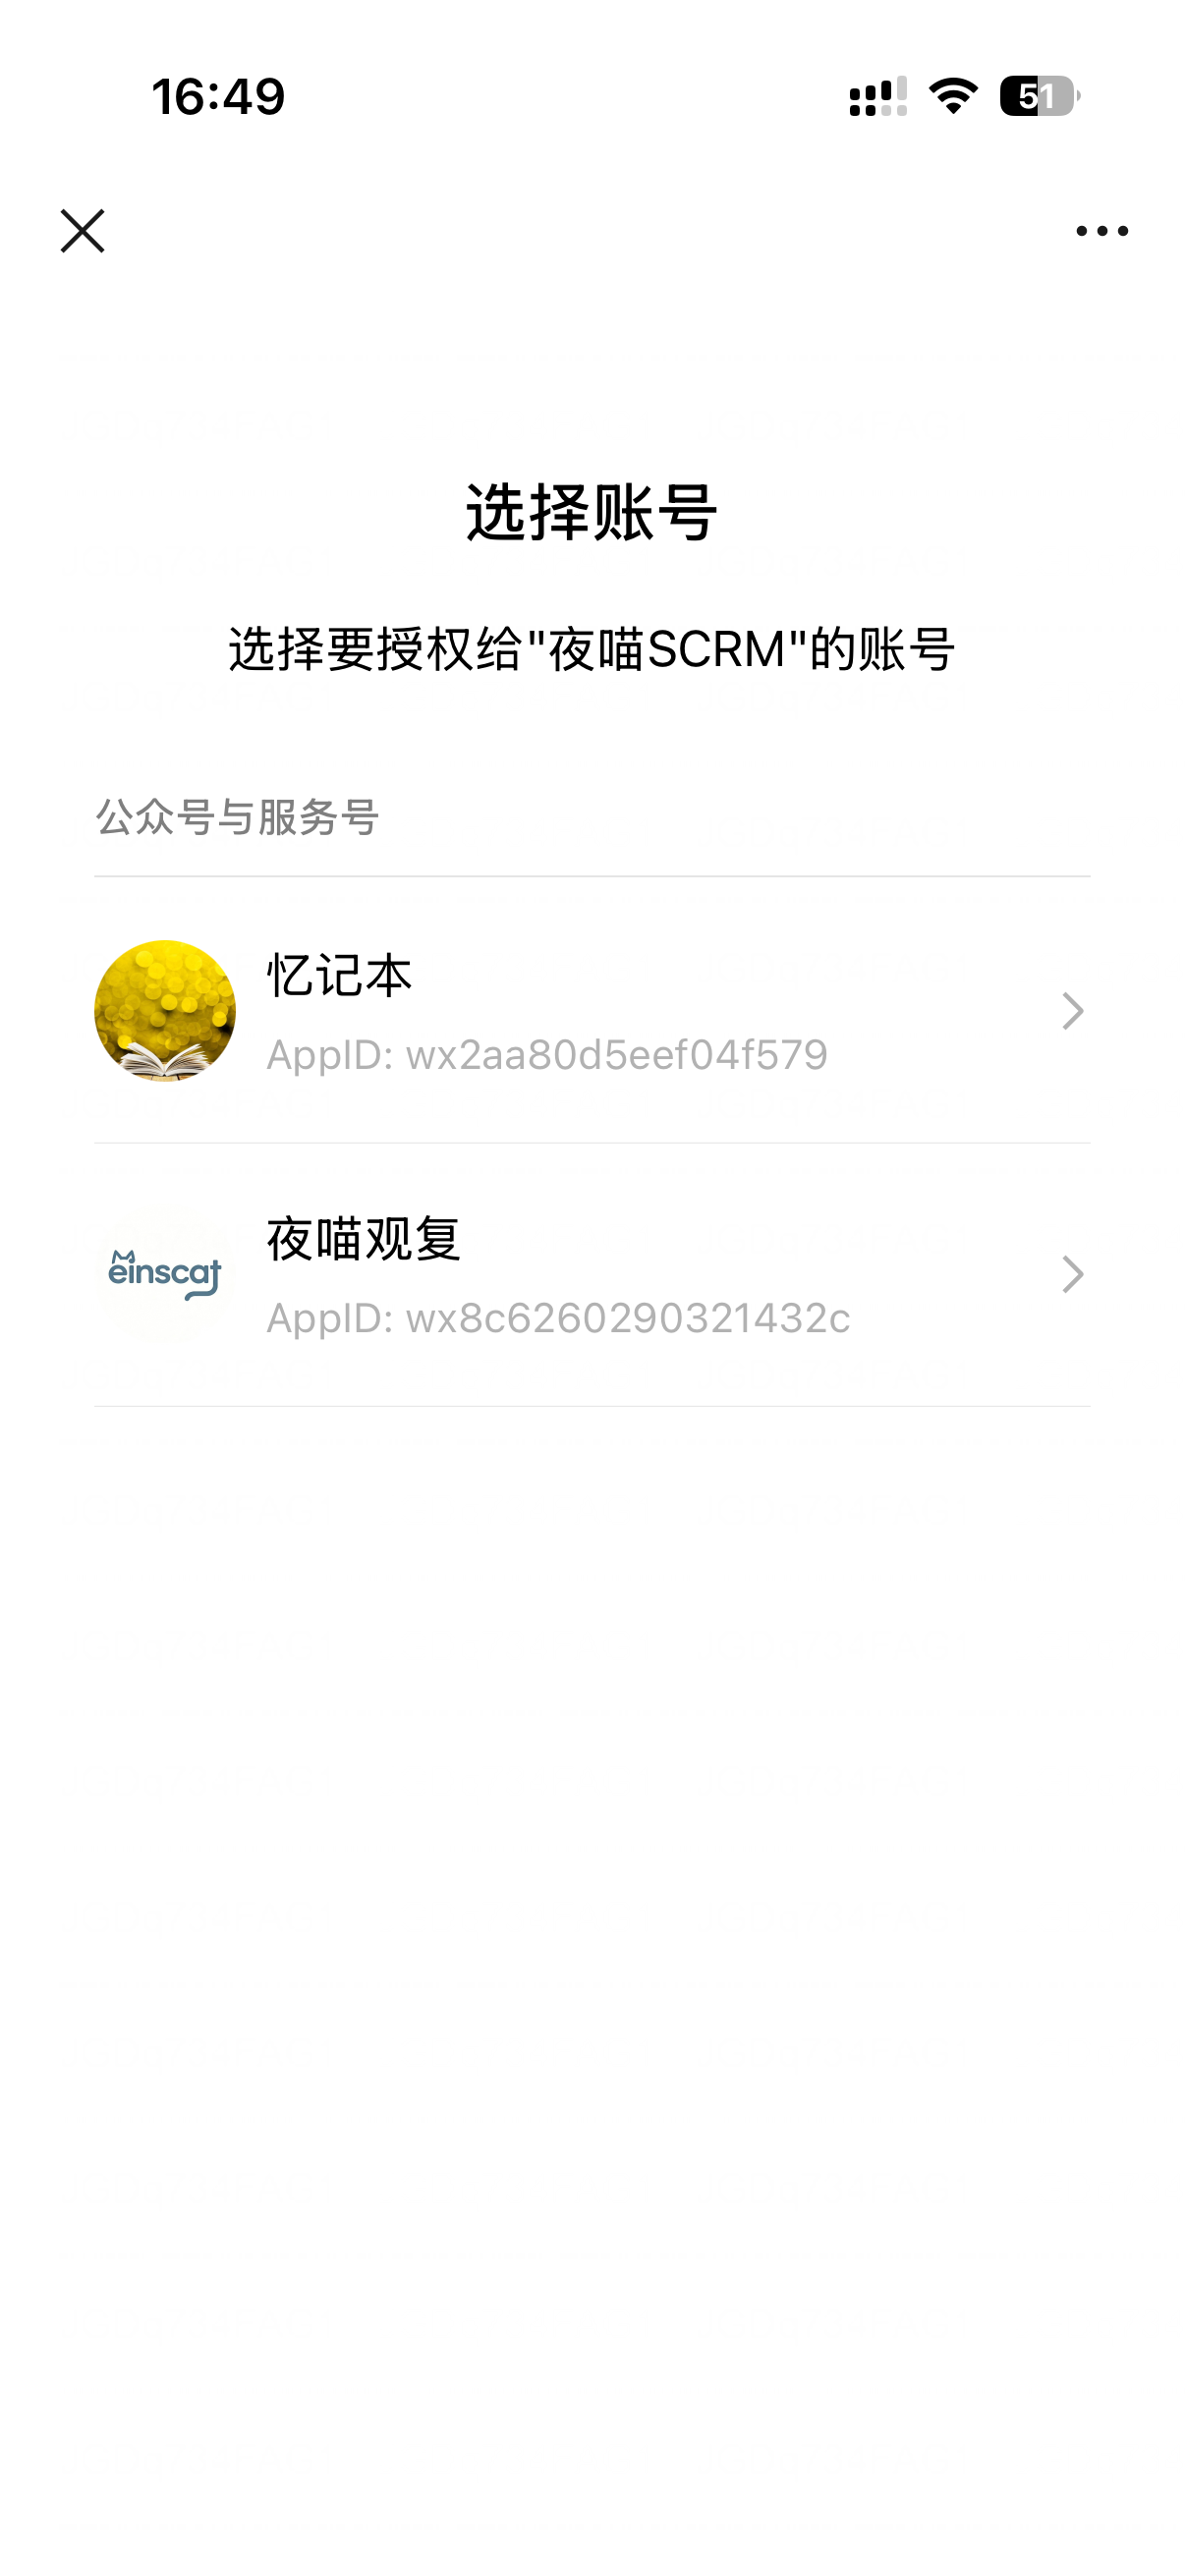
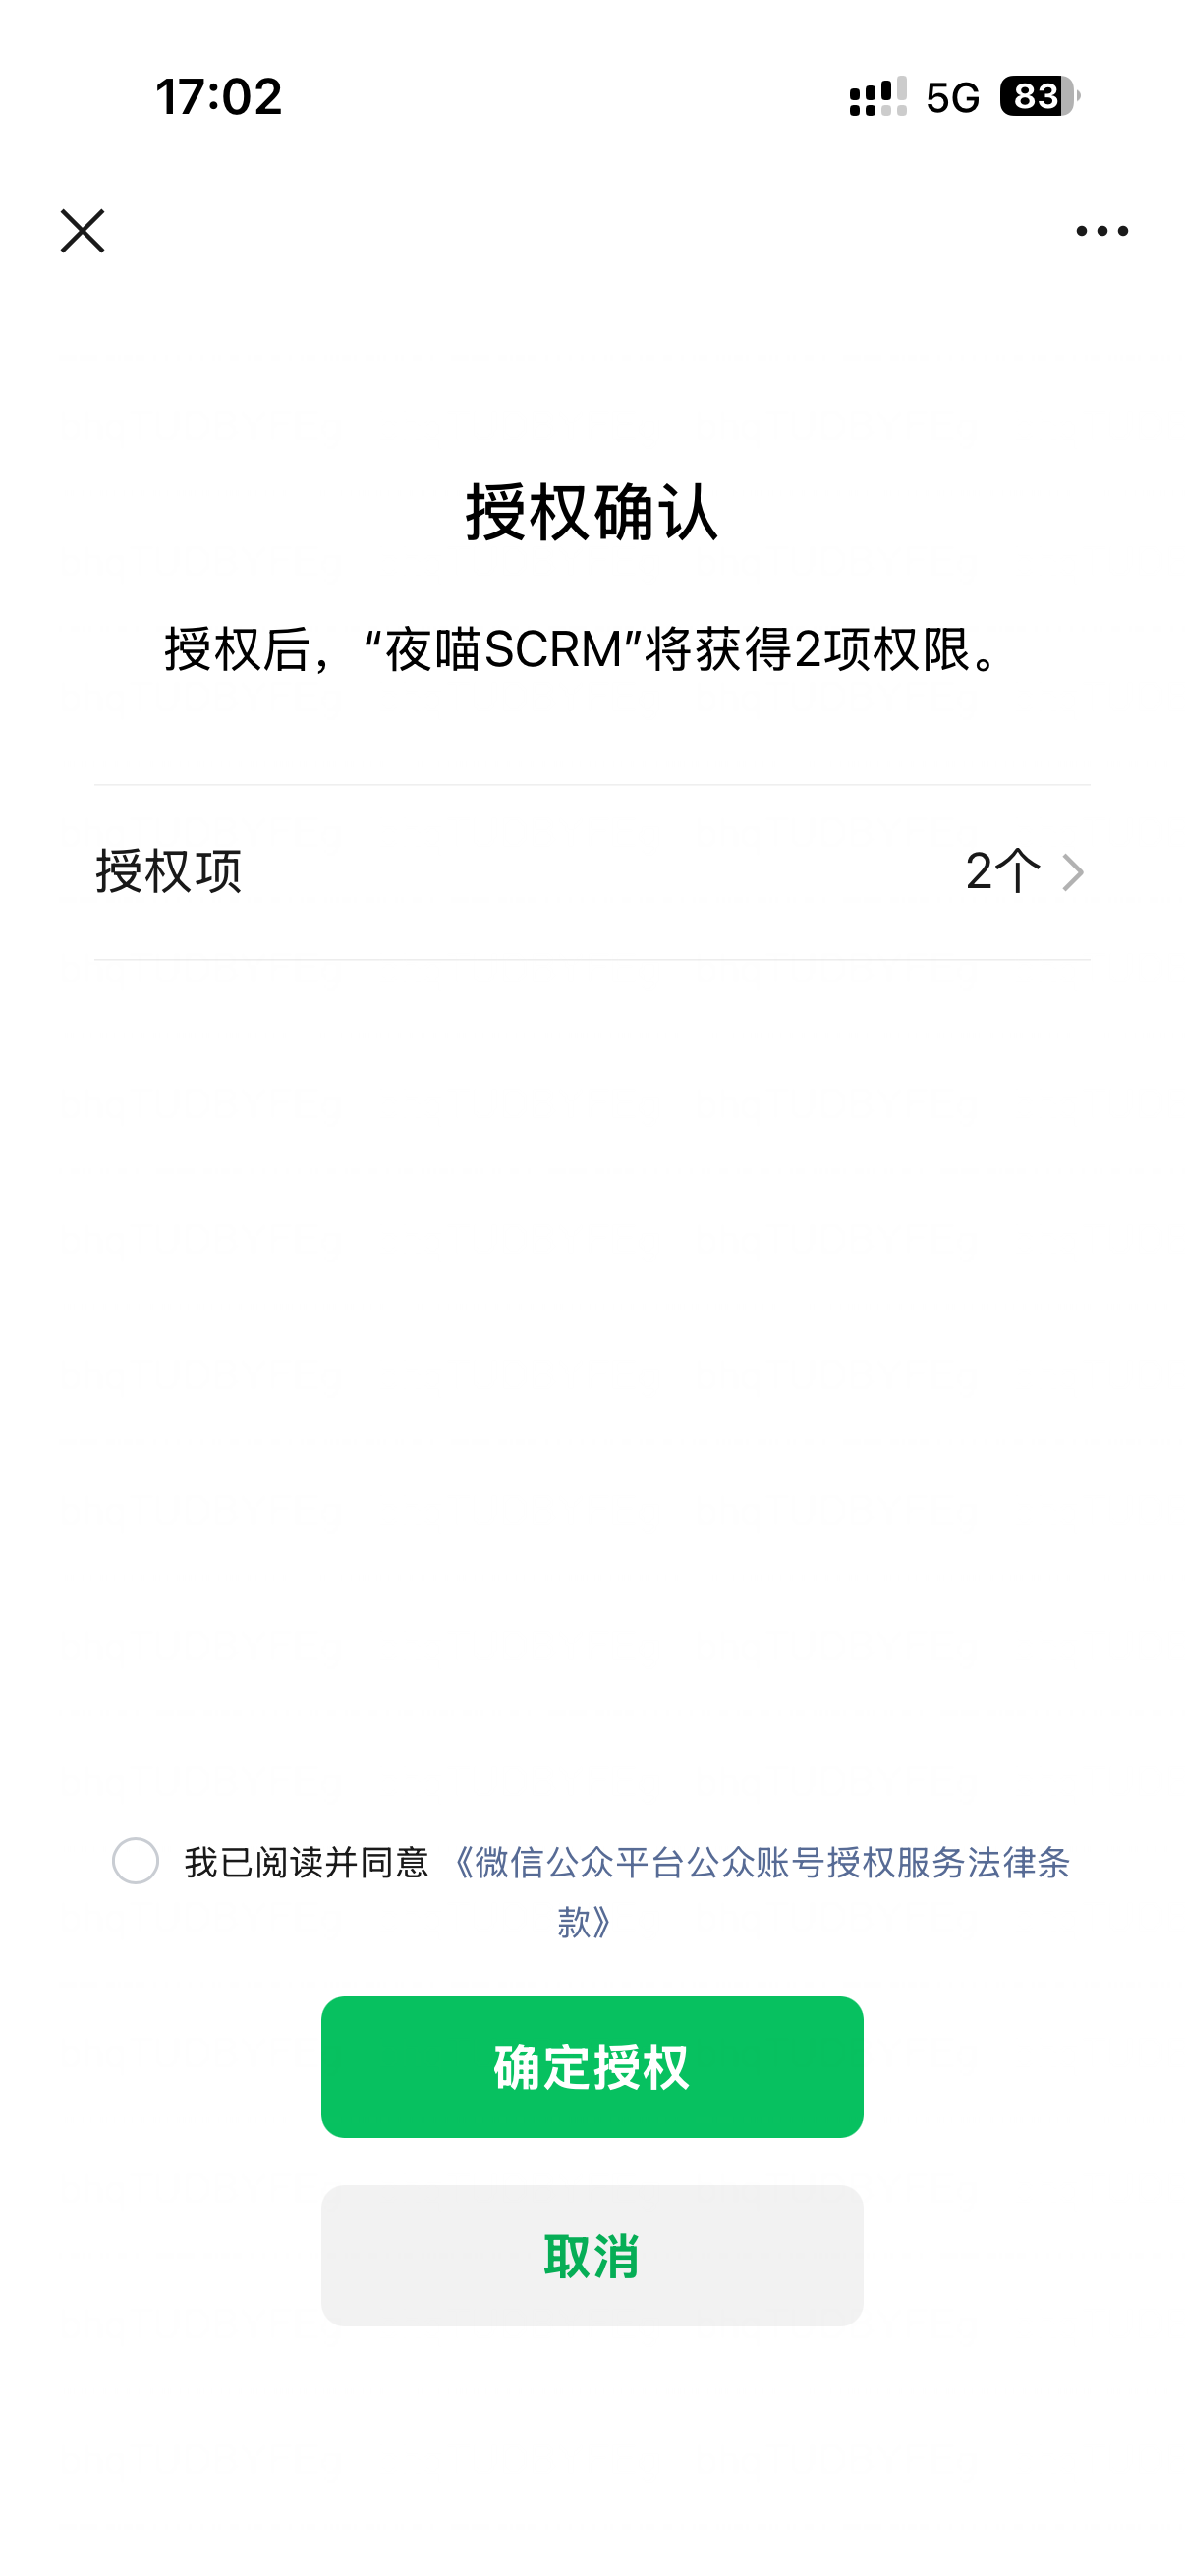
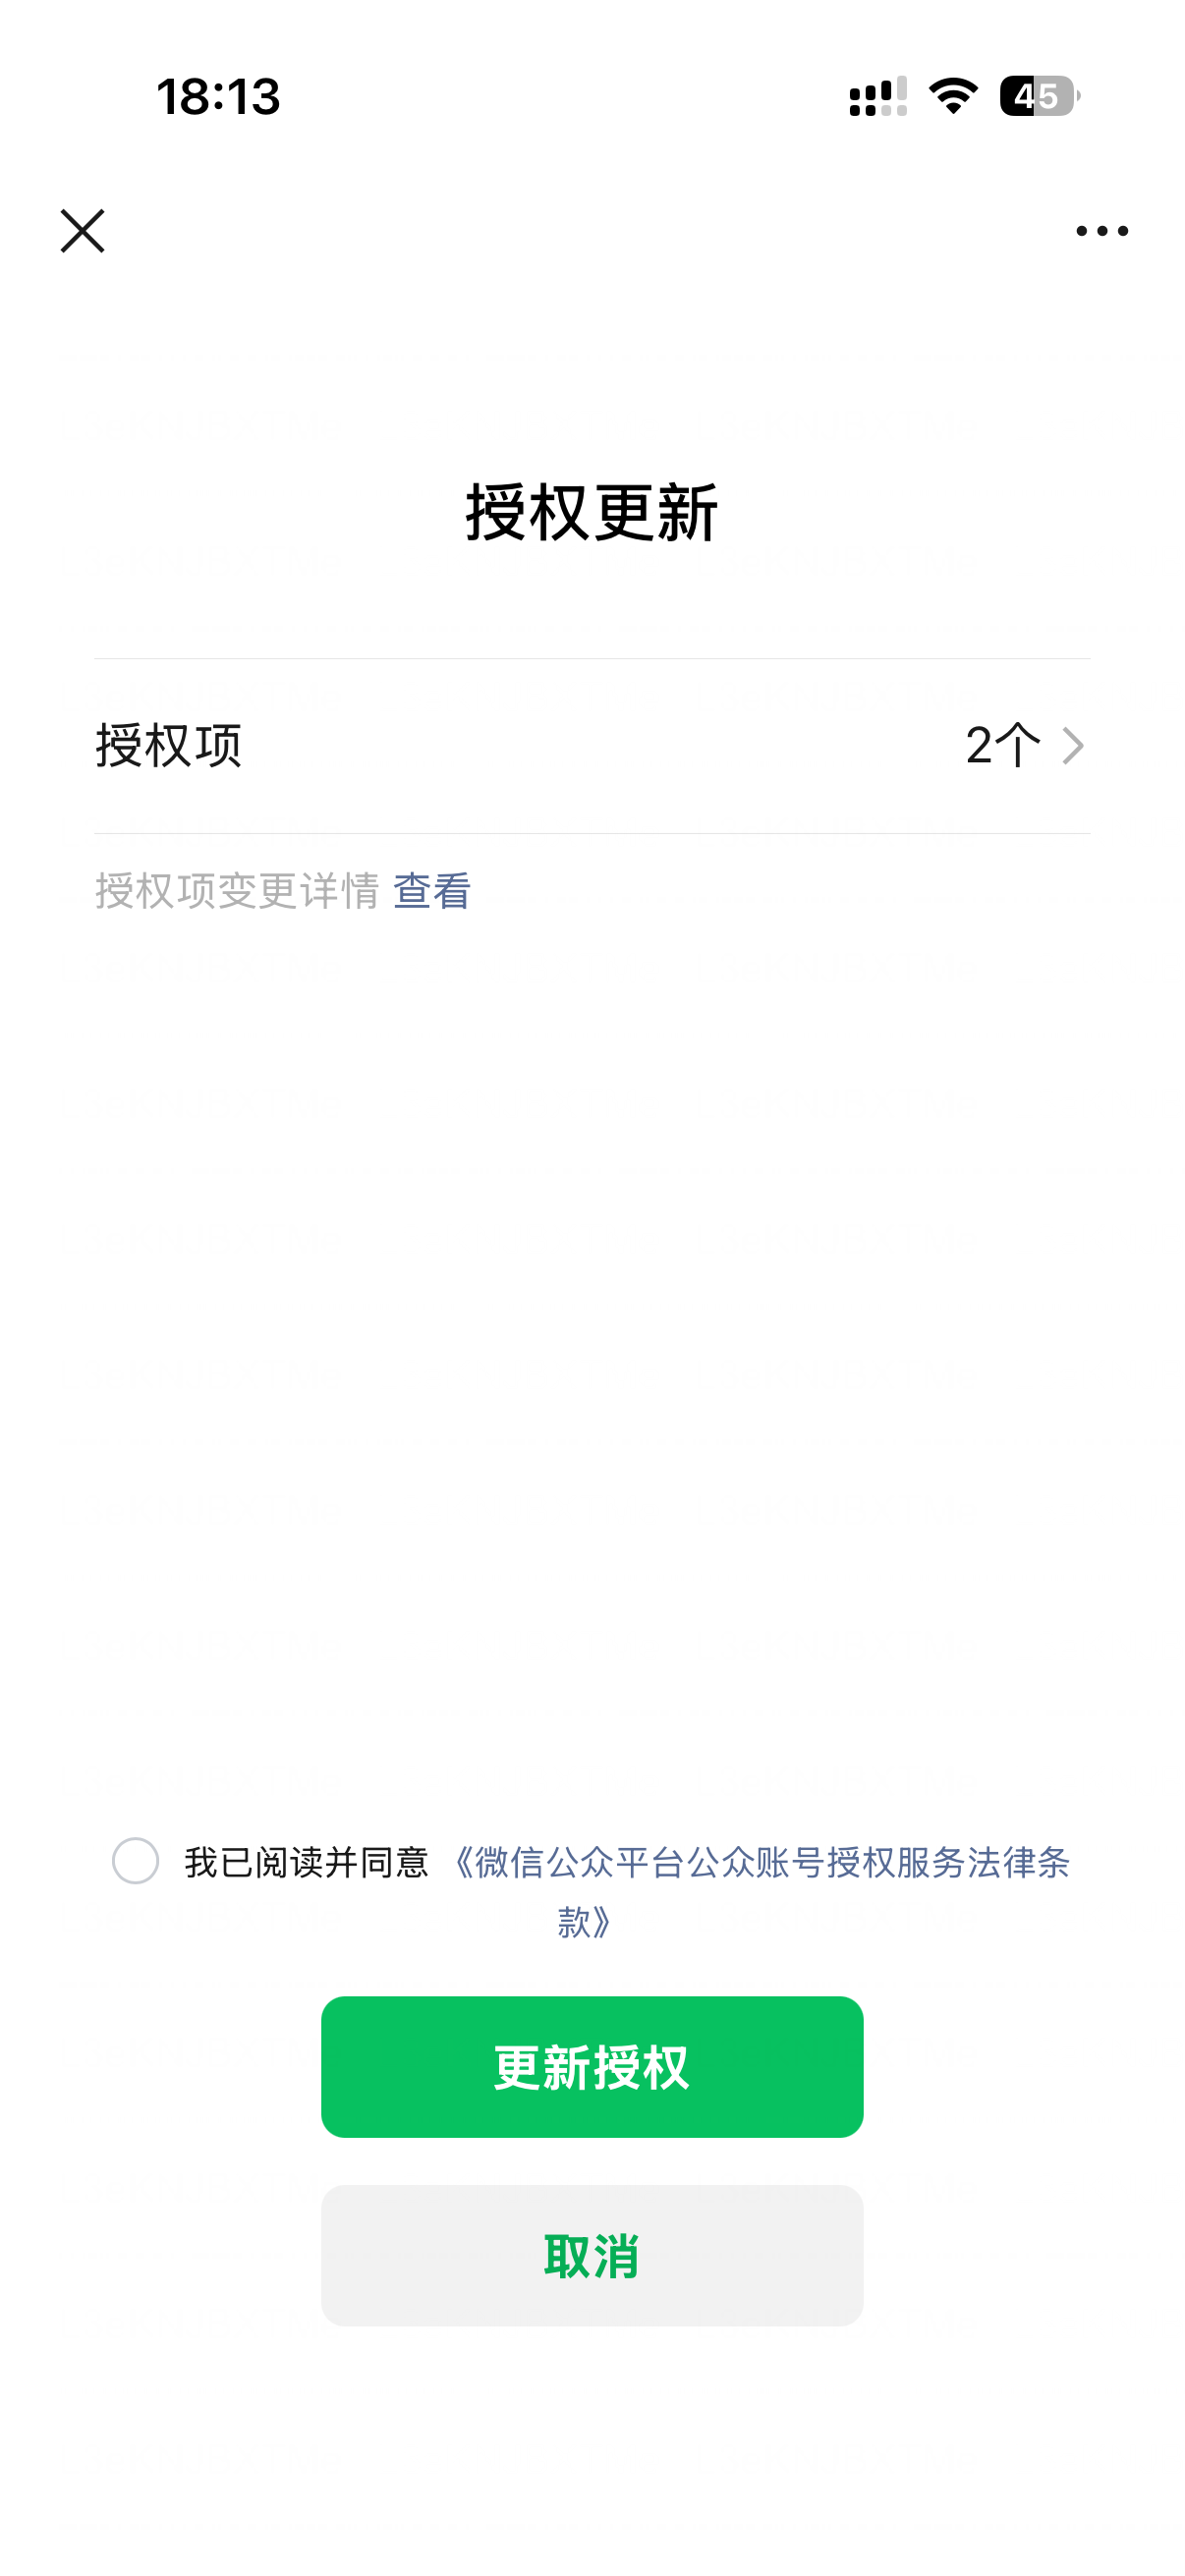
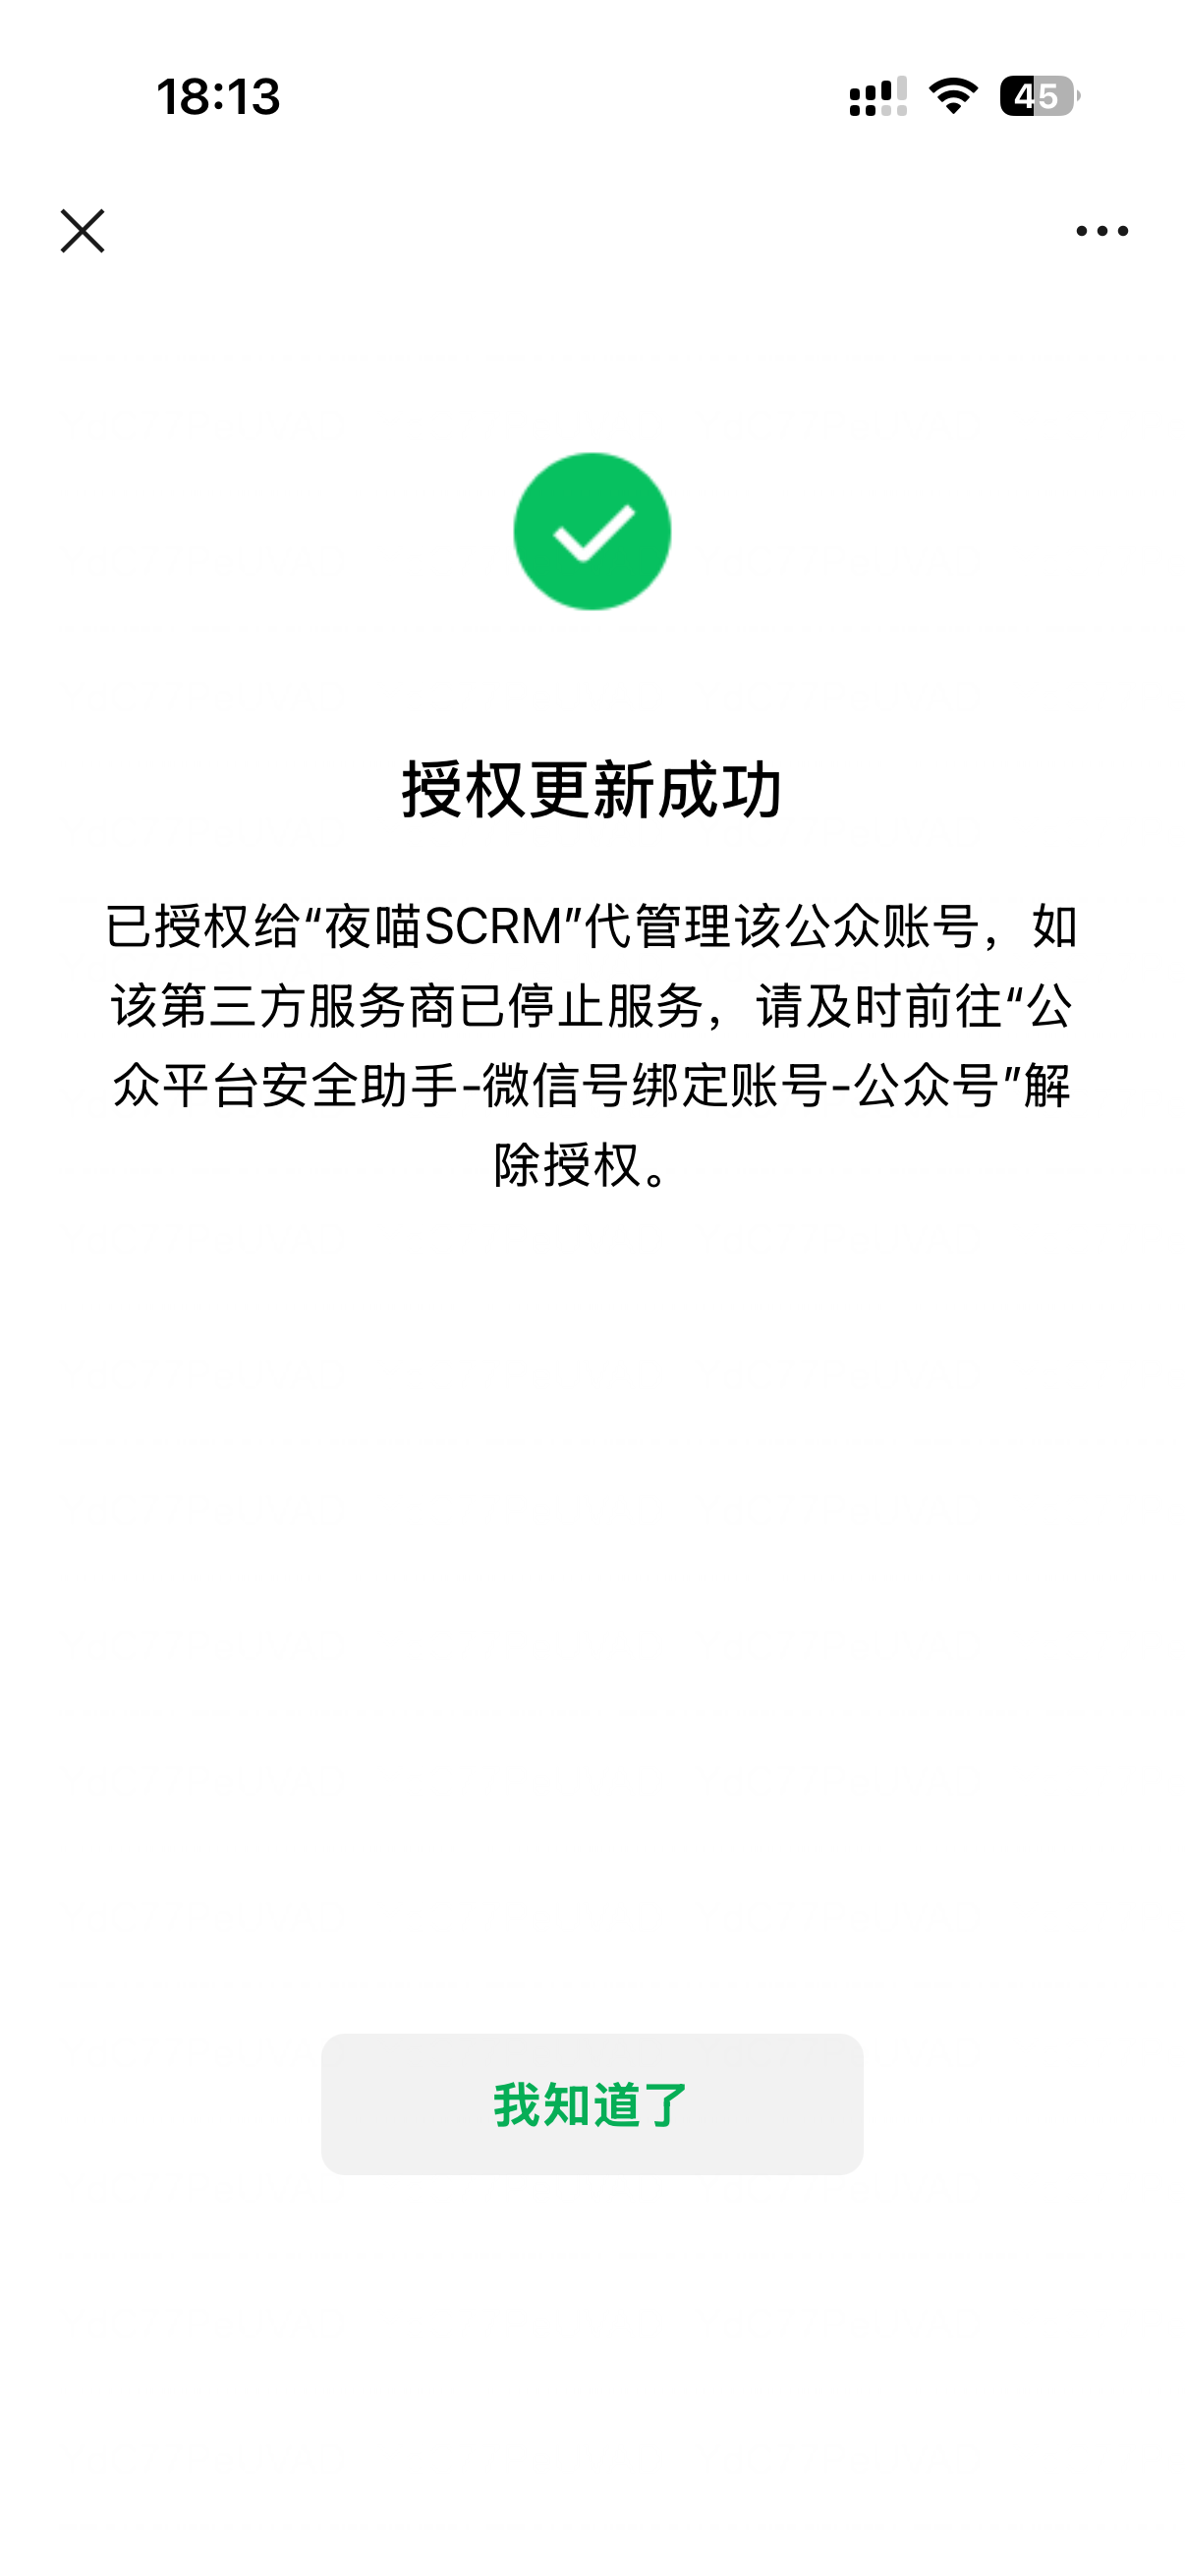
步骤 3:授权成功后的回调与绑定闭环
管理员在手机端点击 【同意授权】 后,微信服务器会立即 302 重定向到我们在授权链接中指定的 redirect_uri,并在 URL 中携带授权凭证:auth_code 与 expires_in。系统支持两种标准的闭环处理形式:
形式 A:后端直收回调(全自动换证落库)
将授权链接的 redirect_uri 直接指向后端的接收端点(如 https://你的域名/v1/open/auth-success):
- 微信客户端在扫码同意后,直接向后端端点发起 GET 请求:
GET /v1/open/auth-success?auth_code=queryauthcode@@@xxx&expires_in=600 - 服务端在 Controller 中直接拦截并提取
auth_code,调用 Service 完成换证与持久化落库。 - 服务端向手机微信端返回一个友好的极简原生 HTML 成功页,提示管理员“授权成功,请关闭窗口返回电脑继续操作”。
形式 B:前端中转 / Postman 调试模式(主动调用 /v1/open/bind)
将授权链接的 redirect_uri 指向前台页面或在本地测试:
- 微信将页面重定向到前端后台(或浏览器直接打开的测试页),URL 携带
auth_code:http://localhost:3000/scrm/oa/list?auth_code=xxxxxx&expires_in=600 - 触发绑定调用:
- 生产环境:前端管理后台页面在 Mounted 时检测 URL 中的
auth_code,主动发起POST /v1/open/bind请求; - 本地调试/写笔记:在浏览器地址栏直接复制
auth_code的值,打开 Postman 调用POST /v1/open/bind接口完成绑定与落库验证:
POST http://localhost:4307/v1/open/bind Content-Type: application/json { "auth_code": "queryauthcode@@@xxx", "account_id": "dev_admin_test" } - 生产环境:前端管理后台页面在 Mounted 时检测 URL 中的
- 绑定成功后,后端完成公众号资料与永久凭证入库,返回商户绑定的公众号信息。
步骤 4:核心后端实现与架构规范
无论采用哪种模式,后端的底层核心动作完全一致:拿到 auth_code 换取令牌与资料 → 领域实体与持久化实体解耦 → 持久化入库。
4.1Web 控制器实现:商户绑定端点 (web/openplatform.go)
// 注册绑定端点
g.POST("/bind", iam.RequireAction("scrm:open:auth:Bind", "绑定授权公众号"), h.BindAuthorizer)

// BindAuthorizerReq 绑定请求体
type BindAuthorizerReq struct {
	AuthCode  string `json:"auth_code" binding:"required"`
	AccountID string `json:"account_id"`
}

// BindAuthorizer 商户扫码授权成功后,使用 auth_code 换取 refresh_token 并绑定入库
func (h *OpenPlatformHandler) BindAuthorizer(ctx *gin.Context) {
	var req BindAuthorizerReq
	if valid, errs := validator.BindAndValid(ctx, &req); !valid {
		h.l.Warn("绑定授权公众号参数校验失败", zap.Any("errs", errs))
		response.Fail(ctx, ecode.InvalidParams.WithDetails(errs))
		return
	}

	accountID := req.AccountID
	if accountID == "" {
		accountID = ctx.GetString("userId")
	}
	if accountID == "" {
		accountID = "dev_admin_test"
	}

	// 调用业务层换证并持久化落库
	authorizer, err := h.svc.FetchAndSaveAuthorizerInfo(ctx, accountID, req.AuthCode)
	if err != nil {
		h.l.Error("换取并绑定授权微信账号信息失败", zap.Error(err))
		response.Fail(ctx, ecode.ServerError.WithDetails(err.Error()))
		return
	}

	h.l.Info("商户成功绑定微信账号",
		zap.String("appid", authorizer.AuthorizerAppID),
		zap.String("nick_name", authorizer.NickName),
		zap.String("user_name", authorizer.UserName),
		zap.String("principal_name", authorizer.PrincipalName),
		zap.Int("account_type", authorizer.AccountType),
		zap.Int("verify_type", authorizer.VerifyType),
	)

	response.Success(ctx, authorizer)
}
4.2业务层实现:换取永久凭据与公众号详细资料 (service/openplatform.go)
// FetchAndSaveAuthorizerInfo 使用 auth_code 换取被授权方的永久刷新令牌与详情并持久化
func (s *openPlatformService) FetchAndSaveAuthorizerInfo(ctx context.Context, accountID, authCode string) (*domain.WxAuthorizer, error) {
	platformAppID := s.cfg.OpenPlatform.AppId
	compToken, err := s.GetComponentAccessToken(ctx, platformAppID)
	if err != nil {
		return nil, fmt.Errorf("get component access token failed: %w", err)
	}

	// 1. 使用一次性 auth_code 换取该公众号的调用凭证与永久 refresh_token
	queryAuthURL := fmt.Sprintf("https://api.weixin.qq.com/cgi-bin/component/api_query_auth?component_access_token=%s", compToken)
	reqBody, _ := json.Marshal(map[string]string{
		"component_appid":    platformAppID,
		"authorization_code": authCode,
	})
	resp, err := s.httpClient.Post(queryAuthURL, "application/json", bytes.NewReader(reqBody))
	if err != nil {
		return nil, err
	}
	defer resp.Body.Close()

	var queryAuthRes struct {
		AuthorizationInfo struct {
			AuthorizerAppid        string `json:"authorizer_appid"`
			AuthorizerRefreshToken string `json:"authorizer_refresh_token"`
			FuncInfo               []any  `json:"func_info"`
		} `json:"authorization_info"`
		ErrCode int `json:"errcode"`
	}
	_ = json.NewDecoder(resp.Body).Decode(&queryAuthRes)
	authorizerAppID := queryAuthRes.AuthorizationInfo.AuthorizerAppid
	refreshToken := queryAuthRes.AuthorizationInfo.AuthorizerRefreshToken

	// 2. 调用微信接口拉取该公众号的真实资料(昵称、头像、主体名称、原始ID等)
	getInfoURL := fmt.Sprintf("https://api.weixin.qq.com/cgi-bin/component/api_get_authorizer_info?component_access_token=%s", compToken)
	infoBody, _ := json.Marshal(map[string]string{
		"component_appid":  platformAppID,
		"authorizer_appid": authorizerAppID,
	})
	infoResp, _ := s.httpClient.Post(getInfoURL, "application/json", bytes.NewReader(infoBody))
	var nickName, headImg, userName, principalName string
	if infoResp != nil {
		defer infoResp.Body.Close()
		var infoRes struct {
			AuthorizerInfo struct {
				NickName      string `json:"nick_name"`
				HeadImg       string `json:"head_img"`
				UserName      string `json:"user_name"` // 原始ID (gh_xxx)
				PrincipalName string `json:"principal_name"`
			} `json:"authorizer_info"`
		}
		_ = json.NewDecoder(infoResp.Body).Decode(&infoRes)
		nickName = infoRes.AuthorizerInfo.NickName
		headImg = infoRes.AuthorizerInfo.HeadImg
		userName = infoRes.AuthorizerInfo.UserName
		principalName = infoRes.AuthorizerInfo.PrincipalName
	}

	// 3. 构建 Domain 实体并交由 Repository 落库
	funcInfoBytes, _ := json.Marshal(queryAuthRes.AuthorizationInfo.FuncInfo)
	authorizer := &domain.WxAuthorizer{
		ID:                     uuid.NewV4().String(),
		AccountID:              accountID,
		AuthorizerAppID:        authorizerAppID,
		NickName:               nickName,
		HeadImg:                headImg,
		UserName:               userName,
		PrincipalName:          principalName,
		AuthorizerRefreshToken: refreshToken, // 接管的核心:必须落库的永久令牌
		FuncInfo:               string(funcInfoBytes),
		Status:                 "NORMAL",
		UpdatedAt:              time.Now().UnixMilli(),
	}

	if err := s.repo.SaveAuthorizer(ctx, authorizer); err != nil {
		return nil, fmt.Errorf("持久化公众号失败: %w", err)
	}
	return authorizer, nil
}
4.3架构分层规范:Domain 层与 DAO 层的防腐隔离
遵循清晰的微服务分层边界规范:
- Domain 层(业务实体):纯净无污染,严禁携带任何 ORM 专属标签(如
gorm标签、TableName()等)。 - DAO 层(持久化实体 PO):专职维护数据库表字段、索引和标签。
- Repository 层(防腐转换):负责在两者之间做双向转换,屏蔽底层存储技术细节。
// 1. DAO 层持久化实体 (dao/openplatform.go)
type WxAuthorizer struct {
    ID                     string `gorm:"primaryKey;type:char(36)"`
    AccountID              string `gorm:"column:account_id;type:char(36);not null;index"`
    AuthorizerAppID        string `gorm:"column:authorizer_appid;type:varchar(100);not null;uniqueIndex"`
    NickName               string `gorm:"column:nick_name;type:varchar(100)"`
    AuthorizerRefreshToken string `gorm:"column:authorizer_refresh_token;type:varchar(200);not null"`
    Status                 string `gorm:"column:status;type:varchar(32);default:NORMAL"`
    UpdatedAt              int64  `gorm:"column:updated_at;autoUpdateTime:milli"`
}

// 2. Repository 层双向防腐转换 (repository/openplatform.go)
func (r *openPlatformRepository) SaveAuthorizer(ctx context.Context, authorizer *domain.WxAuthorizer) error {
    if authorizer == nil {
        return nil
    }
    return r.dao.SaveOrUpdateAuthorizer(ctx, r.toDaoEntity(authorizer))
}

func (r *openPlatformRepository) toDaoEntity(d *domain.WxAuthorizer) *dao.WxAuthorizer {
    return &dao.WxAuthorizer{
        ID:                     d.ID,
        AccountID:              d.AccountID,
        AuthorizerAppID:        d.AuthorizerAppID,
        NickName:               d.NickName,
        AuthorizerRefreshToken: d.AuthorizerRefreshToken,
        Status:                 d.Status,
        UpdatedAt:              d.UpdatedAt,
    }
}
打开数据库查看 wx_authorizer 表,你会发现该测试公众号的昵称、头像、原始 ID、AppID,以及最重要的永久凭证 authorizer_refresh_token 已经完整落库。至此,SCRM 系统全自动代管公众号的授权闭环彻底打通!
常见报错排查速查表
把实操中容易踩的坑集中成一张表,扫码不成功时先来这里对号入座:
| 现象 / 报错 | 原因 | 修复 | 对应章节 |
|---|---|---|---|
换 token 报 61004 / 40164 | 当前公网出口 IP 不在平台的 IP 白名单 | 把 curl ifconfig.me 查到的 IP 加进【IP白名单】 | 微信开放平台应用创建与参数配置·3 |
| 第三方平台接口报 ticket 无效 | 用旧的 component_verify_ticket 去换 token(微信校验"最新值") | 确认授权事件接收 URL 可达、Redis 里存的是最新 ticket | 工程落地·网关一 |
| 扫码提示"该平台尚未全网发布,无法授权" | 第三方平台处于"开发中 / 未全网发布"状态 | 把要测的公众号加进测试白名单(授权测试账号列表) | 微信开放平台应用创建与参数配置·6 |
| 提示"授权入口页域名与回调页域名不同" | redirect_uri 用了 localhost 等与后台登记域名不一致的地址 | 让 redirect_uri 与【授权发起页域名】一致,本地开发用内网穿透域名 | 扫码授权接管·步骤 2 |
AppSecret 忘了 / 找不回来 | 微信只展示一次 | 重置 AppSecret 并立即复制保存 | 微信开放平台应用创建与参数配置·2 |
| 接管后收不到粉丝消息 / 事件 | 消息与事件接收 URL 没配对,或漏了 $APPID$ 占位符 | URL 形如 https://你的域名/v1/open/msg-callback/$APPID$,$APPID$ 原样保留 | 微信开放平台应用创建与参数配置·5 |
用 auth_code 换 token 报 code 失效 | 授权码一次性、短时有效 | 拿到 auth_code 后立即调 bind,别拿同一次授权反复手工测试 | 扫码授权接管·步骤 4 |
对应微信官方文档入口
开发 SCRM 第三方平台,查阅的全部是微信开放平台官方文档: